


YCV 100, VYC 100N, VYC 100P • Installation and Operation
YCV 100, VYC 100N, VYC 100P • Installation and Operation
Installation and Operation, cont’d
2-7
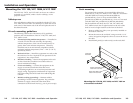
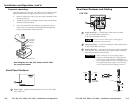
Rear Panel Features and Cabling
YCV 100
YCV 100
S-VIDEO
ENCODER
POWER
VIDEO OUT
S-VIDEO IN
OR
Y
C
12V
0.1A MAX
3
4
1
2
1
Input connectors — Connect an S-video source to either:
• the two female BNC connectors or
• the 4-pin mini DIN connector.
Do not connect S-video sources to both types of
connectors at the same time.
2
Output connector — Connect a composite video output device
to this female BNC connector.
3
Power connector — An external 12 V power supply is included
with the unit. Plug it into this 2-pole captive screw connector.
Wire the connector as shown below.
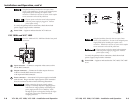
CAUTION
When connecting the power supply, voltage
polarity is extremely important. Applying power
with incorrect voltage polarity could damage the
power supply and the YCV 100. Identify the power
cord negative lead by the ridges on the side of the
cord or a black heat shrink wrapping around it.
Power Supply
Output Cord
SECTION A–A
Ridges
Smooth
AA
Orange Captive Screw
Connector
Tie Wrap
3/16”
(5 mm) Max.
2-6
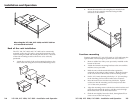
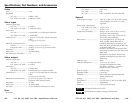
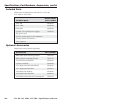
Projector mounting
Projector mount the YCV 100, VYC 100N, or VYC 100P using the
optional PMK 100 mounting kit (part #70-217-01) as follows:
1. Remove rubber feet if they were previously installed on the
bottom of the unit.
2. Attach the projector mounting brackets to the unit with the
machine screws provided.
3. Secure the unit below the ceiling to a projector mount or
other surface by inserting the mounting bolt through the
bracket’s slotted hole, as shown below.
Digital Projector
Projector
Mounting
Bracket
Ceiling
Y
C
V
1
0
0
S
-
V
I
D
E
O
E
N
C
O
D
E
R
P
O
W
E
R
V
ID
E
O
O
U
T
S
-
V
I
D
E
O
IN
O
R
Y
C
1
2
V
0
.5
A
M
A
X
Mounting
Bolt
Mounting the YCV 100, VYC 100N, and VYC 100N
on a projector mount
Front Panel Features
1
1
Power LED — Lights to indicate that the YCV 100/VYC 100N/
VYC 100P is on.