


Installing Cautions and warnings
FortiGate-620B FortiOS 3.0 MR6 Install Guide
01-30006-83054-20081015 15
Mounting
If required to fit into a rack unit, remove the rubber feet from the bottom of the
FortiGate unit.
The FortiGate unit can be placed on any flat surface, or mounted in a standard 19-
inch rack unit.
When placing the FortiGate unit on any flat, stable surface, ensure the unit has at
least 1.5 inches (3.75 cm) of clearance on each side to ensure adequate airflow
for cooling.
For rack mounting, use the mounting brackets and screws included with the
FortiGate unit.
To install the FortiGate unit into a rack
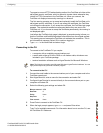
1 Attach the mounting brackets to the side to the unit so that the brackets are on the
front portion of the FortiGate unit. Ensure that the screws are tight and not loose.
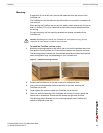
The following photos illustrate how the brackets should be mounted. Note that the
screw configuration may vary depending on your FortiGate unit.
Figure 2: Installed mounting brackets
2 Position the FortiGate unit in the rack to allow for sufficient air flow.
3 Line up the mounting bracket holes to the holes on the rack, ensuring the
FortiGate unit is level.
4 Finger tighten the screws to attach the FortiGate unit to the rack.
5 Once you verify the spacing of the FortiGate unit and that it is level, tighten the
screws with a screwdriver. Ensure that the screws are tight and not loose.
The following photos illustrate how the mounting brackets and FortiGate unit
should be attached to the rack.
!
Caution: Depending on the size of your FortiGate unit, avoid personal injury, you may
require two or more people to install the unit in the rack.