


Collecting Information
Conguring
UsethefollowingCLIcommandstoconguretheFortiDBunitforthenetwork.Fordetailsonusingthe
CLI, see the CLI Reference.
Conguring the IP address and netmask
cong system interface
edit port1
set ip <intf_ip><netmask>
end
Congure the default gateway
cong system route
edit 1
set device <port_number>
set dst <ip_address><netmask>
set gateway <gateway_ip>
end
VA QuickStart Guide
This guide leads you through the process that results in the creation of a vulnerability assessment report
for one of your target databases. The example below assumes you will be assessing an Oracle target
database. Before starting assessment, you will need to make sure that the FortiDB user for your Oracle
target database has the following privileges:
CREATE SESSION•
SELECT_CATALOG_ROLE•
SELECT SYS.AUDIT$ •
SELECT SYS.REGISTRY$HISTORY•
SELECT SYS.USER$ •
SELECT SYS.LINK$•
SELECT SYSTEM.SQLPLUS_PRODUCT_PROFILE•
Login to FortiDB as the FortiDB default admin user (admin) using 1. fortidb1!$ for the password .
Create a target-database connection. 2.
Select a. Targets link under Target Management.
Select b. Add and select the General tab.
Enter the information in the text boxes marked with an asterisk (*) with settings appropriate to c.
your target database. Assume an Oracle target with these parameters:
Name:• vatarget
Type:• Oracle
Port:• 1521
Host Name: • (IP address or machine name on your system that contains the Oracle
target database.)
User Name: • (Name of the FortiDB user for your Oracle target database)
Password:• (Password of the FortiDB user for your Oracle target database)
Select the d. Test Connection to verify your target database is reachable and that your
connection parameters are correct. You should see a ‘Success’ message.
Select e. Save. vatarget appears on the Targets page under the Name column header.
Run assessment against your target database. 3.
Go to a. Assessments under Assessments Management.
Select the check box to the left of b. Scan All Oracle Databases which your target database
belongs to.
Select c. Run. After a minute or so, you should see the Last Run Time column in the Scan All
Oracle Database row get populated with a stop date and time for the assessment you just ran.
Note: If you want to create your own target group, policy group, or assessment, please refer to
online help for detailed instructions.
Generating a Report
We will examine our assessment with the Summary Failed Report which summarizes failed-policy
results.
Go to1. Pre-Dened Report under Report Management.
Select 2. Summary Failed Report.
On the Vulnerability Assessment Summary Failed Report page, select:3.
Scan All Oracle Databases• from the Assessment Name dropdown list
The start date and time associated with Scan All Oracle Databases from the Assessment Time •
dropdown list.
Target name, which is vatarget in this example, from the • Target dropdown list.
Select the 4. Preview Report tab and, after it is compiled, a Summary Failed Report will appear in
your browser.
To view your report in another of the supported formats, scroll down to the 5. Export as drop down
list,selecttheleformatyouwant,andclicktheExportbutton.Thefollowingleformatsare
supported:
PDF •
Excel •
Tab-delimited •
Comma-separated values•
FortiDB MA Quick Start
This section leads you through the process that results in the creation of a Monitoring and Auditing
report for one of your target databases. The example below assumes monitoring of an Oracle target
database and generating alerts using User Behavior Monitor, and creating reports using Alert Report
Manager. If you want to set to audit_trail=OS, you need to run FortiDB Audit log agent. For details, see
the Administration Guide.
Note: To display FortiDB MA Web user interface, you need to use Internet Explorer 7.
To allow FortiDB MA to assess or monitor Oracle databases, create an Oracle user with the following
privileges. For other modules, see the Administration Guide.
CREATE SESSION•
SELECT_CATALOG_ROLE•
DELETE_CATALOG_ROLE•
AUDIT ANY•
AUDIT SYSTEM•
SELECT SYS.AUD$ •
SELECT on the monitored tables or SELECT ANY TABLE•
Login to FortiDB MA as admin using 1. fortidb1!$ for the password.
Create a FortiDB MA user who has User Behavior Monitor User Role and Report Manager User 2.
Role.
In the left-side navigation tree, click on a. User Administration.
Select b. Add New User link at the bottom.
On the c. Add New User page, enter the following information.
User Name•
Password•
Password Again•
First Name and Last Name•
Email Address•
On the d. Statuseld,checkActive to activate a new user you will create.
On the 3. Software Module section, check the User role of User Behavior Monitor and Alert Report
Manager.
Click the a. Save button.
Click the b. Logout link at the top-right of the screen in order to logout as the admin user.
Log in as the newly created user, and create a target-database connection.4.
In the left-side navigation tree, click on the a. User Behavior Monitor link.
Click b. Database > New from the top menu
On the c. Create New Database Connection page, enter Oracle target database information:
Database Connection Name: • specify any name (ex. ora123)
Database Server Name, IP address, and port number: •
enter <IP address>:1521 (ex. 172.30.62.11:1521)
Database Server type : • select Oracle from the pull-down list
Database Name:• enter your target database name (ex. Ora123)
User Name: • enter your target database user name (ex. testuser1)
Password: • enter your target database password (ex. fortinet123)
Click the d. Create button.
To open the connection, go to e. Database > Open. Highlight the target database, ora123, and
click the Open and Run button. The connection icon becomes the open status icon (green) in
the left-side navigation tree.
To create an Object Policy, click 5. Set Policies > Object Policies. In this example, we monitor
security violation and suspicious OS user for SCOTT.BONUS table.
In the a. Object Policies Conguration page, click the Add Item link at the bottom.
In the b. Item Settings tab, click S in the Show Schemaeld,andselectSCOTT from the
schema pull-down list.
Click c. ALL in the Show Table eld,andselectBONUS from the table list.
For Audit-action type, check both d. SELECT and INSERT/UPDATE/DELETE.
In the e. Access Violation Settings tab, check the Active box of “Security Violation” and
“Suspicous OS User”.
Check the f. Enable this guard item box.
Click the g. Save button.
To create a schedule, click 6. Set Defaults > Module Guard Schedule on the top menu.
Forexample,enter1inMinuteseldofInterfalsectiontoretrievedataevery1minute.
Click the 7. Set Timer button.
Login to your target database and execute SQL statements to generate alerts. 8.
For this example, login as SCOTT and select a table BONUS or insert/update/delete some data.
Go to 9. Analysis > Alerts Messages to check alerts
Generating a Report
We will generate reports based on alerts created by User Behavior Monitor.
The example below assumes that you will generate a one time only report in PDF format.
In the left-side navigation tree, click on the 1. Report Manager.
Click 2. New Reports under Alert Report Manager.Specifythefollowingelds.
Report Name (required): • enter “My Report 1” for example.
Module:• check User Behavior Monitor check box.
Database:• select ora123.
Forotherelds,leaveasdefault.
In the 3. Report Generate Schedule section, check the One Time Only check box.
In the 4. Report Format section, check the Show Column of Description (the default is unchecked).
Check 5. Enable Report check box.
Click the 6. Save button. The Current Reports page will display.
Click 7. Summary in the Action column of My Report 1.
Click the 8. PDF button to save the report in PDF format. You can save your report in these formats:
PDF•
Excel•
Tab Delimited•
Comma Delimited•
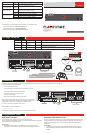
Port Information
Port 1 IP: ____.____.____.____
Netmask: ____.____.____.____
Port 2 IP: ____.____.____.____
Netmask: ____.____.____.____
Port 3 IP: ____.____.____.____
Netmask: ____.____.____.____
Port 4 IP: ____.____.____.____
Netmask: ____.____.____.____
The internal interface IP address and netmask must be valid for the internal network.
General settings
Administrator password:
Network Settings: Default Gateway: ____.____.____.____
Primary DNS Server: ____.____.____.____
Secondary DNS Server: ____.____.____.____
Factory default settings
NAT/Route mode Transparent mode
Port 1 interface 192.168.1.99 Management IP 0.0.0.0
Port 2 interface 0.0.0.0 Administrative account settings
Port 3 interface 0.0.0.0 User name admin
Port 4 interface 0.0.0.0 Password fortidb1!$
To reset the FortiDB unit to the factory defaults, in the CLI type the command
execute reset all-settings