In schedule or memo records, press
whenrequiredtoopenapop-upmenu.In
schedule records, this includes selecting
the type of event, the time of the event and
whether or not to set an alarm. In memos,
this includes selecting a date. Use the
navigation buttons to select your settings
and then press ENTER.
5. When done, press SAVE to add the entry.
Press CLOSEtoexitwithoutsavingthe
entry.Youareaskedtoconrmtheexit.Yes
is highlighted. Press ENTERtoexitwithout
saving. Press to highlight No and then
press ENTERtocanceltheexit.
Viewing Entries
1. Press MENU and then press TOOLS.
2. Press or to select Phonebook,
Schedule or Memo and then press ENTER.
3. Press or to select an entry.
4. Press ENTER to view the selected entry.
5. Press or to scroll through the
available elds.
Ifaeldcontainstoomuchinformation
thancantonthescreen,itwilldisplayina
pop-upboxwhilethateldishighlighted.
Press EDIT or DELETE to edit or delete the
current entry.
Press CLOSEtoexit.
Editing Entries
1. Press MENU and then press TOOLS.
2. Press or to select Phonebook,
Schedule or Memo and then press ENTER.
3. Press or to select an entry.
4. Press EDIT to edit the selected entry.
5. Make your changes just as you would
when adding an entry.
Press or ENTERtoadvancetothenext
eld.
Press or tomovethecursor.Toerasea
letter, press BACK.
6. Press SAVE when done.
Press CLOSEtoexitwithoutsavingany
changes.
Deleting Entries
1. Press MENU and then press TOOLS.
2. Press or to select Phonebook,
Schedule or Memo and then press ENTER.
3. Press or to select an entry.
4. Press DELETE to remove the selected
entry.
Youareaskedtoconrmthedeletion.No
is highlighted. Press ENTER to cancel the
deletion. Press to highlight Yes and then
press ENTER to delete the word.
5. To delete all entries, press DEL ALL.
Youareaskedtoconrmthedeletion.No
is highlighted. Press ENTER to cancel the
deletion. Press to highlight Yes and then
press ENTER to erase the list.
Using a Password
You can use a password to prevent
unauthorizedaccesstothephonebook,
schedule, memos and class schedule.
Warning! Always write the password in a safe,
separatelocation.Toprotectyourinformation,
please make regular copies of your data on
your PC. For more information on backing up
and restoring your data, please see “Copying
FilestoYourDevice”.
1. Press MENU and then press TOOLS.
2. Press or to select Phonebook,
Schedule, Memo or Class Schedule and
then press ENTER.
3. Press PASSWD.
4. At the prompt, type a password of up to
eight characters and press ENTER.
For security, each character will appear as
*
.
5. Re-enter the same password and press
CONFIRM or ENTER.
If the passwords do not match, you must
startover.Thepasswordyousetwillbe
requestedwheneverthePhonebook(or
other protected feature) is selected.
6. To change the password, repeat Steps
1-5.
Todisablethepassword,pressENTER at
both password prompts.
6.2 Class Schedule
Adding Classes
1. Press MENU and then press TOOLS.
2. Press or to select Class Schedule and
then press ENTER.
3. Press FN and then press or to set
the tab to the desired day of the week.
Then press or to select one of the
12 preset blocks of time in AM, PM, or
Night.
4. Press EDIT to add a class.
5. Type a class name and press ENTER.
Press DETAILS to add a teacher, address,
and memo.
Press or ENTERtoadvancetothenext
eld.
Toerasealetter,pressBACK.
Totypeacapital,pressCAP and then press
a letter key.
Totypeanumber,pressanumberkey.
Toenteraspecialcharacter(ifpermitted),
press FN and then press a number key.
You can also press FN and then press to
view a menu of special characters. Use the
direction keys to highlight one and then
press ENTER.
Press SAVEwhenyouarenishedadding
details.
6. Continue adding classes until your class
schedule is complete, then press SAVE.
Press DEL ALL to delete all classes. You
areaskedtoconrmthedeletion.Cancel
is highlighted. Press ENTER to cancel the
deletion. Press to highlight OK and then
press ENTER to erase the schedule.
Press PASSWD to assign a password to
yourClassSchedule.Pleasesee“Usinga
Password”in“UsingPhonebook,Schedule
and Memo”.
Viewing Your Schedule
1. Hold FN and then press or to change
days.
2. Press or to scroll through the
schedule.
3. Press ENTER or DETAILS to view any
details of the highlighted class, then
press BACK to return to the schedule.
6.3 Timer
1. Press MENU and then press TOOLS.
2. Press or to select Timer and then
press ENTER.
3. Press SETUP.
4. Press to open a calendar.
A calendar is displayed.
5. Use the direction keys to select a target
date (day, month, and year) and then
press ENTER.
6. Press to go to the event eld.
7. Type an event title.
8. Press START when nished.
TheTimerscreenwillthendisplayhowlong
it will be until the day of the event.
9. Press CLOSE when done.
Press RESET to clear the scheduled event.
6.4 Stopwatch
1. Press MENU and then press TOOLS.
2. Press or to select Stopwatch and then
press ENTER.
3. When ready, press START to begin
timing.
Thestopwatchbeginscountingtimein
hundredthsofasecond(HH:MM:SS.ss).
4. Press PAUSE to allow for adjustments.
Forexample,atime-out,cautionag,or
other non-event pause. Press CONTINUE
when ready to resume where the
stopwatch left o.
5. Press LAP as the participant reaches the
end of each lap or portion of the event.
Uptosix(6)splittimesarerecorded.
6. Press PAUSE to view the nal time.
7. Press RESET to start over again.
6.5 Using the Clock
Theclockdisplaysbothhometimeandworld
time in your selected format. You can use
the clock to check the time in dierent cities
around the world.
1. Press MENU and then press TOOLS.
2. Press or to select Clock and then
press ENTER.
Thecurrenttimeanddateisdisplayedfor
the selected home and world cities.
3. Press CLOSE when done.
Setting the Date and Time
1. While viewing the clock, press SETUP.
2. Adjust the date and time for your home
city.
Press or to change the current setting.
Press or tomovebetweentheelds.
While setting the clock, press 24 HR (or 12
HR) to toggle between a 12- and 24-hour
clock.
3. Press SAVE when done.
Press CLOSEtoexitwithoutsavingany
changes.
Changing Cities
1. Press CITY.
Thehomecityishighlighted.
2. Press ENTER to change the home city.
Oryoucanpress and then press ENTER
to change the world city.
A menu of cities is displayed.
3. Press or to highlight the city you
want.
Youcanalsotypetherstfewlettersofa
city name to go directly to that part of the
list.
Press BACKtoexitwithoutselectinganew
city.
4. Press ENTER to select the highlighted
city.
Thenewcitywillbedisplayed,alongwith
the appropriate time for that new city.
While selecting a city, press DST ON (or
DST OFF) to toggle daylight saving time
(DST)onoro.
5. Press SAVE when done.
Press CLOSEtoexitwithoutsavingany
changes.
6.6 Using the Calculator
Yourdevicealsoincludesascienticcalculator
that allows you to perform advanced
calculations.
1. Press MENU and then press TOOLS.
2. Press or to select Calculator and then
press ENTER.
3. Perform your calculation.
Press CLEAR or AC to clear all calculations.
Press CE to clear only the current number.
Press ENTER to complete the calculation.
Press... To...
T(.) type a decimal point
M(+/-) change the number from positive
to negative or vice versa
Y(+) add numbers
U(-) subtract numbers
I(x) multiply numbers
O(÷) divide numbers
Advanced Calculations
Press... To...
N(1/x) calculate a reciprocal
X(√x) calculateasquareroot
Z(x
2
) squareanumber.
C(x
y
) calculate x raised to the
ythpower.Forexample,
press 3, C, 2, then ENTER
to calculate 3 raised to the
power of 2.
F(
) + C(y√x) calculate the yth root of x.
Forexample,press4, F, C, 8,
1 then ENTER to calculate
the 4th root of 81.
R(%) calculate percentages. For
example,press2, 5, I(x),
2, 0, R, then ENTER to
calculate the value of 20%
of 25.
A(sin) calculatetheSINofan
angle.Forexample,press
A, 3, 0, CAP, 0, then ENTER
tocalculatetheSINofa30
degree angle.
F(
) + A(sin) calculateaninverseSIN
S(cos) calculatetheCOSofan
angle.Forexample,press
S, 6, 0, CAP, 0, then ENTER
tocalculatetheCOSofa60
degree angle.
F(
) + S(cos) calculateaninverseCOS
D(tan) calculatetheTANofan
angle.Forexample,press
D, 4, 5, CAP, 0, then ENTER
tocalculatetheTANofa45
degree angle.
F(
) + D(tan) calculateaninverseTAN
Q(log) calculate logarithms
W(10
x
) calculate 10 to the xth
power
E(ln) calculate natural logarithms
P(π) inputs the numerical value
ofπintoanequation
B(n!) calculate the factorial of n
V(
) calculate the constant
eraisedtothespecied
power. e is the base of the
natural logarithm.
Calculator Memory
Trythefollowingequationtopracticeusing
the calculator memory:
(32x12)-(8x8)=320
1. Press CLEAR or AC to clear the calculator,
if necessary.
2. Press K(
) to clear the calculator
memory, if necessary.
3. Type 32, press I(x), type 12 and then
press ENTER.
4. Press G(
) to add the result to memory.
indicates a number is stored in memory.
5. Press CLEAR or AC.
6. Type 8, press I(x), type 8 and then press
ENTER.
7. Press H(
) to subtract the result from
the number stored in memory.
8. Press CLEAR or AC.
9. Press J(
) to retrieve the number from
memory.
6.7 Metric Converter
1. Press MENU and then press TOOLS.
2. Press to select Metric Converter and
then press ENTER.
3. Press or to select a conversion
category.
4. Press or to select a unit of measure.
5. Type a number.
As you type, the other units display their
convertedvalues.Totypeadecimal,press
T(.). Use BACK to delete a number.
6. Press CLEAR or NEW to reset all values
and perform another conversion.
6.8 Currency Converter
1. Press MENU and then press TOOLS.
2. Press to select Currency Converter and
then press ENTER.
3. Press or to select a currency.
4. Type the amount you have in the
highlighted currency.
Theamountyoutypeisautomatically
converted to the listed currencies
accordingtothesavedexchangerates.
5. Press NEW or CLEAR to clear a
conversion.
Adjusting Exchange Rates
1. Press SETUP.
2. Press or to select an exchange rate
you want to change.
Eachexchangerateisbaseduponthe
equivalentto1USDollar.
3. Press CLEAR to clear the selected rate.
4. Enter a new exchange rate.
5. Adjust as many rates as you want.
6. Press SAVE.
Press CLOSEtoexitwithoutsavingyour
changes.
Press DEFAULTtoresetallexchangerates
to their default values.
6.9 Changing the Settings
When using this device, you can activate
the Learn a Word feature, adjust the screen
contrast,theshutotime,andthetypesize.
You can also set up the time, date and cities
displayed in the clock.
1. Press MENU.
2. Press TOOLS.
You can also press or until you reach
theToolsmenu.
3. Settings will be highlighted. Press ENTER
to select it.
4. Press or to move to Shuto,
Contrast, Type Size, Learn a Word or Time
Setup.
Shuto determines how long your product
stays on if no key is pressed.
Contrast determines how dark or light the
screen is.
Type Size determines how large or small the
textisinthedevice.
Learn a Word determines whether or not
you see a word every time you turn on your
device.
Time Setup establishes the time, date and
city settings for the clock.
Note:Toresetyourdevicetoitsdefault
settings, press FN and then press CLEAR.
TheOrganizerpasswordisnoterased.
5. Press or to change the setting.
Your changes are automatically saved.
Note: At Time Setup, pressing opens a
secondary menu of options. Please see
“SettingtheTimeandDate”formore
information.
6. Press ENTER when done.
Press CLEAR or CLOSEtoreturntotheTools
menu.
Learn a New Word
Your dictionary comes with a Learn a Word
feature to help you increase your vocabulary.
Each time you turn your dictionary on, you can
see a random headword.
6.10 Setting the Time and Date
When is at Time Setup, press to open a
sub-menu of options for setting up the clock.
1. Press MENU.
2. Press TOOLS.
3. Settings is highlighted. Press ENTER to
select it.
4. Press to move to Time Setup and
then press ENTER.
5. Press or to move to Date, Time,
Home City, World City, Home City DST,
World City DST, or Time Format.
Date sets the date for your home city.
Time sets the time for your home city.
Home City allows you to select the major
city or region closest to your home.
World City allows you to select a world city
or region that you want to monitor.
Home City DST sets daylight saving time
(DST)foryourhomecityonoro.
World City DST sets daylight saving time
(DST)foryourworldcityonoro.
Time Format determines whether you use a
12- or 24-hour clock.
6. Press or to open a pop-up box.
For Date and Time, press or to move
betweentheelds.Press or to change
them.
For Home City and World City, press or
to highlight a city. You can also type a letter
to go directly to that part of the list.
For Home City DST, World City DST and Time
Format, pressing or changes and saves
the setting.
7. Press ENTER to save the setting.
Press BACK toexitwithoutsaving.
8. Press CLOSE when done.
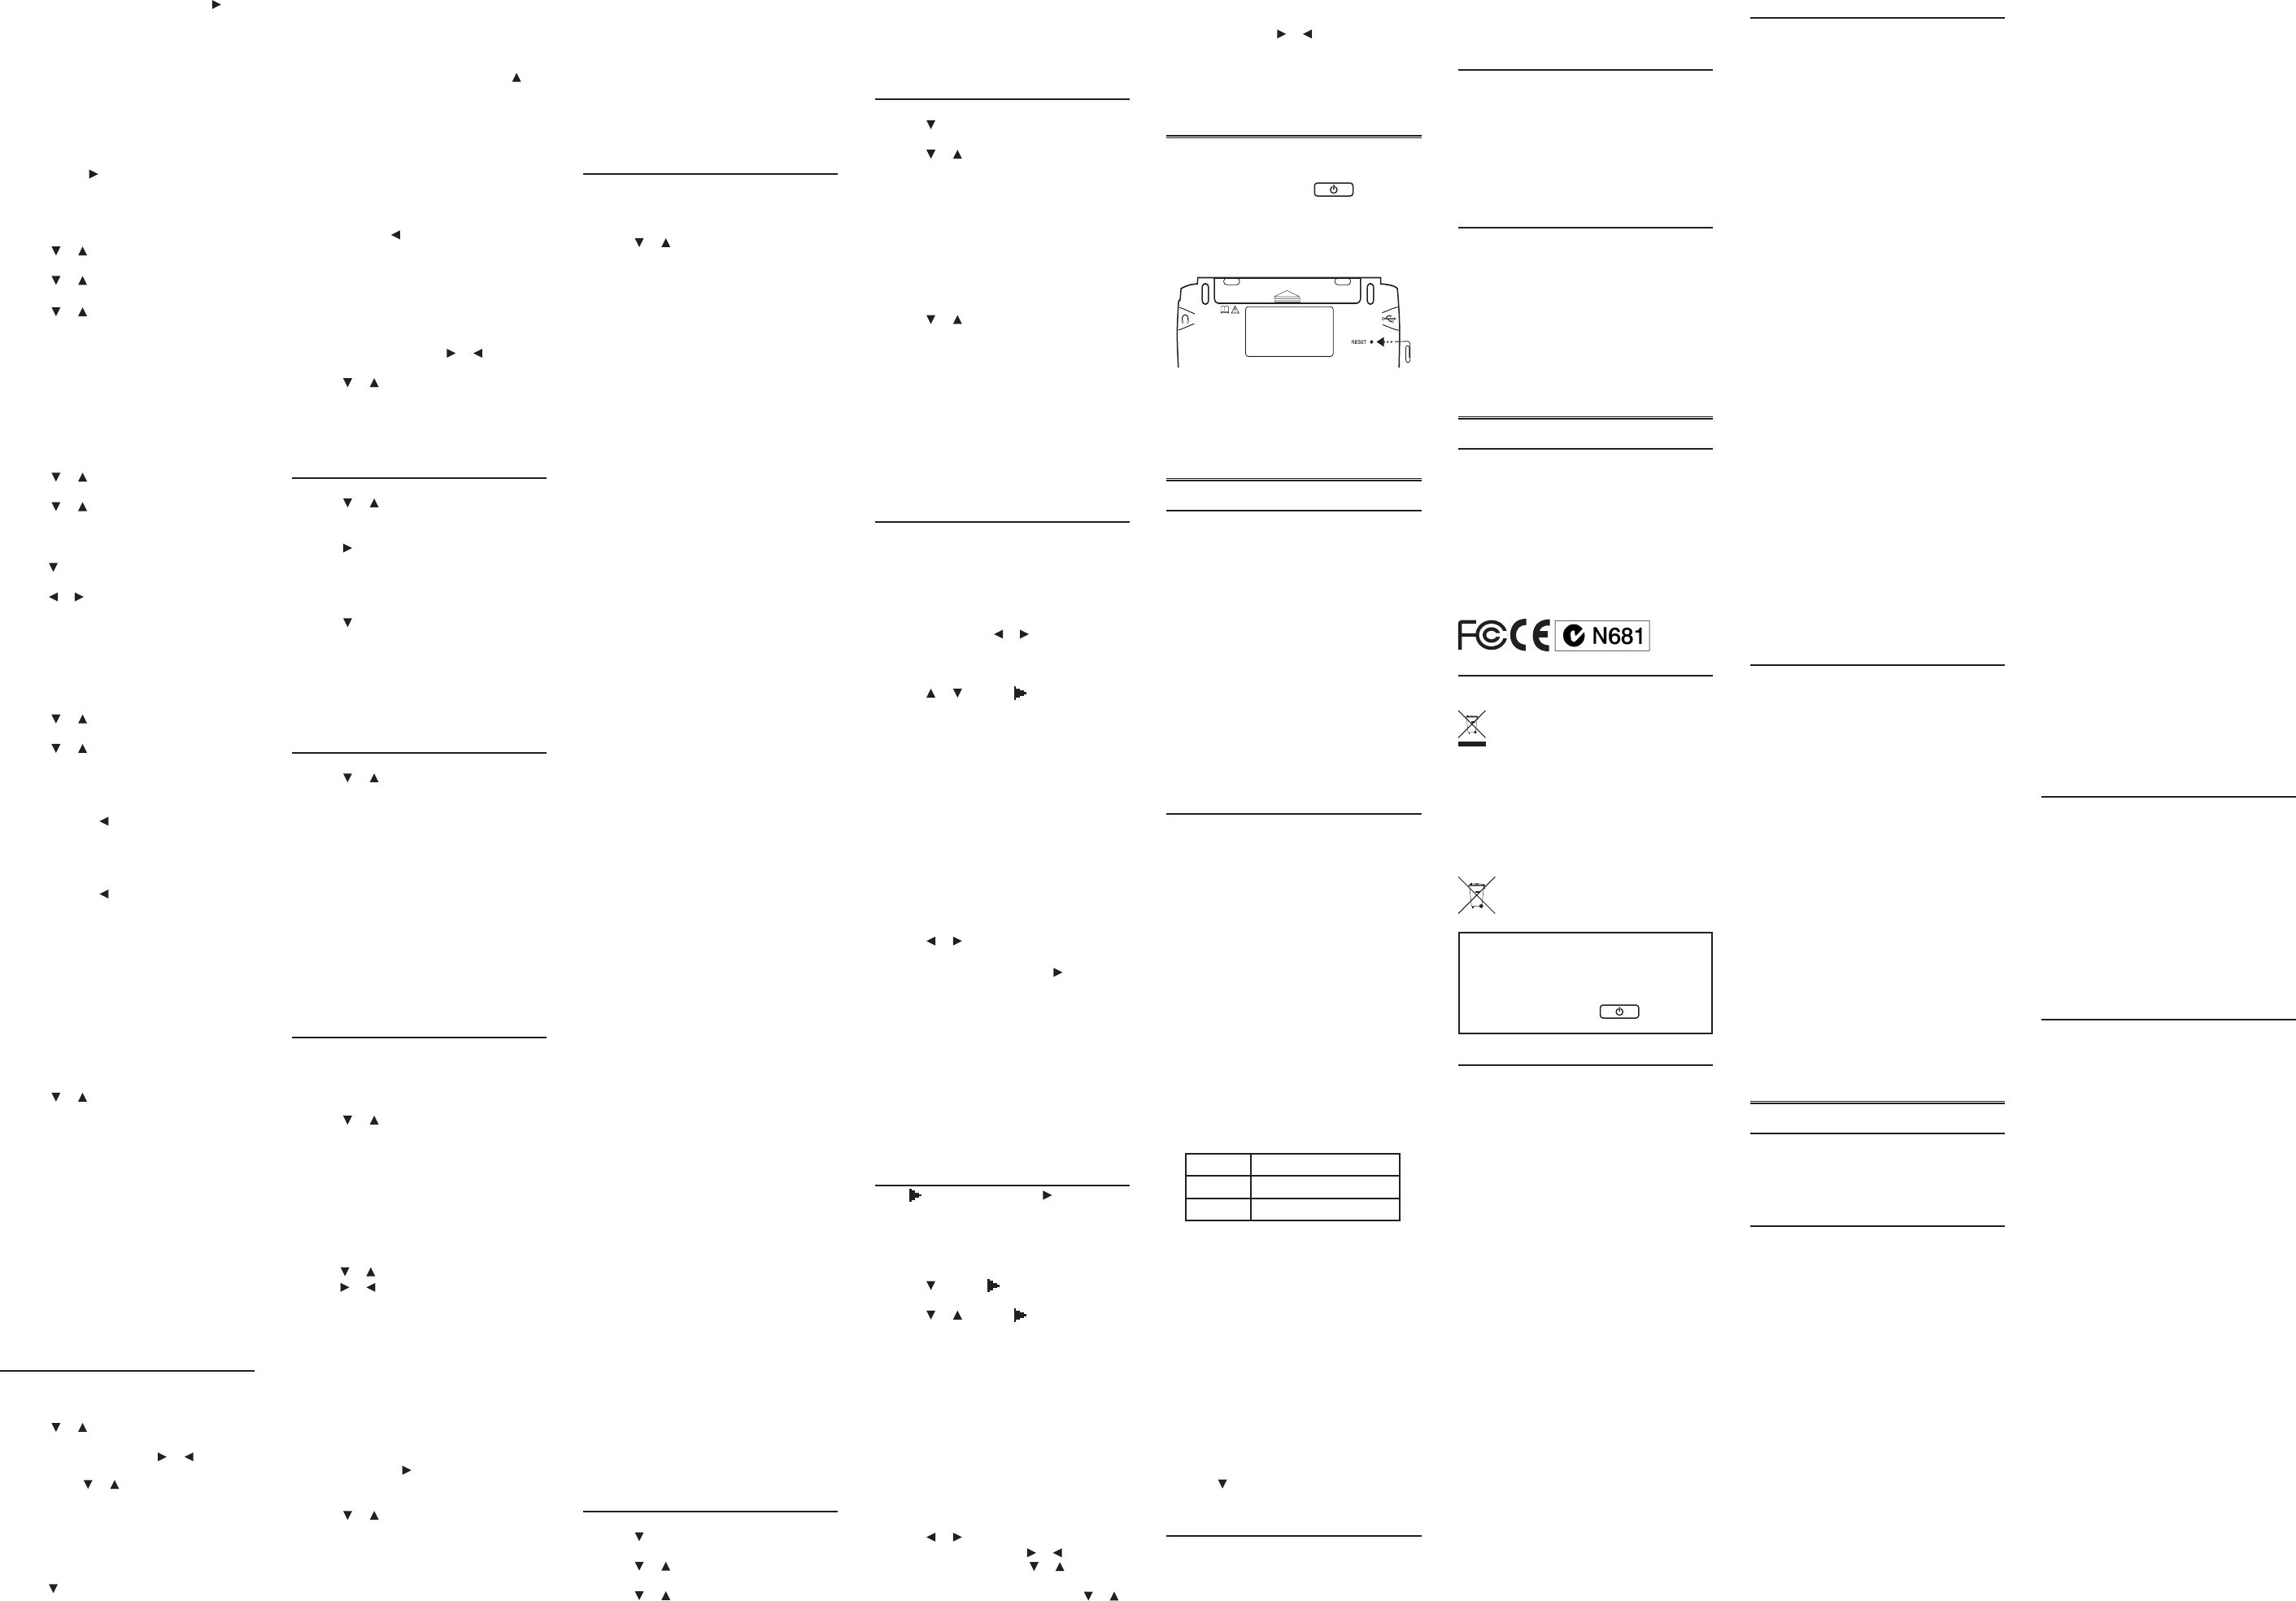
7. Resetting Your Product
If the keyboard fails to respond, or if the screen
performs erratically, perform a system reset by
following the steps below.
1. Hold CLEAR and press .
Ifnothinghappens,tryStep2.
2. Use a paper clip to gently press the reset
button on your unit.
Theresetbuttonisrecessedinapin-sized
hole on the back of your device.
Warning! Pressing the reset button with
more than light pressure may permanently
disable your product. In addition, resetting
the product erases settings and information
entered in its built-in books.
8. PC Connections
8.1 Connecting Your Device
Yourdevicehasabuilt-inUSBport.When
lookingatthekeyboard,theUSBportisonthe
left side of your device.
1. Turn on your device.
2. Connect the wide end of a USB cable to a
USB port on your PC and the smaller end
to the USB port on your device.
You see a “Franklin connects” icon on the
screen of your device when it is properly
connectedtoyourPC.Thekeyboardon
your device is now disabled.
Thersttimeyouplugyourdeviceinto
yourPC,softwaredriversmustinstall.This
happens automatically. When the drivers
are installed your PC will let you know that
your device is ready to use. A window may
also be opened displaying the available
foldersonyourdevice.Ifyouneedtond
it,lookforadrivelabeled“RemovableDisk”.
8.2 Copying Files to Your Device
Your device is not limited to the books
it comes with. You can transfer personal
dictionaries. You can also save copies of your
data to another location on your PC to backup
important information.
Trycopyingapersonaldictionarytoyour
device.
1. Make sure your device is connected to
your PC.
See“ConnectingYourDevice”formore
information.
2. On your PC, use Windows Explorer to
nd the drive labelled “Removable Disk”
and double-click it to open it.
3. Double-click “PersonalDict” to open that
folder.
4. Navigate on your PC to where you store
.csv les.
Oryoucancreateacustomdictionary
using a spreadsheet or database
application. Note: Custom dictionaries
should be created with the following
structure:
word-1 denitionforword-1
word-2 denitionforword-2
... ...
Important:Whenyousavethele,please
besuretoselect“CSV(commadelimited)
(*.csv)” format.
Thelenameyougivetheleisexactly
how it will display on your device.
5. Right-click the .csv le you want to copy
to your device and then click “Copy”
from the pop-up menu.
6. Right-click in the “PersonalDict” window
and then click “Paste” from the pop-up
menu.
7. Repeat steps 4 through 6 to copy
additional les to your device.
8. Close the open folders.
9. Unplug the USB cable from your PC and
the device.
10. Press MENU and then press LEARN.
11. Press to highlight Personal Dictionary
and then press ENTER.
8.3 About Your Device Folders
When you access your device on your PC, an
assortment of folders are available to you
depending on which features you have used.
Remember,“PersonalDict”isalwaysthe
location to save any .csv formatted personal
dictionaries so they appear on your device.
Any other available folders will contain the
saved material from My Vocabulary List, the
Phone book and other features.
8.4 Backing Up Your Data
Because you have access to the folders in
which any information you enter is saved, you
can backup this important information on your
PC. While your device is connected to your PC,
right-click any or all of those folders and then
click “Copy”. Find a location on your PC where
you want to save this information, right-click in
that window and then click “Paste” to save the
information.
8.5 Restoring Your Data
If you accidentally erase information or it is lost
while replacing the batteries, you can restore
any important information you have previously
saved to your PC. Connect your device to your
PC.Next,ndthelocationonyourPCwhere
you saved a backup copy of your information.
Right-clickonthoselesorfoldersandclick
“Copy”. Click the window containing your
device’s folders, right-click and then click
“Paste” from the pop-up menu. You can then
re-access your previously saved information.
9. Additional Information
9.1 Specications
Model SCD-2110: Speaking Merriam-
Webster’s Collegiate® Dictionary, 11
th
Edition
Batteries: two AAA
Size:102x76x19.5mm(4x3x0.8in)
Weight:155g(5.5oz)
©2003-2012FRANKLINELECTRONIC
PUBLISHERS,INC.Burlington,N.J.08016-4907
U.S.A.Allrightsreserved.
©2003-2008 Merriam-Webster, Incorporated.
All rights reserved.
ISBN978-1-59074-676-9
9.2 Recycling and Disposal
Device Disposal
Thisdeviceshouldbedisposedthrough
your local electronic product recycling
system – do not throw into the trash bin.
Packaging Disposal
Please save this User’s Guide and all packing
materials, as they contain important
information. In case of disposal, please refer to
your local recycling system.
Battery Disposal
Donotdisposeofbatterieswith
normal household waste. Please obey
your local regulations when disposing
of used batteries.
Thisunitmaychangeoperatingmodes,
lose information stored in memory, or fail
to respond due to electrostatic discharge or
electricalfasttransients.Normaloperationof
this unit may be re-established by pressing
the reset key, by pressing
, or by
removing and replacing the batteries.
9.3 License Agreement
READTHISLICENSEAGREEMENTBEFORE
USINGTHEPRODUCT.YOURUSEOFTHE
PRODUCTDEEMSTHATYOUACCEPTTHE
TERMSOFTHISLICENSE.IFYOUDONOT
AGREEWITHTHESETERMS,YOUMAYRETURN
THISPACKAGEWITHPURCHASERECEIPTTO
THEDEALERFROMWHICHYOUPURCHASED
THEPRODUCTANDYOURPURCHASEPRICE
WILLBEREFUNDED.PRODUCTmeansthe
software product and documentation found
inthispackageandFRANKLINmeansFranklin
Electronic Publishers, Inc.
Limited Use License
AllrightsinthePRODUCTremaintheproperty
ofFRANKLIN.Throughyourpurchase,
FRANKLINgrantsyouapersonaland
nonexclusivelicensetousethisPRODUCT.You
maynotmakeanycopiesofthePRODUCT
or of the data stored therein at the time
of purchase, whether in electronic or print
format.Suchcopyingwouldbeinviolationof
applicable copyright laws. Further, you may
not modify, adapt, disassemble, decompile,
translate, create derivative works of, or in
anywayreverseengineerthePRODUCT.
Youmaynotexportorreexport,directlyor
indirectly,thePRODUCTwithoutcompliance
with appropriate governmental regulations.
ThePRODUCTcontainsFranklin’scondential
and proprietary information which you
agreetotakeadequatestepstoprotectfrom
unauthorizeddisclosureoruse.Thislicense
iseectiveuntilterminatedbyFranklin.This
license terminates immediately without notice
fromFRANKLINifyoufailtocomplywithany
provision of this license.
9.4 FCC Notice
ThisdevicecomplieswithPart15oftheFCC
Rules.Operationissubjecttothefollowing
twoconditions:(1)Thisdevicemaynotcause
harmfulinterference,and(2)Thisdevicemust
accept any interference received, including
interference that may cause undesired
operation.
Warning:Changesormodicationstothis
unitnotexpresslyapprovedbytheparty
responsible for compliance could void the
user’sauthoritytooperatetheequipment.
NOTE:Thisequipmenthasbeentestedand
found to comply with the limits for a Class B
digital device, pursuant to Part 15 of the FCC
Rules.Theselimitsaredesignedtoprovide
reasonable protection against harmful
interference in a residential installation.
Thisequipmentgenerates,usesandcan
radiateradiofrequencyenergyand,ifnot
installed and used in accordance with the
instructions, may cause harmful interference
to radio communications. However, there is
no guarantee that interference will not occur
inaparticularinstallation.Ifthisequipment
does cause harmful interference to radio or
television reception, which can be determined
byturningtheequipmentoandon,theuser
is encouraged to try to correct the interference
by one or more of the following measures:
–Reorientorrelocatethereceivingantenna.
–Increase the separation between the
equipmentandreceiver.
–Connecttheequipmentintoanoutletona
circuit dierent from that to which the receiver
is connected.
–Consultthedealeroranexperiencedradio/
TVtechnicianforhelp.
NOTE:Thisunitwastestedwithshielded
cablesontheperipheraldevices.Shielded
cables must be used with the unit to insure
compliance.
NOTE:Themanufacturerisnotresponsible
foranyradioorTVinterferencecausedby
unauthorizedmodicationstothisequipment.
Suchmodicationscouldvoidtheuser’s
authoritytooperatetheequipment.
9.5 Product Care
Your device is designed to be light, compact
and durable. However, it is an electronic
device and must be treated carefully. Putting
unnecessary pressure on it or striking the
device against other objects can cause
damage.
In order to avoid damage to your device,
please:
• Keepthelidclosedwhenyouarenotusing
it.Thiswillprotectthescreenfrombeing
broken, scratched or marred in any way.
• Donotdrop,crush,bend,orapply
excessiveforcetothedevice.
• Donotexposeyourdevicetomoisture,
extremeorprolongedheat,cold,humidity,
or other adverse conditions. Avoid storing
it in damp, humid or wet places. It is not
waterproof.
• Cleanthedevicebysprayingamildglass
cleaner onto a cloth and wipe its surface.
Donotsprayliquidsdirectlyonyourdevice.
• Shouldthedevice’sdisplayglassbreak,
properly dispose of the product avoiding
contact with your skin, then wash your
hands immediately.
• Pleasekeepscreenprotectorsandplastic
bags away from babies and children to
avoid danger of suocation.
10. Warranty Information
10.1 Disclaimer of Warranties
Exceptasspecicallyprovidedherein,Franklin
makesnowarrantyofanykind,expressor
implied, with respect to this product.
10.2 Limited Warranty (U.S.
only)
LIMITED WARRANTY, DISCLAIMER OF
WARRANTIES, AND LIMITED REMEDY
FRANKLINWARRANTSTOTHEORIGINAL
PURCHASERTHATTHISPRODUCTWILLBE
FREEFROMDEFECTSINMATERIALSAND
WORKMANSHIPFORAPERIODOFONE(1)
YEARFROMTHEORIGINALDATEOFPURCHASE
ASEVIDENCEDBYACOPYOFTHESALES
RECEIPT.THISLIMITEDWARRANTYDOES
NOTCOVERDAMAGEDUETOACTSOFGOD,
ACCIDENT,MISUSE,ABUSE,NEGLIGENCE,
MODIFICATION,UNSUITABLEENVIRONMENT,
ORIMPROPERMAINTENANCE.THESOLE
OBLIGATIONANDLIABILITYOFFRANKLIN,AND
THEEXCLUSIVEREMEDYUNDERTHISLIMITED
WARRANTY,ISREPAIRORREPLACEMENT
ATTHESOLEOPTIONOFFRANKLINAND
THISREMEDYAPPLIESONLYINTHECASEIN
WHICHFRANKLINDETERMINESTHATTHE
PRODUCTWASDEFECTIVEANDTHATTHE
DEFECTAROSEWITHINTHEDURATIONOF
THELIMITEDWARRANTY.THISREMEDYIS
THEEXCLUSIVEREMEDYFORBREACHOF
THISWARRANTY.THISWARRANTYGIVESYOU
CERTAINRIGHTS;YOUMAYALSOHAVEOTHER
RIGHTSTHATMAYVARYFROMJURISDICTION
TOJURISDICTION.
EXCEPTFORTHELIMITEDWARRANTY
EXPRESSLYRECITEDABOVE,THISFRANKLIN
PRODUCTISPROVIDEDONAN“ASIS”BASIS,
WITHOUTANYOTHERWARRANTIES,EXPRESS
ORIMPLIED,INCLUDING,BUTNOTLIMITEDTO,
WARRANTIESOFMERCHANTABLEQUALITY,
MERCHANTABILITY,ORFITNESSFORA
PARTICULARPURPOSE,ORTHOSEARISINGBY
LAW,STATUTE,USAGEOFTRADE,ORCOURSE
OFDEALING.THISWARRANTYAPPLIESONLY
TOPRODUCTSMANUFACTUREDBYORFOR
FRANKLINANDSPECIFICALLYDOESNOT
INCLUDEBATTERIES,CORROSIONOFBATTERY
CONTACTSORANYOTHERDAMAGECAUSED
BYBATTERIES.FRANKLINSHALLNOTHAVE
ANYLIABILITYTOTHEPURCHASERORANY
OTHERPERSONORENTITYFORANYINDIRECT,
INCIDENTAL,SPECIAL,ORCONSEQUENTIAL
DAMAGESWHATSOEVER,INCLUDING,BUT
NOTLIMITEDTO,LOSSOFREVENUEOR
PROFIT,LOSTORCORRUPTEDDATA,OR
OTHERCOMMERCIALORECONOMICLOSS,
EVENIFFRANKLINHASBEENADVISEDOFTHE
POSSIBILITYOFSUCHDAMAGES,OREVENIF
OTHERWISEFORESEEABLE.FRANKLINISNOT
RESPONSIBLEFORCLAIMSBYATHIRDPARTY.
FRANKLIN’SMAXIMUMAGGREGATELIABILITY
SHALLNOTEXCEEDTHEAMOUNTPAIDFOR
THEPRODUCTASEVIDENCEDBYTHESALES
RECEIPT.SOMESTATES/JURISDICTIONSDO
NOTALLOWTHEEXCLUSIONORLIMITATION
OFLIABILITYFORCONSEQUENTIALOR
INCIDENTALDAMAGES,SOTHEABOVE
LIMITATIONMAYNOTAPPLYTOYOU.IF
THELAWSOFTHERELEVANTJURISDICTION
DONOTPERMITFULLWAIVEROFIMPLIED
WARRANTIES,THENTHEDURATIONOF
IMPLIEDWARRANTIESANDCONDITIONSARE
LIMITEDTOTHEDURATIONOFTHEEXPRESS
WARRANTYGRANTEDHEREIN.
WarrantyService:Ifyouthinkyourproduct
isdefective,callFranklin’sCustomerService
Desk,1-800-266-5626,torequestareturn
merchandiseauthorization(“RMA”)number,
before returning the product (transportation
charges prepaid) to:
Franklin Electronic Publishers, Inc.
Attn:ServiceDepartment
OneFranklinPlaza
Burlington,NJ08016-4907
If you return a Franklin product, please include
your name, address, telephone number, a
brief description of the defect and a copy of
your sales receipt as proof of your original
dateofpurchase.YoumustalsowritetheRMA
prominently on the package if you return the
product; otherwise there may be a lengthy
delay in the processing of your return. Franklin
strongly recommends using a trackable form
of deliver to Franklin for your return.
10.3 Limited Warranty (EU and
Switzerland)
Notwithstandingthedisclaimerofwarranties
above,thisproduct,excludingbatteriesand
liquidcrystaldisplay(LCD),isguaranteed
by Franklin to be free of defects in materials
or workmanship for a period of two years
from the date of purchase. It will be repaired
orreplacedwithanequivalentproduct(at
Franklin’s option) free of charge for any defect
in workmanship or materials during that time.
Thiswarrantyexplicitlyexcludesdefectsdueto
misuse, accidental damage, or wear and tear.
Thiswarrantydoesnotaecttheconsumer’s
statutory rights.
10.4 Limited Warranty (outside
U.S., EU and Switzerland)
Notwithstandingthedisclaimerofwarranties
above,thisproduct,excludingbatteriesand
liquidcrystaldisplay(LCD),isguaranteed
by Franklin to be free of defects in materials
or workmanship for a period of one year
from the date of purchase. It will be repaired
orreplacedwithanequivalentproduct(at
Franklin’s option) free of charge for any defect
in workmanship or materials during that time.
ProductspurchasedoutsidetheUnitedStates,
theEuropeanUnionandSwitzerlandthatare
returned under warranty should be returned
to the original vendor with proof of purchase
and description of fault. Charges will be made
for all repairs unless valid proof of purchase is
provided.
Thiswarrantyexplicitlyexcludesdefectsdueto
misuse, accidental damage, or wear and tear.
Thiswarrantydoesnotaecttheconsumer’s
statutory rights.
SES-28004-00
Rev. A
Printed in China


