


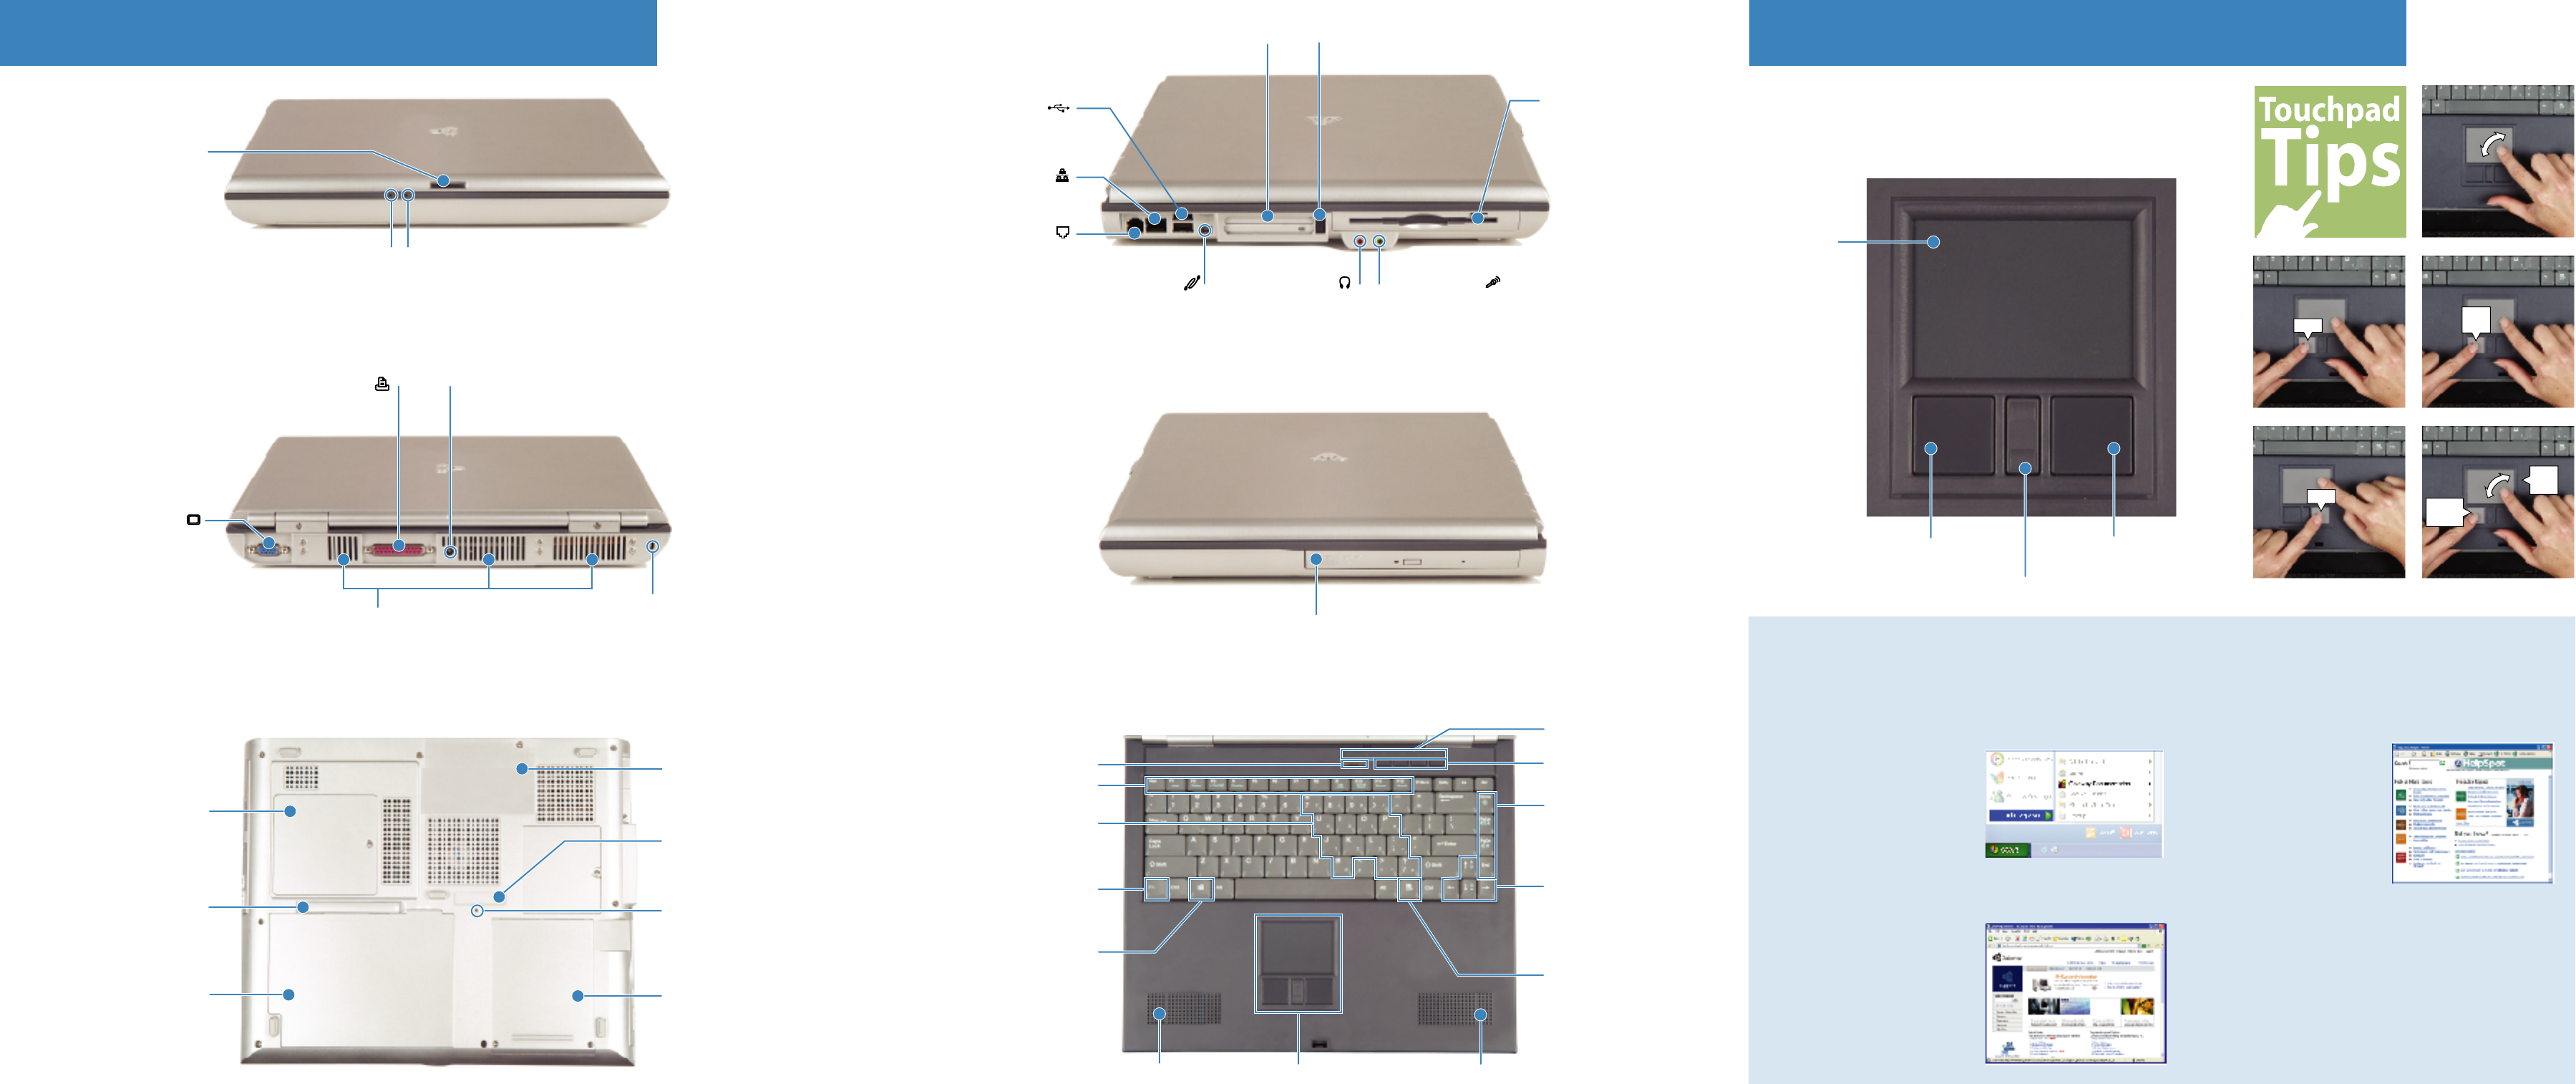
Front
Back
Left
Right
Bottom Keyboard
Using the touchpad
Battery charge indicator
This LED lights up when the
notebook is plugged in and shows
battery activity and status
Power indicator
This LED lights up when the
notebook is turned on and shows
the notebook power status
Checking out your Gateway 400
The EZ Pad™ consists of a touchpad, two buttons, and a
rocker switch. Use the touchpad to move the pointer on the
screen. Use the EZ Pad buttons to select objects. Use the
rocker switch to scroll your screen up and down.
Left touchpad
button
Right touchpad
button
Rocker switch
Touchpad
LCD panel release latch
Press this to open the
LCD panel
Ventilation fans
Helps cool internal components. Do not
block or insert objects into these slots.
CD/DVD/Recordable drive
Depending on what you ordered,
you may have a drive for playing
CDs or DVDs or recording CDs
Monitor port
Plug an analog VGA
monitor in here
Kensington™ lock slot
Secure your notebook to an
object by connecting a
Kensington cable lock here
Parallel port
Plug a parallel device
(such as a printer) in here
Battery bay
Insert the battery here
Battery latch
Slide to release the battery
Memory bay
Install as many as two
memory modules here
Serial number label
Includes your notebook's
serial number
System label
Includes the product
model number
Modem jack
Plug a modem cable in here
PC Card eject button
Press this to remove the PC Card
Headphone jack
Plug headphones
or amplified
speakers in here
Diskette drive
Insert a standard 3.5-inch
diskette here
PC Card slot
Insert one Type II or one
Type III PC Card here
Microphone jack
Plug a microphone
in here
Status indicators
Touchpad
Function/System keys
Numeric keypad
Press these to type numbers when
the numeric keypad is turned on
Navigation/Volume keys
Press these to move the
cursor or to adjust volume
Arrow/LCD brightness/
Volume keys
Press these to move the
cursor or to control screen
brightness
Speaker
Application key
Press this for quick access
to shortcut menus and help
assistants in Windows
Speaker
FN key
Press this along with a colored system
key to perform a specific action
Windows key
Press this to start the
Windows Start menu
Power connector
Plug the AC adapter
cable in here
Ethernet jack
Plug a 10/100 Ethernet
network cable in here
USB ports
Plug a USB (Universal Serial Bus)
device (such as a scanner or digital
camera) in here
IEEE 1394™ port
Plug an IEEE 1394 (also known as
Firewire™ or i.Llink™) device (such
as a digital camcorder) in here
Reset hole
Insert a straightened paper
clip here to manually
restart the notebook
Hard drive bay
The hard drive kit
is located here
Multi-function buttons
Power button
For information about using
your Gateway notebook,
click Start, All Programs,
Gateway Documentation,
then click Gateway 400
User's Guide.
For information about using
your Gateway notebook,
click Start, then Help and
Support. Click the Pick a
Topic area for more
information about your
Gateway 400 notebook.
To use an automated menu system and your telephone
keypad to find answers to common problems, call 800-
846-4526 (U.S.) or 877-709-2951 (Canada).
To talk to a Gateway Technical Support representative
about a non-tutorial technical support question, call 800-
846-2301 (U.S.) or 800-846-3609 (Canada and Puerto
Rico).
For help and information
about common issues,
check out Gateway's
Technical Support on the
Web at
www.support.gateway.com
Getting help
Gateway offers a number of options for additional help and information:
Refer to your documentation Check HelpSpot (WindowsXP only)
Check Gateway eSupport Call Technical Support
To move the pointer
on the screen
To select an object
on the screen
To start a program
or open a file
To access a shortcut menu
or find information
about a screen object
To move an object
on the screen
click
click,
click
click
press
& hold
then
drag