against the Paper Support, or, you may prefer to hold the
sheets in place with one hand.
4. To punch, press the PUNCH ~ button (D2). The
WirePRO 1000 punches up to 17 sheets of 20 Ib./80
gram paper at once. Punch only TWO clear covers at a
time to prevent jams and excessive wear.
5. If you try to punch too many sheets GBC's patented "Jam
Stopper" safeguard feature will automatically stop and
reverse the punch die. At this time the yellow LED indicator
will temporarily flash. Remove the paper from the punch
throat and decrease it's thickness before trying to punch
again.
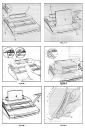
E. BINDING
1. Using the dial on the lelt side adjust the Wire Crimper to
correspond with the wire element size to be used.
2 Place the large loops of the wire element into the Wire
Holder as shown in figure 3. Be sure it is firmly secured
with the small loops facing toward you.
3. Place your punched pages face downward onto the small
loops of the wire element. Then place your front and back
covers face-to-face against each other. Place the covers
onto the wire element with the back cover first and the
inside of the front cover facing upward. This step ensures
that alter crimping the seam of the wire element will be
hidden between the back cover and last page (figure 4).
4. Hold the wire element firmly at each end of the book and
remove it from the Wire Holder by sliding it to the lelt or
lilting it off. While firmly holding the wire element at each
end place the book with the open end of the wire face
down into the Wire Crimper. You can release the book
so it rests against the support rack or continue to hold it
with one hand (figure 5).
5. To crimp the wire together pull the handle down toward
you completely until it goes no further. Remove the book
and flip the front cover around to the front. Your
presentation is now complete.
F. EMPTY CHIP DRAWER
1. Empty Chip Drawer (F) after repeated use. Pull drawer
gently toward you to open. When putting back in, the
drawer will snap into place (see figure 6).
G. SERVICE
Should your WirePRO 1000 require service contact:
General Binding Corporation
6210 Capitol Dr.
Wheeling, IL 60090
1-800-790-7787
Thank you lor purchasing the GBC WirePRO 1000. This system
leatures our new exclusive wire holder design that enables
you to assemble your document as you punch, making it
easier to load paper onto the binding element than previous
systems! The WirePRO 1000 advanced punching technology
also makes it easier to punch more paper at once while
providing greater reliability.
A. GEmNG STARTED
1. Push the handle (A) onto the shalt located on the right side
of the machine (see figure 1). Align the flat spot of the
\ handle with the flat of the shalt and secure it with the allen
wrench provided.
i 2. Insert U shaped wire support bracket into holes on top rear
of machine.
r 3. Firmly push the female end of the power cord into the
power cord receptacle (A 1) located on the back of the
machine
A CAUTIDN: Make sure this step is complete prior to
plugging the male end of the power cord into a power
receptacle.
4. Plug the male end of the power cord into an appropriate
power receptacle
B. DETERMINE SHEET WIDTH
1. Set Edge Guide (B) to paper size you wish to bind (11",
8-1/2"letter size, 11-1/4" oversized cover. A4 ring. AS.
Japan A4) (see figure 1). When using oversized covers, set
the Edge Guide on Covers, punch all of the covers for your
job and set aside. Move the Edge Guide back to the 11"
setting to punch your contents then bind.
2. Raise lid on cover (D). and pull up appropriate selector
pins to disengage punch pins that may nick the edge of
your sheet. To determine which pins should be pulled up
follow the punch steps indicated in section "D" using blank
test paper.
C. DETERMINE WIRE SIZE
1. Slide the Binder Sizer open (C) (see figure 1).
2. Place document including covers behind Binder Sizer.
3. Release the Binder Sizer and select the wire binding
element that corresponds with the size shown by guide.
For best results. always use GBC brand covers with GBC
color-coordinated wire.
I D. PUNCHING PAPER (see figure 2)
I 1. Lilt the Paper Support (D) into place (optional).
2. Align sheets or covers and insert edge to be bound into
punch throat (D1).
~ 3. Jog the sheets until they are flush against the edge guide
( and the bottom of the punch throat. Allow the paper to rest
SPECIFICATIONS
Dimensions. 18" (W) x 8112" (H) x 16" (D) Punch Capacity: 17 sheets of 20 Ib. paper
457mm x 216mm x 4D6mm 17 sheets of 80gm2 paper
361bs. (15.5 kg.) 125 sheets or 9116"
(14mm)
115V AC. 60Hz. 2.0 amps.
or 230V AC. 5OHz. 1.2 amps 11.7" (297mm A4)
14
Weight:
Electrical Power:
Bind Capacity'
Maximum Sheet Width:
Dis-engagable Punch Pins:
5