


6
Reverse Function
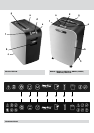
1 Should you wish to reverse the shredding direction while
shredding a document, a reverse button (f) has been fitted
for your convenience.
2 By pressing the reverse button the shredding cutters will
change direction allowing the retrieval of the document
being shredded. The feed area will turn to red.
3 The reverse function will only run while the button is being
pressed. When the reverse button has been released the
shredder will revert to stand by mode.
4 To turn back to auto mode simply press the right hand auto
feed button again (e).
CD and Credit Card Shredding
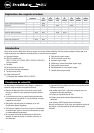
Models GDM10 and GDHS7 can not shred CD’s or credit cards
therefore this section is not applicable to these two models.
All other Jam Free models can shred CD’s and credit cards as
follows:
1 A separate CD tray is provided to collect the shredded
CD shards. Ensure that this is correctly mounted onto the
standard shredder bin before shredding CD’s or credit
cards. CD and credit card shards should be disposed of
separately to paper.
2 Pull up the orange CD guide (g) located in the center of the
feed area and flip it into position over the shredder mouth.
3 For credit card shredding, switch the shredder to auto mode
and insert the card into the center slot. Only shred 1 credit
card at a time.
4 For CD shredding, extend the sides of the orange CD guide,
switch the shredder to auto mode and place the CD into the
center of the CD slot. Only shred 1 CD at a time.
5 Empty the CD tray after 8 credit cards or CD’s to avoid
waste spilling over into the paper waste bin. Remove the CD
tray before recommencing to shred paper.
Operation
1 After unpacking the product, pull out the shredder bin and
remove the CD shard tray,which sits on top of the bin. Store
this tray somewhere safe and use when you shred CD’s or
credit cards to separate waste for recycling. (not applicable
for GDM10 and GDHS7 models)
2 Connect shredder to mains supply.
3 Press the central power on button (d). This will switch the
power on and all the LED warning symbols on the indicator
panel (a) will ash in sequence. The shredder will now be in
standby mode and the “Power-on” symbol on the indicator
panel will be illuminated amber.
4 To start shredding, press the right hand auto feed button (e)
this will illuminate the feed area green and illuminate the
symbol green.
This sets the shredder into auto mode and initiates the Jam
Free mechanism. You are now able to shred.
5 Insert paper to be shredded into the feed area. The Jam
Free mechanism will sense the thickness of the paper being
shredded.
If the paper thickness is within the shredder’s capacity,
the motor will start and your documents will be shredded.
Cutters will stop once the shredding process is complete.
If the paper thickness is greater than the shredders sheet
capacity the area around the feed slot will turn from green
to red and the motor will not run. In this situation the Jam
Free Icon on the indicator panel will flash red, the green
will go off, instead the will be illuminated red.
6 If this happens, remove some of the sheets from the paper
stack and re-try until the feed area reverts back to green,
the shredder will then automatically start and allow the
paper to be shredded.
If the shredder is left in auto mode for more than 10
minutes without being used, the shredder will automatically
turn back to standby mode in order to save power.