


5
G
Guarantee
Operation of this machine is guaranteed for two years from date of
purchase, subject to normal use. Within the guarantee period, ACCO
Brands Europe will at its own discretion either repair or replace the
defective machine free of charge. Defects due to misuse or use for
inappropriate purposes are not covered under the guarantee. Proof
of date of purchase will be required. Repairs or alterations made by
persons not authorised by ACCO Brands Europe will invalidate the
guarantee. It is our aim to ensure that our products perform to the
specifications stated. This guarantee does not affect the legal rights
which consumers have under applicable national legislation governing
the sale of goods.
Register this product online at www.accoeurope.com
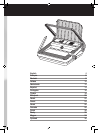
Wire binding instructions
For use with GBC 34 loop wire elements.
1. Set the wire
1
Lift the lid and punch handle to the upright position.
2
Place entire document so it rests on the lid.
3
Check the wire size (mm) needed using the paper thickness guide.
W20 / W25E:
4
Measure your wire using the wire size guide.
5
Turn the wire selector (located at the side of the machine) until the
number matches your wire size (5mm-14mm).
6
The machine will automatically prevent your wire from over closing,
and will adjust the margin depth.
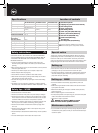
Troubleshooting
• This machine has a recommended duty cycle of 5 operations per
minute, up to a maximum of 30 minutes on / 30 minutes off.
• This machine is tted with a thermal overload safety feature. In
extreme circumstances, the motor may overheat which will activate
the safety feature. This feature will prevent the machine punching until
it has cooled sufficiently.
• The thermal overload switch will automatically reset after
approximately 15 minutes. The machine will then operate as if it had
been overloaded (see step 4 below).
2. Sort paper
1
For managing large documents use the document separator.
2
Push the separator into the document.
3
Lift the separator upwards to reveal the first stack of paper ready for
easy punching.
3. Set paper size
1
On manual machines, ensure that the punch handle is in the upright
position before centering the paper.
2
Load the first paper stack into the punch slot.
3
Centre the paper using the dial located at the front of the machine.
4. Punch paper
For manual punching: Lower the raised handle until the paper is
punched and support the machine when lifting the handle to the upright
position.
For electric punching (W25E only): Press the ‘punch button’
located on the right panel of the machine.
Note: If the machine is overloaded and fails to complete the punch
cycle, the red LED will be lit. Press the ‘punch button’ to cancel the red
LED. If this does not work contact the service helpline.
5. Wire binding
1
Open the hinged cover at the front of the machine to reveal the wire
binding channel.
2
Place the wire (open side up) on the wire support.
3
Feed each paper stack onto the wire and repeat until your document
is complete.
4
Support the document and wire on removal from the wire support.
5
Insert the document into the wire closing jaws (wire opening face
down).
6
Support the document and pull down the handle at the side of the
machine to close the jaws.
W18:
7
Use the wire closing guide (located in the wire closing jaws) to
ensure correct closure of the wire.
Binding tips:
To hide the spine of the wire:
• Load the internal sheets onto the wire rst, repeating until all are
loaded.
• Load the front PVC cover onto the wire element.
• Load the rear cover onto the wire element last.
• It is best to close the wire a little, check, and then close the wire a little
more until you are happy with the wire closure.
• If the wire does not close properly, check that the machine has been
set to the correct wire size.
• For further hints and tips please visit our website:
www.gbceurope.com
6. Maintenance
Please ensure the clippings tray is emptied on a regular basis. This may
prevent your machine from overloading.
W25E:
When the clippings tray is full, a yellow LED will be lit. Empty the
contents of the tray to continue binding.
Security
A security slot is fitted for use with leading makes of security leash.
E.g. Kensington Microsaver.