


GD Systems
Page - 3 Windmill
You will be prompted to change the disk at various stages but apart from this the procedure is very similar
to that detailed in section 3.2.1.
3.2.4 Installing PanCom software from 3.5" disks
This is again very similar to the above installation of Windmill from 3.5" disks.
Instead of copying the DISK folders contained in the windmill folder, simply follow the above instructions
using the DISK folders contained in the PanCom Directory.
3.3 Viewing Datasheets, Manuals and Photos.
The datasheets and manuals are stored in the 'datasheet' and 'manual' folders respectively.
The files are stored in PDF format and will require the use of Acrobat Reader which, if not already installed
on your machine, can be downloaded free of charge from the following web site:
http://www.adobe.com/products/acrobat/readstep2.html
You are free to reproduce and distribute both the datasheets and the manuals.
Also included on the CD are photos of EDA products, these are intended for use by sales teams. The pho-
tos come in two formats *.jpg and *.tif. The *.jpg are a low resolution and hence smaller file size version of
the higher quality *.tif files.
Any brochures being made using the enclosed photos should be made using the *.tif files which are a
standard publishing file type.
4.0 To Run the Software
Once the software has been successfully installed there are three main ways to start the software as de-
tailed below.
4.1 Running the Software from the Task Bar
By default whenever the software is installed it will appear as an icon in the programs section of the start
task bar.
To run the software from this location click ‘start’ in the bottom task bar, click on ‘programs’ and then click
on either the ‘Windmill’ or ‘PanCom’ icons.
4.2 Running the Software from Windows Explorer
Open windows explorer, open the directory where the file was installed.
(Our suggested default installation location is c:\EDA)
Double click on either the ‘Windmill’ or ‘PanCom’ icon.
4.1 Running the Software from the Desktop
If your system has been set-up with a short cut on the desktop simply double click the ‘Windmill’ or
‘PanCom’ icon on your desktop.
5.0 Using Windmill Software
5.1 Defining a new system.
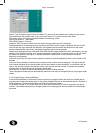
In order to create a new system click on the ‘create new’ button. The screen will display blank panel and
device information as shown in figure 5.2. To change the settings go to section 5.4
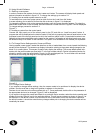
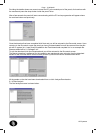
5.2 Loading from an earlier system stored on a disk
To load data from a previous system saved on disk click on the ‘Load from disk’ button.
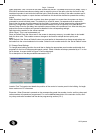
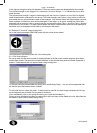
A screen allowing you to select a file from the disk as shown in figure 5.1 is displayed.
To change the directory click on the appropriate buttons until the correct directory appears. To select the
desired file double click on the file name. Data will load and a screen similar to Figure 5.2 will be displayed.
To change settings proceed to section 5.4
Figure 5.1
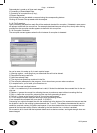
5.3 Loading a system from the control panel.
Connect the front panel port of the control panel to the PC and click on ‘Load from panel’ button. A
progress bar will be displayed as the data is loaded. If this fails try pressing the internal reset button on the
processor board of the control panel and re-click the ‘load from panel’ button.
Care should be taken to establish that the cause and effects are the same for the system in all panels as
individual panels may operate different relays in an alarm or fault condition.
This option is not available for the module port at present.