


2 309709H
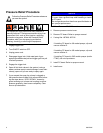
Pressure Relief Procedure
Follow the Pressure Relief Procedure whenever
you see this symbol.
1. Engage trigger lock.
2. Turn ON/OFF switch to OFF.
3. Unplug power cord.
4. Disengage trigger lock. Hold metal part of gun
against grounded metal pail and trigger gun into pail
to relieve pressure.
5. Engage the trigger lock.
6. Open all fluid drain valves in the system, having a
waste container ready to catch drainage. Leave drain
valve(s) open until you are ready to spray again.
7.
If you suspect the spray tip or hose is clogged or
that pressure has not been fully relieved after follow-
ing the steps above, VERY SLOWLY loosen tip
guard retaining nut or hose end coupling to relieve
pressure gradually, then loosen completely. Clear
hose or tip obstruction.
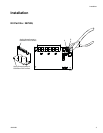
1. Follow Pressure Relief Procedure.
2. Remove pressure control cover.
3. Remove PC board. Refer to sprayer manual.
4. If using Kits: 287909, 287910
If installing PC board in 490 model sprayer, clip and
remove resistor B.
If installing PC board in 495 model sprayer, clip and
remove resistor A.
If installing PC board in 595 model sprayer (and/or
FT600), do not clip resistors.
5. Install PC board. Refer to sprayer manual.
6. Install cover.
This equipment stays pressurized until pressure is
manually relieved. To help prevent serious injury from
pressurized fluid, such as skin injection, splashing
fluid and moving parts, follow the Pressure Relief
Procedure when you stop spraying and before
cleaning, checking, or servicing the equipment.
NOTICE
Electrostatic discharges can damage components on
PC board. Use a ground strap when handling or install-
ing PC board.
Use configurations other than those specified below in
poor sprayer performance.