


Grandstream Networks, Inc., 1297 Beacon St., 2
nd
Flr, Brookline, MA 02446 USA
Tel: (617) 566-9300, FAX: (617) 249-1987
www.grandstream.com
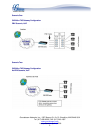
Scenario Three:
GXW40xx & GXW410x Scenario
Maintain toll-free calling across locations
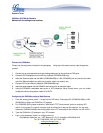
Connect the GXW40xx
Please use the equipment included in the packaging. Using any other power source may damage the
product.
1. Connect one or more standard touch-tone analog telephones (or fax machine) to FXS ports.
2. Connect a PSTN telephone line to LINE port (optional, GXW4004/4008 only).
3. Insert the Ethernet cable into the WAN (GXW4004/4008) or LAN (GXW4024) port and connect the other
end of the Ethernet cable to an uplink port (a switch, router or a modem, etc.).
4. Connect a PC to the LAN port (optional, GXW4004/4008 only).
5. Insert the power adapter into the GXW40xx and connect it to an electrical outlet.
6. Using the GXW40xx embedded web server or IVR (Interactive Voice Prompt) menu, you can further
configure the device using either a static IP or DHCP.
Configuring the GXW40xx using a Web Browser
1. From the analog phone, press *** to get into the IVR menu. Enter option 02 (GXW4004/4008) or 002
(GXW4024) to obtain the GXW40xx’s IP address.
2. For GXW4004/4008, please enable the “WAN side HTTP/Telnet access” option by entering IVR
option 12 and press 9. A reboot or power cycle of the device is required this change. You can also
access the GXW4004/4008’s web configuration from a PC connected to the LAN port via 192.168.2.1.
3. Type the GXW40xx’s IP address in your PC browser.
4. Log in using password “admin” to configure the unit.
Last updated on April 1, 2008
4