


2
power on your computer. Your operating system should
detect the new hardware device and initiate the installa-
tion procedure. Continue to follow the standard USB
device installation screens until installation is complete.
2. Insert four AAA batteries into the keyboard.
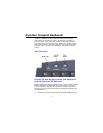
3. Press and hold the Learn button on the receiver for two
seconds, and then release it. The Status light will blink
slowly, indicating the receiver is in “Learn Mode.”
4. Press and release the Teach button located at the top of
the keyboard. The Status light on the receiver will blink
rapidly for four seconds, then begin to blink slowly.
Note: At this time, press the Teach button on any additional devices
(such as a second keyboard, an Ultra Mouse, or a GyroRe-
mote).
5. To exit Learn Mode, press the Learn button on the
receiver for two seconds. Otherwise, Learn Mode will
automatically time out after five minutes.
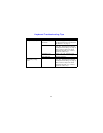
If more than one Gyration device is being installed on the
same system, place the receiver into Learn Mode (step 3
above) and then press the Teach button on each device before
exiting Learn Mode. However, do not press the Learn button
on the receiver for each device to be added (see “Keyboard
Troubleshooting Tips” on page 11).
When the receiver is put into Learn Mode, it erases its mem-
ory of previously learned devices and looks for new devices.
Therefore when adding a new device to a system, it is neces-
sary to put the receiver into Learn Mode and then press the
Teach button on all the devices that will be used on the sys-
tem.
After the Teach/Learn sequence is performed, the receiver
and device(s) will remain synchronized after powering down
and/or changing channels. It is only necessary to perform the
Teach/Learn sequence when setting a device up for the first
time or when adding additional devices to the system.