


3 - 6 Quick Check® 600/800 Series User’s Guide
Wide-to-Narrow Ratio
The wide-to-narrow ratio (W/N) applies to symbologies with two
element widths, including Codabar, Interleaved 2 of 5, and Code 39. “W/N” is the
ratio of wide to narrow elements. Only one symbology can have a W/N ratio at
a time. The range of values is 1.4 to 3.9 ± 0.2.
Fixed Message Length
You can set a Fixed Message Length for any symbology except EAN/UPC, but
only one symbology can have a fixed message length at a time. You can enter
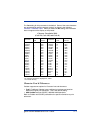
the message length for any value between 0 and 255. "Symbology
Specifications" on page 3-3 lists the message length specification for each
symbology.
♦ To modify the symbology options:
1. Display the menu that begins with
Print Results (press POWER and
then SELECT).
2. Set the cursor on the asterisk next to
Change Settings and then press
SELECT.
A menu that begins with
Specifications appears.
3. With the cursor on the asterisk next to
Specifications, press SELECT.
A menu that begins with
Symbologies appears.
4. With the asterisk next to
Symbologies, press SELECT.
A list containing the names of the first four available
symbologies appears. Next to each symbology name is either the term
ON
or
OFF indicating its enable status. To review the entire list, press ↑ or ↓
and hold it down, or press ↑ or ↓ and let up each time. The names of the
additional available symbologies appear.
5. To change the enable status of a symbology, position the cursor next to the
symbology name and press SELECT. For all the symbologies except Code
93 and Code 49, a new menu appears with the name of the symbology on
top and a list of parameters that you can change.
With the cursor on the asterisk next to
ENABLE, press → or SELECT. The
symbology enable status changes between
Yes and No.
• To change a parameter, use ↓ to move the cursor to the asterisk next
to the name of the first parameter.
• To change a numeric value such as the magnification factor, press →
to move the cursor from the asterisk to the parameter value, then
press ↑ or ↓ until the value you want appears.
• To change a selection such as
Yes/No or Checked!/None, press
→ or SELECT.
• To return to the previous menu, press POWER.
When you exit any menu, all the displayed parameter choices are saved.