


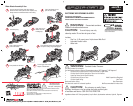

To Insert Batteries:
1. Remove water tank/web fl uid canister from blaster housing.
2. Using a Phillips/cross head screwdriver (not included),
loosen the screw in the battery compartment door. Remove
door (screw will stay attached to door), and remove and
discard dead batteries.
3. Insert 3 x fresh 1.5V “AA” or LR6 size alkaline batteries.
Replace battery compartment door and tighten screw.
1. Always follow the instructions carefully. Use only batteries specified and be sure to insert item
correctly by matching the + and – polarity markings.
2. Do not mix old batteries and new batteries or standard (carbon-zinc) with alkaline batteries.
3. Remove exhausted or dead batteries from the product.
4. Remove batteries if product is not to be played with for a long time.
5. Do not short circuit the supply terminals.
6. Should this product cause, or be affected by, local electrical interference, move it away from other
electrical equipment. Reset (switching off and back on again or removing and re-inserting batteries) if
necessary.
7. RECHARGEABLE BATTERIES: Do not mix these with any other types of battery. Always
remove from the product before recharging. Recharge batteries under adult supervision. DO NOT
RECHARGE OTHER TYPES OF BATTERIES.
CAUTION:
TO AVOID BATTERY LEAKAGE
1. Be sure to insert the batteries correctly and always follow the toy and
battery manufacturers’ instructions;
2. Do not mix old and new batteries or alkaline, standard (carbon-zinc) or
rechargeable (nickel-cadmium) batteries;
3. Always remove weak or dead batteries from the product.
CAUTION:
IMPORTANT: BATTERY INFORMATION
Please retain this information for future reference. Batteries should be replaced by an adult.
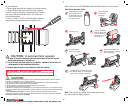
Web Blaster Assembly & Use:
Rotate back part of nozzle
(not the gear) until the
D shaped opening in the
nozzle shows red dot on
can. Shake can well.
Push Lock Button
in and pull out
Rear Clamp.
Lift locking ring.
Load can into Blaster
Housing with red dot
facing up. Make sure
silver collar is in front
of Holding Clip.
Push in Rear Clamp
and push Lock Button.
Make sure to use only SPIDER-MAN 3 Web Fluid Refi ll canisters with this blaster!
1 2
3
4
5
Close and lock locking ring.
Blaster will not spin if locking
ring is disengaged.
Place Web Blaster on forearm and fasten
touch fastener straps. Use middle fi ngers
to press down on trigger to shoot web.
6
7
Note: Clear nozzle of any excess string for best performance.
For best results aim slightly upwards.
5008(SPD_69239_Spinning_Blaster.indd)2006-11-0508/Eva/2006-11-18/CN_Mac7/BR/Artech_150L
185 K