


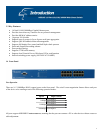


This switch can be placed directly on your desktop, on the floor, or mounted in a rack. Users can immediately use most of
the features simply by attaching the cables and turning the power on.
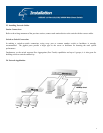
2.1 Desktop Installation
For desktop installation, the switch needs to be put on a clean, flat desk or table close to a power outlet. After you have
plugged in all network cables and the power cord, the system is ready.
Before installing the switch, you must ensure that:
1. It is accessible and cables can be connected easily
2. Cabling is away from:
a. Sources of electrical noise such as radios, transmitters and broadband amplifiers
b. Power lines and fluorescent lighting fixtures.
3. Water or moisture will not enter or come in contact with the switch at any time
4. Airflow around the unit and through the vents on the side of the case is ample for heat dissipation (it is recommended
that you provide a minimum of 25 mm. of clearance).
To prolong the operational life of your unit:
1. Never stack more than eight freestanding units on top of each other
2. Do not place objects on top of any unit or stack
3. Do not obstruct any vents at the sides of the case
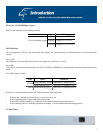
2.2 Rack-Mount Installation
The switch may stand alone, or may be mounted in a standard 19-inch equipment rack. Rack mounting produces an
orderly installation when you have a number of related network devices. Rack mounting brackets and screws have been
included in the packaging for the switch. They are used for rack mounting the unit.
The following describes a general sequence of steps for securing the unit on a rack:
1. Disconnect all cables from the switch before continuing.
2. Place the unit right side up on a hard, flat surface with the front facing towards you.
3. Place one mounting bracket over the bracket mounting holes on each side panel of the unit.
4. Insert the screws (included in the rack mount kit) through the bracket and, using a screwdriver, secure the screws
into the bracket mounting holes on the unit.
5. Place the unit onto the rack by securing the mounting brackets to the mounting strips on either side of the rack. To
do this, align the holes on the mounting brackets with the appropriate holes on the mounting strips. Be sure to use
four screws (two for each bracket) that are meant for use with the specific rack that you will be mounting the unit on.
(These screws are provided or specified by the manufacturer of the rack, not by Hawking Technologies.)
6. Reconnect all cables.
8