


56
Using and Caring for Your Inkjet Print Cartridges
4
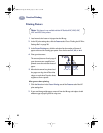
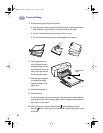
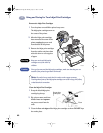
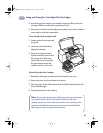
1 With the printer turned on, open the top cover.
In a few moments the print cartridge cradles automatically move to the center
of the printer and the Inkjet Print Cartridge light flashes.
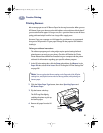
2 Snap up the cradle latch from the top of the inkjet print cartridge to be
replaced.
3 Lift the cartridge out of the cradle.
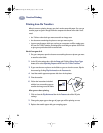
4 Discard the empty cartridge.
5 Remove the replacement inkjet print cartridge from its packaging.
6 Carefully remove the protective vinyl tape from the replacement cartridge.
7 Place the cartridge into the now-empty print cartridge cradle and push the
cartridge firmly, straight down into the cradle.
8 Close the latch. You will notice some resistance when closing the latch. When
the latch is fully closed, you will hear a click.
9 Close the top cover.
You’ll hear the cradle mechanism move, returning to the home position on the
right side of the printer.
10 If the inkjet print cartridge light continues to blink after you install new
inkjet print cartridges, check the part numbers on the cartridges to ensure you
installed the correct ones:
895Cxi, 895Cse, 880C, 882C, 832C, 830C, 815C require:
Black HP 51645 Series
Tri-Color HP C1823 Series
810C, 812C require:
Black HP No. [15] (equivalent to C6615A)
Tri-Color HP No. [23] (equivalent to C1823 Series)
Keep new and used inkjet print cartridges out of the reach of children.
Note: Be careful not to touch the ink nozzles or the copper contacts.
Touching these parts of the inkjet print cartridge can result in clogs, ink failure,
or bad electrical connection. Also, do NOT remove the copper strip; these are
electrical contacts required for proper operation of the inkjet print cartridges.
Warning
dj895c.book Page 56 Monday, July 12, 1999 11:31 AM