


5
6
7
5
1
3
2
Insert a memory card in the appropriate card slot with the memory
card label facing up.
The photos on your card display on the screen in thumbnail view.
To select a photo for printing, touch the circle in the lower left
corner of the photo. To view a photo at a larger size, touch the
center of the photo.
If there are more photos on your card than those displayed on the
screen, press or to scroll through your photos.
Touch to print all selected photos or the
currently displayed photo. While your photos print, you can scroll
through your photos and use other features on the touch screen.
1.
2.
3.
HP Photosmart A820 series Basics Guide
See Install the software in this guide to
learn how to install the HP Photosmart
software on your computer. From your
computer you can make changes to photos,
e-mail photos, clean and align the print
cartridge, check ink levels, and more!
Electronic Help
HP Photosmart software
www.hp.com/support
Need more information?
Load paper in the printer
Lift the input tray lid.
Push the input tray open, as shown.
Load HP Advanced Photo Paper (sample pack included) in the
input tray with the glossy side facing toward the front of the
printer. Push the paper in gently until it stops.
Close the input tray, but leave the lid open.
Pull the paper-width guide forward, then slide it to the left to t
close to the edge of the paper without bending the paper.
Close the input tray lid. Touch OK to print the alignment page.
1.
2.
3.
4.
5.
6.
Print your rst photo
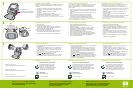
Install the print cartridge
Your printer came with the introductory print cartridge. It can print about
10 photos.* HP replacement cartridges print more than introductory
cartridges.
Insert the print cartridge into the print cartridge cradle with the
label facing up and the copper colored contacts facing the inside
of the printer.
Push the print cartridge into the cradle until it snaps
into place.
Close the print cartridge door and touch OK.
Proceed to the next step to load paper in preparation for print
cartridge alignment. Alignment ensures high print quality.
*Actual number of photos printed may vary based on photo media size, images printed and
other factors.
1.
2.
3.
4.
Printed in [country]. 04/07
© 2007 Hewlett-Packard Development Company, L.P.
Go to www.register.hp.com to register your product
and receive free driver notices, faster technical support,
and personalized newsletters.
Print cartridge cradle
Guía básica de HP Photosmart A820 series
Consulte la sección relativa a la instalación de software
de esta guía para saber cómo instalar el software HP
Photosmart en su equipo. En su equipo, puede
realizar cambios en las fotografías, enviarlas por correo
electrónico, limpiar y alinear el cartucho de impresión,
comprobar los niveles de tinta y mucho más.
Ayuda electrónica
Software HP Photosmart
www.hp.com/support
¿Necesita más información?
Printed in [country]. 04/07
© 2007 Hewlett-Packard Development Company, L.P.
Instale el cartucho de impresión
Con la impresora se suministra un cartucho de impresión inicial. Puede
imprimir unas 10 fotografías*. Los cartuchos de sustitución de HP
imprimen más fotografías que los cartuchos iniciales suministrados
con la impresora.
Inserte el cartucho de impresión en su soporte con la etiqueta hacia
arriba y los contactos de color cobre orientados hacia el interior de
la impresora.
Empuje el cartucho de impresión en el soporte hasta que encaje en
su sitio.
Cierre la puerta del cartucho de impresión y toque OK.
Continúe con el siguiente paso para cargar papel antes
de proceder con la alineación del cartucho de impresión.
La alineación garantiza una calidad de impresión óptima.
*El número real de fotografías impresas puede variar en función del tamaño del papel
fotográco, de las imágenes impresas y de otros factores.
1.
2.
3.
4.
Cargue papel en la impresora
Levante la tapa de la bandeja de entrada.
Empuje la bandeja de entrada para abrirla, tal y como se
muestra en la imagen.
Cargue papel fotográco avanzado HP (se incluye un paquete
de muestra) en la bandeja de entrada con el lado satinado
orientado hacia la parte delantera de la impresora. Empuje el
papel con cuidado hasta que se detenga.
Cierre la bandeja de entrada, pero deje la tapa abierta.
Tire hacia afuera de la guía de anchura del papel y desplácela
hacia la izquierda para ajustarla al borde del papel sin doblarlo.
Cierre la tapa de la bandeja de entrada. Toque OK para
imprimir la página de alineación.
1.
2.
3.
4.
5.
6.
Imprima la primera fotografía
Introduzca una tarjeta de memoria en la ranura correspondiente
con la etiqueta hacia arriba.
Las fotografías de la tarjeta aparecerán como miniaturas en la
pantalla. Si desea seleccionar una fotografía para imprimirla,
toque el círculo de la esquina inferior izquierda de la fotografía.
Para ver una fotografía a mayor tamaño, toque el centro de la
fotografía en cuestión.
Si en la tarjeta hay más fotografías que las que aparecen en
pantalla, pulse o para desplazarse por las fotografías.
Toque para imprimir todas las fotografías seleccionadas o la
que aparece en pantalla en ese momento. Mientras se imprimen
las fotografías, puede desplazarse por las fotografías y utilizar
otras funciones de la pantalla táctil.
1.
2.
3.
Visite www.register.hp.com para registrar el producto
y obtener de forma gratuita avisos de controladores,
una asistencia técnica más rápida y boletines
informativos personalizados.
Soporte del cartucho de impresión
Besoin de plus d’informations ?
Printed in [country]. 04/07
© 2007 Hewlett-Packard Development Company, L.P.
Installez la cartouche d’impression
Votre imprimante a été livrée avec une cartouche d’impression de
démarrage. Celle-ci permet d’imprimer 10 photos environ*.
Les cartouches de remplacement HP ont une capacité plus élevée.
Insérez la cartouche d’impression dans le support avec l’étiquette
orientée vers le haut et les contacts cuivrés, vers l’intérieur de
l’imprimante.
Poussez la cartouche d’impression dans le support jusqu’à ce
qu’elle s’enclenche.
Fermez le panneau d’accès à la cartouche d’impression et
appuyez sur OK.
Ensuite, chargez du papier pour aligner la cartouche d’impression.
Un bon alignement garantit une impression de qualité.
* Le nombre réel de photos imprimées varie selon le format du support, les images
imprimées et d’autres facteurs.
1.
2.
3.
4.
Chargez du papier dans l’imprimante
Soulevez le capot du bac d’alimentation.
Ouvrez le bac d’alimentation (voir l’illustration).
Chargez du papier photo avancé HP (échantillons fournis) dans
le bac d’alimentation, face brillante orientée vers l’avant de
l’imprimante. Poussez doucement le papier vers l’avant, jusqu’à ce
qu’il se bloque.
Fermez le bac d’alimentation, mais laissez le capot ouvert.
Tirez le guide de largeur du papier vers l’avant, puis faites-le
glisser vers la gauche, contre le bord du papier, sans plier ce
dernier.
Fermez le capot du bac d’alimentation. Appuyez sur OK pour
imprimer une page d’alignement.
1.
2.
3.
4.
5.
6.
Imprimez votre première photo
Insérez une carte mémoire dans l’emplacement adéquat, avec
l’étiquette vers le haut.
Les photos stockées dans votre carte s’afchent à l’écran
en mode vignette. Pour sélectionner une photo à imprimer,
appuyez sur le cercle situé en bas, à gauche. Appuyez au milieu
d’une photo pour l’agrandir.
Si votre carte contient plus de photos qu’il n’en apparaît à l’écran,
appuyez sur ou pour les faire déler.
Appuyez sur pour imprimer les photos sélectionnées ou la
photo afchée à l’écran. Pendant l’impression, vous pouvez
continuer à visualiser les photos et à utiliser l’écran tactile.
1.
2.
3.
Guide de base HP Photosmart série A820
Pour connaître la procédure d’installation du
logiciel HP Photosmart, consultez la section
correspondante. Depuis votre ordinateur, vous
pouvez retoucher et envoyer par e-mail des
photos. Vous pouvez également nettoyer/aligner
la cartouche, vérier son niveau d’encre, etc.
Aide électronique
Logiciel HP Photosmart
www.hp.com/support
Rendez-vous sur le site www.register.hp.com pour
enregistrer votre produit et recevoir gratuitement les avis
de disponibilité des pilotes, une assistance technique
rapide et des lettres d’information personnalisées.
Support de la cartouche d’impression