


4. Slide the back end of the left rack rail into the inside rear
of the rack. Be sure that the pins extend through the holes
marked during the rack template procedure.
IMPORTANT: Be sure that the scissor-type locking latches engage
when the ends of the rail seat into the rack uprights.
5. Repeat steps 3 and 4 for the right rack rail.
6. Remove the hook-and-loop fasteners (1) securing the
VHDCI SCSI cables and the Ethernet crossover cable to the
storage fixture.
7. Disconnect and remove the VHDCI SCSI cables from the
storage system.
8. Loosen the thumbscrews that secure the storage system and
slide the storage system from the storage system fixture.
9. Align the storage system with the rails and slide it into the
rack.
WARNING: The storage system weight, as assembled for
shipping, exceeds 22.7 kg (50 lb). To reduce the risk of
personal injury or damage to the equipment, at least two
people are required to lift the storage system during
removal or installation. Install the storage system in the
lowest available position in the rack.
WARNING: Always use at least two people to lift a
storage system into the rack. If the system is being loaded
into the rack above chest level, a third person must assist
with aligning the system with the rails while the other two
people support the weight of the system.
CAUTION: To prevent storage system damage and to
ease insertion, support the weight of the storage system
and keep it level when sliding the storage system into the
rack.
10. Secure the storage system to the rack.
Setup and
Installation in a Rack
Perform the following procedures to set up the packaged
cluster in a rack.
WARNING: To reduce the risk of personal injury or
damage to the equipment, at least two people are
required to lift the components during installation
or removal.
Rack Planning Resources
The rack resource kit ships with Compaq or HP 7000-, 9000-,
and 10,000-series racks. For more information on the content of
each resource, refer to the rack Documentation CD.
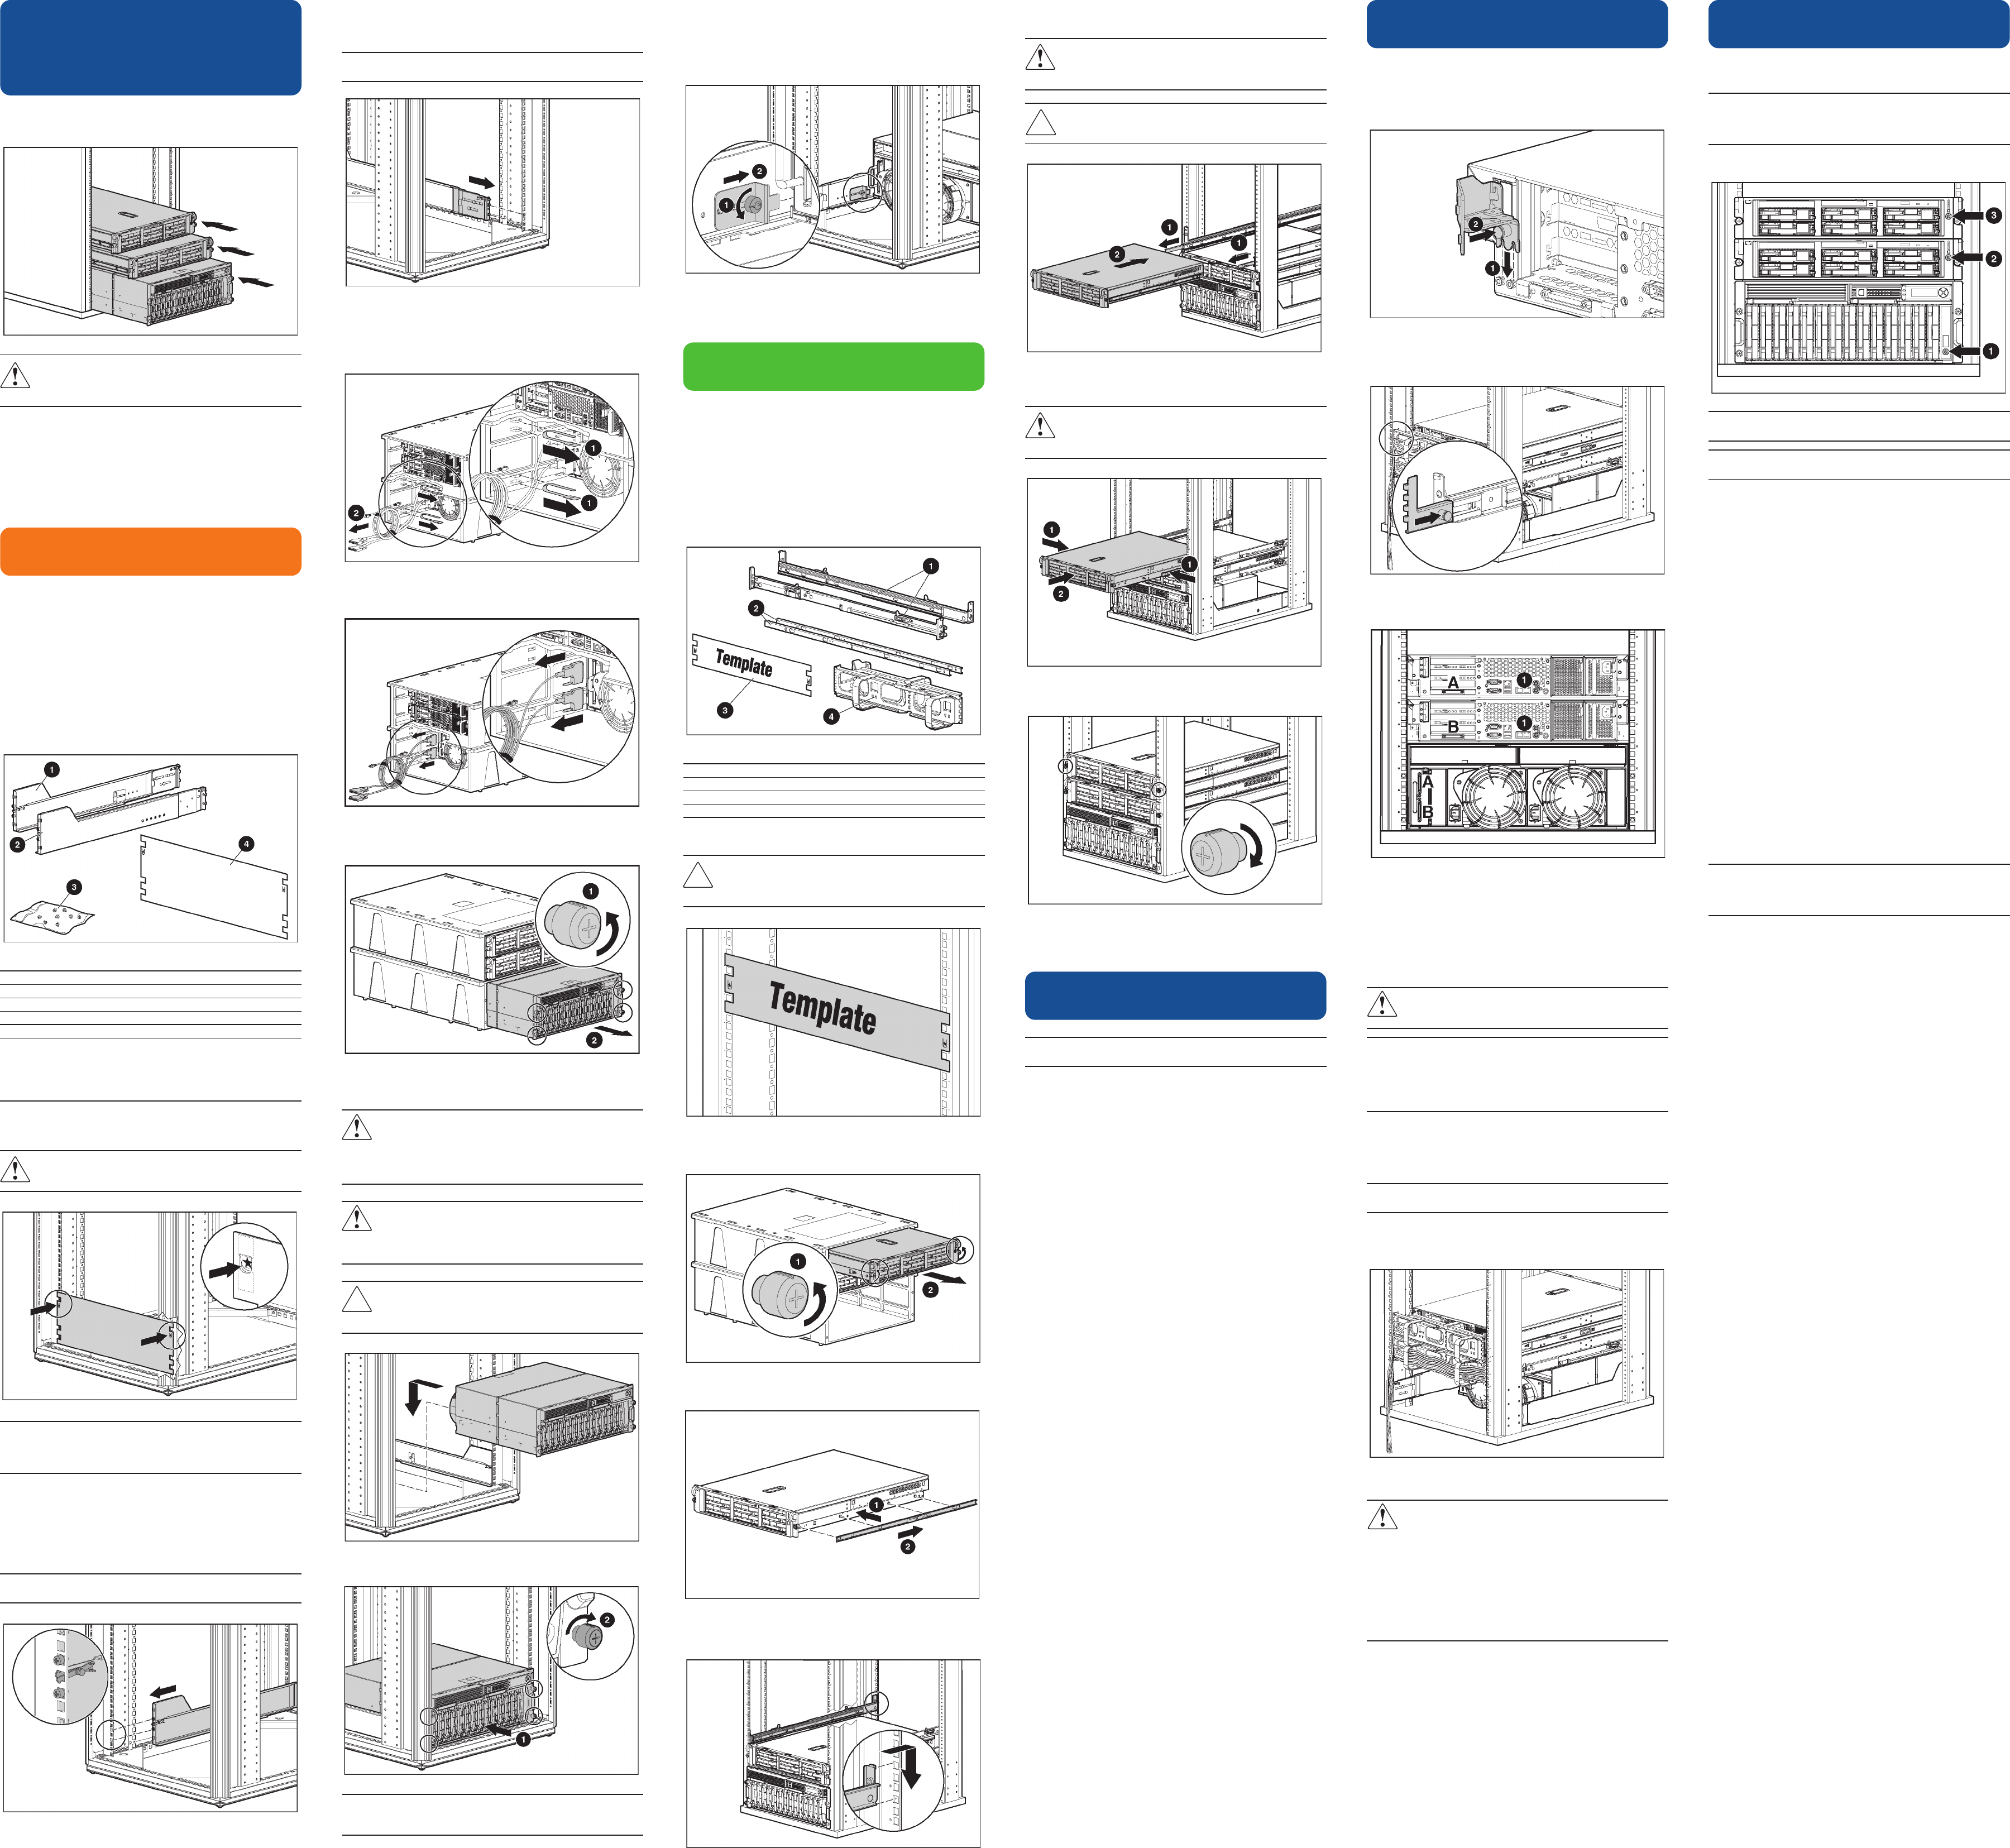
1 Installing the Storage System in
the Rack
The rack-mounting hardware kit provides the required
components for quick deployment in Compaq branded, HP
branded, and most square-and round-hole third-party racks.
The adjustable feature of the rack rails enables installation in
racks with depths of 69.90 to 73.81 cm (27.52 to 29.06
inches).
If you are installing the Smart Array Cluster Storage system in
an M-Series rack, contact an authorized reseller to obtain an
M-Series Rack Rail option kit.
1. Locate the following materials necessary for installing the
storage system.
Item Description
1 Rack rail (left)
2 Rack rail (right)
3 Pins for round-hole rack conversion
4 4U rack template
IMPORTANT: Install the storage system in the rack, leaving enough
space above to install the servers. The following procedure details
installation in a square-hole rack. For installation procedures
concerning round-hole racks, refer to the HP Smart Array Cluster
Storage System User Guide on the Documentation CD.
2. Use the instructions provided on the rack template to mark
the rack for rail locations.
WARNING: The storage system weight, as assembled for
shipping, exceeds 22.7 kg (50 lb). Install the storage
system in the lowest available position in the rack.
IMPORTANT: Unless you are converting the rails for use in
round-hole racks, do not remove the pins from the ends of the
rack rails. These load-bearing pins are designed to fit through
the holes without being removed.
NOTE: Identify the left (L) and right (R) rack rails by the markings
stamped into the sheet metal.
3. Insert the front end of the left rack rail into the inside front
of the rack. Be sure that the pins extend through the holes
marked during the rack template procedure.
IMPORTANT: Be sure that the scissor-type locking latches engage
when the ends of the rail seat into the rack uprights.
11. Use the shipping bracket to secure the system in the rack
for shipping:
a. Loosen the thumbscrew on the shipping bracket.
b. Slide the shipping bracket forward until it engages the
storage system chassis.
c. Tighten the thumbscrew.
2 Installing the Servers in the Rack
Follow the steps in this section if you are installing the servers in
a Compaq or HP 7000-, 9000-, or 10,000-series rack or a
third-party rack with square holes. If you are installing the
servers in an HP Rack System/E and HP Systems round-hole
rack or a third-party rack with round holes, or if the supplied
rails do not fit the square-hole rack you are using, order the
third-party option kit for racks with round holes and use the
installation instructions that ship with the option kit.
1. Locate the following materials necessary for installing the
servers.
Item Description
1 Left and right standard rack rail assemblies
2 Server rails
3 Rack template
4 Cable management arm
2. Mark the rack.
CAUTION: Always plan the rack installation so that the
heaviest item is on the bottom of the rack. Install the
heaviest item first, and continue to populate the rack from
the bottom to the top.
3. Loosen the thumbscrews that secure the servers and slide
the servers from the server fixture.
4. Secure each server rail to the server.
5. Secure the left and right standard rack rails to the
appropriate side of the rack.
6. Extend the slides from the standard rack rails, and then
slide the server rails into the slides.
WARNING: To reduce the risk of personal injury or
equipment damage, be sure that the rack is adequately
stabilized before sliding the server rails into the rack
rails.
CAUTION: Be sure to keep the server parallel to the floor
when sliding the server rails into the rack rails. Tilting the
server up or down could result in damage to the rails.
7. Press the rail-release latches and slide the server into the
rack.
WARNING: To reduce the risk of personal injury, be
careful when pressing the server rail release latches and
sliding the server into the rack. The sliding rails could
pinch your fingers.
8. Secure the server to the rack.
9. Repeat steps 1 through 8 for the second server.
3 Installing Hardware Options
IMPORTANT: If your system was previously configured, skip to
"Cabling the System in a Rack."
NOTE: Detailed option installation instructions are available with the
options and are also in the server setup and installation guide, the
server supplemental setup guide, and the storage system user guide
on the Documentation CD.
1. Install the server options.
2. Install the storage system options.
IMPORTANT: Tightening of the shipping bracket is only necessary if
the rack is to be shipped with the Smart Array Cluster Storage
system installed.
NOTE: Figures show one server already installed in the rack.
4 Cabling the System in a Rack
NOTE: It is recommended, for ease of cabling, to install one cable
management arm on a server and route the cables before installing
the second cable management arm.
1. Secure the cable management arm bracket to the server.
NOTE: The cable management arm is removed for clarity.
2. Secure the cable management bracket to the rail.
3. Connect the VHDCI SCSI cables labeled A and B from the
storage system to the servers.
4. If you are configuring a Microsoft or Linux operating
system, connect the Ethernet crossover cable between the
servers. Use the same RJ-45 connector (1), NIC 1, on each
server.
5. Connect peripheral devices such as the keyboard, mouse,
and monitor. For information on peripheral device
connections, refer to "Component and LED Identification"
on this poster.
WARNING: To reduce the risk of electric shock, fire, or
damage to the equipment, do not plug telephone or
telecommunications connectors into RJ-45 connectors.
IMPORTANT: If the RILOE II board is installed in the server, be sure
that you can attach the video cable to the video connector on the
rear of the RILOE II board. The standard video connector on the
server rear panel is not used when the RILOE II board is installed.
For more information, refer to the HP Remote Insight Lights-Out
Edition II User Guide on the Documentation CD.
NOTE: If you are using a KVM switchbox, refer to the switchbox
documentation for detailed instructions.
6. Connect the power cords to the servers and storage system.
IMPORTANT: Do not power on the servers or the storage system
until instructed to power on.
7. Route the cables and secure to the cable management
arm.
8. Connect the power cords to the AC power source.
WARNING: To reduce the risk of electric shock or
damage to the equipment:
Do not disable the power cord grounding plug. The
grounding plug is an important safety feature.
Plug the power cord into a grounded (earthed) electric
outlet that is easily accessible at all times.
Unplug the power cord from the power supply to
disconnect power to the equipment.
Do not route the power cord where it can be walked
on or pinched by items placed against it. Pay
particular attention to the plug, electric outlet, and the
point where the cord extends from the server.
5 Powering On and Configuring
the Packaged Cluster in a Rack
1. Power on the storage system (1) and wait for the controllers
to initialize.
IMPORTANT: You must power on the Smart Array Cluster Storage
system before powering on the servers. After powering on, wait
until the storage system startup complete message displays. It might
take up to two minutes for the system to completely power up.
2. Power on one server, (2) or (3).
IMPORTANT: Do not use the Option ROM Configuration for Arrays
(ORCA) utility to configure the Smart Array Cluster Storage.
IMPORTANT: If your system was previously configured, power on
the second server. The installation process is complete.
While the server boots, the ROM-Based Setup Utility (RBSU)
and the ORCA utility are automatically configured to prepare
the server for the operating system installation. To configure
these utilities manually:
Press the F8 key when prompted during the array
controller initialization to configure the array controller
using ORCA.
Press the F9 key when prompted during the boot
process to change the server settings, such as the
settings for language and operating system, using
RBSU. The system is set up by default for the English
language and a Microsoft Windows 2000 installation.
For more information on the automatic configuration, refer to the
HP ROM-Based Setup Utility User Guide located on the
Documentation CD.
3. Insert the SmartStart CD into the CD-ROM drive and reboot
the server. Follow the on-screen instructions to begin the
operating system installation process.
For more information on installing the operating system,
refer to the SmartStart installation poster included in the
ProLiant Essentials Foundation Pack, the HP ProLiant DL380
Generation 3 Packaged Cluster Setup and Installation
Guide, or the operating system documentation.
4. Repeat steps 2 and 3 for the second server.
5. Set up and verify the Smart Array Cluster Storage system
and cluster operations.
IMPORTANT: For detailed information on completing the cluster
setup, refer to the HP ProLiant DL380 Generation 3 Packaged
Cluster Setup and Installation Guide located on the Documentation
CD.
NOTE: Updated installation and cluster setup information is
periodically released in HP white papers. Go to
www.hp.com/servers/proliant/highavailability
for the most recent information.
The installation is complete.