


39
Chapter 3: Operation
Automatically Freeing
the Take-Up Shaft
(FlexJet E Only)
Like the manual method, this method removes the take-up shaft
from the completed roll without having to unroll the markers. The
only difference is the use of the take-up motor.
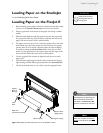
1. Tape the loose end of the roll down so that it cannot ap free.
2. While one person lifts from the bottom and holds the paper roll
still, press the Unroll key to rotate the take-up shaft opposite to
the direction that the paper was rolled on the machine.
3. The larger the roll, the more rotations are required to free the
shaft. When the shaft freely rotates in the roll, stop turning the
take-up shaft. If the printer jams and the motor does not turn
then do not unwind the roll with the motor. (See Manually
Freeing the Take-Up Shaft above.)
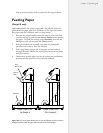
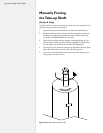
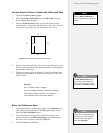
4. Rotate the take-up shaft by hand until the rectangular opening
in the anged coupling is perpendicular to the opening in the
support block (see Figure 19). Remove the shaft and lay it on the
ground.
5. Continue to twist the shaft counter clockwise while pulling it
out of the paper roll until it is free.
Reattach Paper
to the Take-up Shaft
(FlexJet E Only)
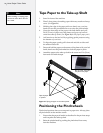
1. Use the Page Advance key to drive enough paper forward to
wrap under and around the take-up shaft.
2. Make sure the paper wraps under the take-up shaft.
3. Follow the guidelines described in Taping Paper to the Take-
Up Shaft.
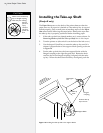
The take-up shaft is very
heavy when many plots
have been rolled up. It is
recommended that two or more
people remove the plotted paper
roll from the machine.
Caution
Except when the feed roll is
changed, it is best to leave the
pinchwheels down when removing
completed markers from the take-
up roll. Leaving the pinchwheels
down will help keep the paper
aligned with the feed roll and
reduce the time between printing
operations.
Note
i