


2
Filename: QS Ethernet 5-Port Switch.doc Title: HP-Print2k.dot
Template: quick_ref_template.dot Author: Elizabeth Stoneburg Last Saved By: Elizabeth Stoneburg
Revision #: 17 Page: 2 of 9 Printed: 09/14/01 03:01 PM
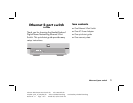
connecting the 5-port switch
1 Verify that all of the box components are
included.
2 Remove the Ethernet 5-Port Switch and
AC Power Adapter from the box.
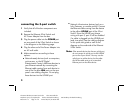
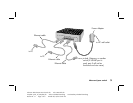
3 Plug the power cable into the POWER port
on rear panel of the 5-Port Switch as shown
in the diagram on the following page.
4 Plug the other end of the Power Adapter into
an AC wall outlet.
5 Make connections according to these
options:
■
Network-ready devices (such as computers,
print servers, or the HP Digital
Entertainment Center). Add these devices to
your Ethernet network by connecting the
Ethernet cable coming from each device to
one of the five blue LAN ports on the rear
panel—see cabling diagram. Do not plug
these devices into the UPLINK port.
■
Network infrastructure devices (such as a
hub, Gateway, or another switch). Connect
the Ethernet cable coming from the device
to the yellow UPLINK port of the 5-Port
Switch. Since the UPLINK port shares
wiring with port 5, port 5 will be disabled
if a cable is plugged into the UPLINK port
(and vice versa). See the cabling diagram
in this quick start guide as well as the
diagram on the underside of the Ethernet
5-Port Switch.
Note: If the second device also has an uplink port,
do not connect its uplink port to the UPLINK
port on the 5-port switch. You may use the
uplink port on either device, but the other
end of the cable must go to a standard
Ethernet port on the other device.