


F33995 (Rev. A, 6/06) Page 8 of 12 © HOBART 2006
Loading Labels
The SLA contains a label sensor to alert the operator when out
of labels or when labels are not advancing. When applicable,
the message Out of Security Labels displays on the Ultima
console and a beep sounds to alert the operator. Although,
when out of security labels, the Ultima merchandising labels
continue to print. You may also receive this message if the SLA
is turned off, but you are still operating the Ultima printer.
Refer to the following procedures and diagrams to correctly load
labels. Be sure the SLA is powered off when loading labels.
Note
If applicable, remove the backing paper from the take-up spool
and label core from the label hub before you begin loading.
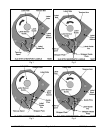
To load labels:
1. Open the SLA label supply door.
2. Turn off power at ON/OFF power switch.
3. Place the roll of labels on the label hub.
4. If the label roll does not have a leader, strip approximately
12” of labels off the backing paper to create a leader.
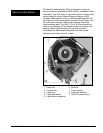
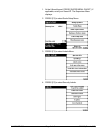
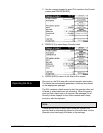
5. Thread the leader between the label sensor guide and the
label guide as shown in Fig 1 and 2. On the early model
SLA, thread the leader between the label sensor guide and
the 2 guide pins as shown in Fig 3 and 4.
6. Continue threading the leader past the label guide pin as
shown in Fig 1-4.
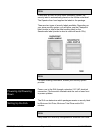
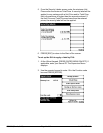
7. For Sensormatic labels, the leader should be threaded
between the stripper plate and the stripper guide plate. Loop
the end of the leader and thread through the slit in the
stripper plate as shown in Fig 2 or Fig 4. For Checkpoint
labels, the leader should be threaded around the stripper
plate as shown in Fig 1 or Fig 3.
8. Thread the leader thru the slots of the take-up spool. Wrap
the leader counterclockwise around the take-up spool as
shown in Fig 1-4.
9. Turn the take-up spool counterclockwise a few times to be
sure the backing paper winds securely.
10. Turn on power at ON/OFF power switch.
11. Press label eject switch to position the label so that it is
visible below the edge of the stripper plate. This may require
the label eject switch to be pressed several times.
12. Close the SLA label supply door.