


VG1202-PTS-INST Rev A
1/12
VG1202-PTS-INST Rev A
1/12
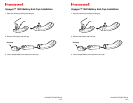
Voyager™ 1202 Battery Latch Installation
1. Open the latch by pinching and lifting up. Squeeze
the sides of the latch to completely remove the latch
from the scanner.
2. Remove the battery and end cap.
3. Replace the latch by ensuring
the locking tab faces the
bottom of the scanner and the
text on the latch faces the
same direction as the text on
the scanner.
4. Pinch the sides of the
replacement latch and slide
into place.
5. Lift up on the latch, without removing it, and replace the battery and end cap.
6. Slide the latch back into place and press to lock it.
Locking tab
facing
bottom of
scanner
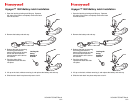