


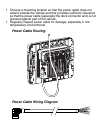


4. Secure the cable to the vehicle structure at approximately
one foot intervals, taking care not to over tighten, pinch con-
ductors, or penetrate the insulation.
5. Connect the watertight connector end of the power cable to
the Thor VM1 Quick Mount Smart Dock power connector by
aligning the connector pins to the power connector; push
down on the watertight connector and twist it to fasten
securely.
6. Secure the power cable to the Thor VM1 using strain relief
cable clamps, and place the Thor VM1 in the dock.
7. If using the Screen Blanking feature, install the screen
blanking box or switch. (Refer to the installation instructions
that came with the Screen Blanking box, or to the Thor VM1
User’s Guide, available at www.honeywellaidc.com for fur-
ther information about the Screen Blanking box.)
8. Press the power switch on the back of the Thor VM1 dock.
9. Press the power button on the front of the Thor VM1.
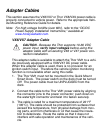
Thor VX8/VX9 Adapter Cable
This adapter cable is available to attach the Thor VM1 to a vehi-
cle previously equipped with a VX8/VX9 DC power cable. This
cable has bare wires for ground and ignition sense connection
plus a D9 cable that connects to a COM port on the Thor VM1
dock to provide a screen blanking signal.
1. The Thor VM1 must not be mounted in the Quick Mount
Smart Dock. The power switch on the dock must be turned
Off. The power cable must be UNPLUGGED from the
dock.
2. Connect the cable to the Thor VM1 power cable by aligning
the connector pins to the power connector; push down on
the watertight connector and twist it to fasten securely.