


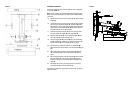

FIGURE 3
Wall Mount Installation
Complete the following steps to install the projector mount and projector
to your wall. (FIGURE 4)
Note: Look at the bottom of the swivel bracket (G) and locate the arrow.
Make sure you install the projector mount with the arrow pointing toward
your screen.
15. Use the Allen wrench to remove the upper plate (E) from the swivel
bracket (G).
16. Use the Allen wrench to remove the two screws from the enclosed
end of the of the suspension adapter (N), and place it (N) into the
slotted extension on the upper plate (E). Make sure that the two (2)
outer holes on the suspension adapter (N) align with the holes on
the slotted extension on the upper plate (E).
17. Screw the two screws removed in step 2 into the two (2) holes to
secure the suspension adapter (N) to the upper plate (E).
18. Attach the swivel bracket (G) to the suspension adapter (N) and
secure them with two screws removed in step 1.
19. Secure the upper plate (E) to the wall (M) using the commercially
available hardware (F) suitable for your environment. Be sure that
the swivel bracket (G) arrow is pointing toward your screen.
20. Carefully raise the projector (C) with the mounting bracket (B)
attached and insert it into the bottom of the swivel bracket (G) by its
tabs.
21. Rotate the projector (C) with the mounting bracket (B) attached
180º so that the projector’s focus rings is pointing toward your
screen.
22. Align the safety screw (H) on the swivel bracket (G) with the end of
the arrow -shaped slot on the mounting bracket (B) and screw it
through the opening to prevent further rotation. Hand-tighten the
screw (H).
23. Hand-tighten the remaining two clamp screws (J) to secure the
mounting bracket (B) to the swivel bracket (G).
Check all of the hardware for proper tightness and security. Do not over-
tighten the screws.
FIGURE 4