


1
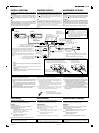
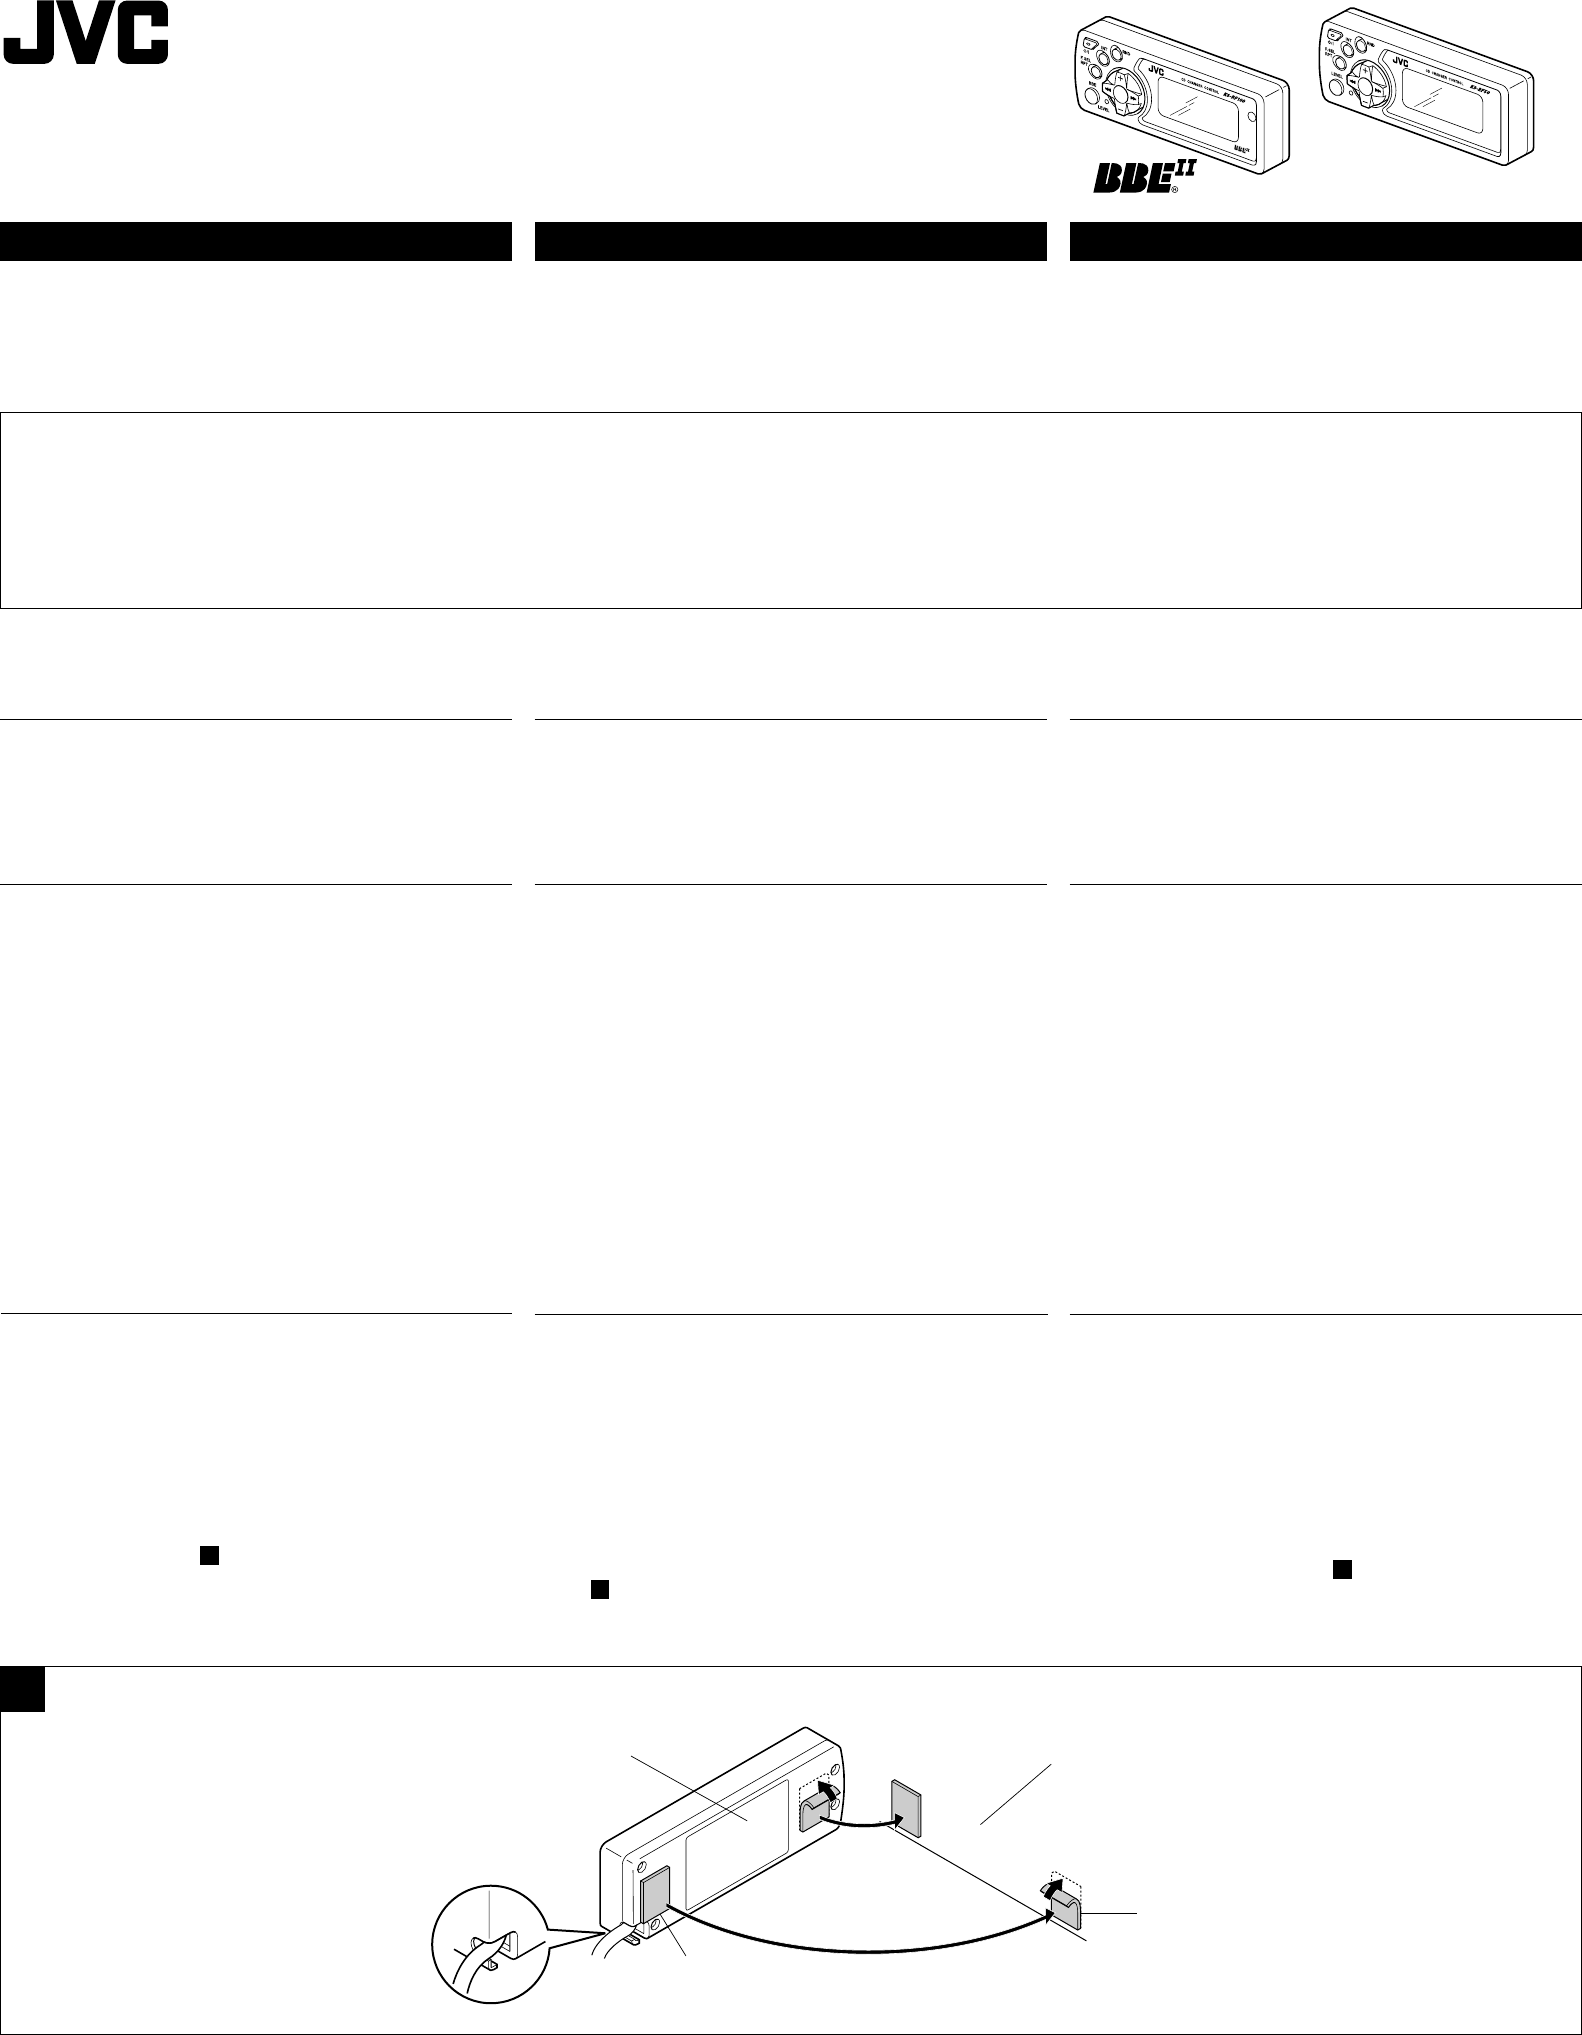
• Installing the main unit
Install as shown in Fig. A on a flat surface (dashboard, console,
etc.) where it can be attached securely and where it can be
operated easily, using Velcro tapes.
ESPAÑOL FRANÇAIS
Muchas gracias por haber comprado este producto de JVC.
Tenga a bien leer detenidamente este manual de instrucciones
antes de poner en funcionamiento la unidad a fin de obtener un
rendimiento óptimo y mayor duración.
Nous vous remercions d’avoir acheté cet appareil JVC. Veuillez
lire consciencieusement ce manual d’instructions avant de
commencer à faire fonctionner l’appareil de façon à être sûr
d’obtenir les performances optimales et la plus longue utilisation
de cet appareil.
ENGLISH
WARNING
• This unit is designed to operate with 12 volts DC, negative
ground electrical systems only.
ADVERTENCIA
• Esta unidad ha sido diseñada para funcionar con 12 voltios
de CC, únicamente sistemas eléctricos de masa negativa.
PRECAUTIONS
•This unit is for the control of JVC Compact Disc Automatic
Changer CH-X Series. For use of the CD automatic changer,
refer to its instructions.
• When there is no disc in the disc magazine of the CD automatic
changer or when the disc is inserted into the tray upside down,
“NO DISC” will be shown on the display. In such a case, remove
the disc magazine from the CD changer and reload the discs
correctly.
• When “R-1” to “R-8” is shown on the display, confirm that the
cord is connected correctly and press the microcomputer reset
button of the main unit and the CD changer.
• When the display shows “R-8”, confirm that the unit is connected
to the CD automatic changer.
PRECAUCIONES
• Esta unidad es para controlar el cambiador automático de
discos compactos de JVC de la serie CH-X. Para usar el
cambiador automático de CD refiérase a las instrucciones del
mismo.
• Cuando no haya ningún disco en el magazín del cambiador o
cuando se haya puesto el disco al revés en la bandeja,
aparecerá “NO DISC” en el display. En tal caso, retire el
magazín del cambiador y vuelva a colocar correctamente los
discos.
• Cuando el visor muestra de “R-1” a “R-8”, confirme que el
cordón está conectado correctamente y presione el botón de
reposición del microcomputador de la unidad principal y del
cambiador de CD.
• Cuando el visor muestra “R-8”, confirme que la unidad está
conectada al cambiador automático de CD.
PRECAUTIONS A OBSERVER
•
Cet appareil est pour la commande de changeur automatique
de disques audionumériques JVC de la série CH-X. Pour
l'utilisation du changeur automatique de disque, se reporter à
son manuel d'instructions.
•
Quand il n’y a pas de disque dans le magasin de disques du
changeur automatique ou si le disque est introduit dans le
plateau sens dessus dessous, “NO DISC” apparaîtra sur
l’affichage. Dans un tel cas, retirer le magasin de disque du
changeur CD et remettre les disques correctement.
•
Quand “R-1” à “R-8” est indiqué sur l’affichage, s’assurer que
le câble est correctement raccordé et appuyer sur la touche de
réinitialisation du microprocesseur de l’appareil principal et du
changeur CD.
•
Si l’affichage montre “R-8”, s’assurer que l’appareil est raccordé
au changeur CD automatique.
INSTALLATION
The main unit can be installed separately from the FM modulator
box, for ease of operation.
• Installing the FM modulator box
Install under the seat or the like, avoiding the car’s heater vents.
Note:
When the installation position has been determined, confirm
that the cords are sufficiently long.
Notes:
•For safe driving, install the unit in a place where operation of
the unit will not interfere with driving. (Avoid installing where it
would be too high (roof, etc.).)
•Avoid placing the unit in a place subject to excessive heat, direct
sunlight, etc.
• Wipe the places where the Velcro tapes are to be attached
clean before attaching them.
• Do not drop or apply excessive shocks to the unit.
• Do not disassemble the unit.
Notas:
• Por seguridad, instale la unidad en un lugar donde su uso
no interfiera con la conducción. (Evite instalarla en un lugar
que resulte muy alto (techo, etc.).)
• Evite colocarla en un lugar sometido a altas temperaturas,
luz solar directa, etc.
• Limpie previamente el lugar donde va a fijar la cinta Velcro.
• No la deje caer ni la someta a fuertes golpes.
• No la desarme.
Remarques:
•
Pour la conduite en sécurité, installer l’appareil dans un endroit
où l’utilisation ne gênera pas la conduite. (Eviter l’installation
où il pourrait être trop haut (plafond, etc.).)
•
Eviter de placer l’appareil dans un endroit sujet à la chaleur
excessive, en plein soleil, etc.
•
Essuyer l’endroit où la bande Velcro est à coller, nettoyer avant
de la fixer.
•
Ne pas laisser tomber ni cogner l’appareil.
•
Ne pas démonter l’appareil.
MISE EN PLACE
De l’appareil principal peut être installée séparément de la boîte
de modulateur FM, pour faciliter l’utilisation.
• Montage de la boîte de modulateur FM
L'installer sous le siége ou dans un endroit similaire, en éviter
les bouches de chauffage de la voiture.
Remarque:
Une fois la position d’installation déterminée, s’assurer que les
cordons sont suffisamment longs.
• Montage de l’appareil principal
Installer comme montré en Fig.
A
sur une surface plate (tableau
de bord, console, etc.) où il peut être fixé de façon sûre et où
son utilisation est commode, en utilisant de la bande Velcro.
INSTALACION
La unidad principal puede instalarse separadamente de la caja
del modulador de FM para facilitar la operación.
• Instalación de la caja del modulador de FM
Instálela debajo del asiento o en un lugar similar, evitando los
orificios de salida del calefactor del automóvil.
Nota:
Después de haber determinado la posición para instalación,
confirme que los cordones sean suficientemente largos.
• Instalación de la unidad principal
Instale la unidad con cinta Velcro, tal como se muestra en la
Fig. A , sobre una superficie plana (tablero de instrumentos,
consola, etc.) donde pueda fijarse firmemente y manejarse
con facilidad.
LVT0844-001B
[J]
AVERTISSEMENT
•
Cet appareil est conçu pour fonctionner sur courant continu de
12 volts avec la masse négative seulement.
KS-RF100/KS-RF50
CD CHANGER CONTROLLER (FM modulator built-in)
CONTROLADOR CAMBIADOR DE CD (modulador de FM incorporado)
CONTROLEUR DE CHANGEUR DE DISQUE AUDIONUMERIQUE (Modulateur FM incorporé)
Instructions
Manual de instrucciones
Manuel d‘instructions
Thank you for purchasing this JVC product. Please read these
instructions carefully before starting operation to be sure to obtain
optimum performance and a longer service life from the unit.
INFORMATION (For U.S.A.)
This equipment has been tested and found to comply with the limits for a Class B digital device,
pursuant to Part 15 of the FCC Rules. These limits are designed to provide reasonable protection
against harmful interference in a residential installation. This equipment generates, uses, and
can radiate radio frequency energy and, if not installed and used in accordance with the
instructions, may cause harmful interference to radio communications. However, there is no
guarantee that interference will not occur in a particular installation.
If this equipment does cause harmful interference to radio or television reception, which can be
determined by turning the equipment off and on, the user is encouraged to try to correct the
interference by one or more of the following measures:
– Reorient or relocate the receiving antenna.
– Increase the separation between the equipment and receiver.
– Connect the equipment into an outlet on a circuit different from that to which the receiver is
connected.
– Consult the dealer or an experienced radio/TV technician for help.
KS-RF50
KS-RF100
1101MNMMDWJEIN
EN, SP, FR
The cord can also extend out from the
side.
El cordón también puede ser tendido
desde la parte lateral.
Le cordon pourra également ressortir
sur le côté.
Dashboard, etc.
Tablero de instrumentos, etc.
Tableau de bord, etc.
Velcro tape (soft surface)
Cinta Velcro (superficie blanda)
Bande Velcro (surface douce)
Velcro tape (hard surface)
Cinta Velcro (superficie dura)
Bande Velcro (surface dure)
Rear panel of the main unit
Panel trasero de la unidad principal
Panneau arrière de l’appareil principal
A
KS-RF100&50[J]-ff.p65 06.6.2, 0:52 PM1