


8
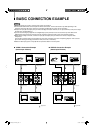
You can set the following set-up menu items.
● H. POSITION ● WHITE BALANCE ● CONTROL LOCK
Note:
● Parameters for H. POSITION can be set separately depending on the video input (Input
A or Input B) selected by the input select buttons on the front panel.
Select the required video input with the input select buttons on the front panel in
advance.
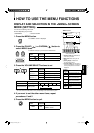
1. While pressing the MENU button, press the
PHASE (
) button.
The <SET-UP MENU> screen is displayed.
2. Press the PHASE ( ) or CHROMA ( ) button to
select the desired menu item.
A selection mark (3) is put next to the selected item.
Front panel
button
Function
displayed
Contents
PHASE (
)
∞
Advance selection mark (3).
CHROMA (
)
5
Reverse selection mark (2).
3. Press the VOLUME/SELECT buttons to set.
Front panel
button
Function
displayed
Contents
VOLUME/
SELECT (+)
+ Increase (to max. value).
3
Advance the setting value.
CUTO
Selects CUT OFF setting
screen.
VOLUME/
SELECT (–)
– Decrease (to min. value).
2
Reverse the setting value.
DRV
Selects DRIVE setting
screen.
Notes:
● For the WHITE BALANCE setting, select the CUT
OFF or DRIVE setting screen, then select the buttons
(PHASE/CHROMA/BRIGHT) corresponding to the function
indicated (R/G/B).
● To return to the <SET-UP MENU> screen, press the EXIT
(MENU) button.
H. POSITION
WHITE BALANCE
CONTROL LOCK
EXIT
PHASE CHROMA BRIGHT CONTRAST MENU VOLUME/SELECT
–
+
<SET–UP MENU>
‰ H. POSITION : 00
WHITE BALANCE
CONTROL LOCK : OFF
1
2
3
4
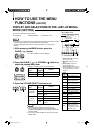
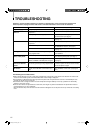
HOW TO USE THE MENU
FUNCTIONS
(cont’d)
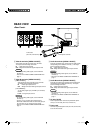
DISPLAY AND SELECTIONS IN THE <SET-UP MENU>
MODE (SETTING)
<SET-UP MENU> screen
<Front panel button>
1 Selection mark (3): Indicates the
menu item you select.
2 Menu item: Menu items you can
select.
3 Setting display: Indicates the
current settings (value).
4 Function display: The functions of
the front panel buttons (7 buttons on
the left) correspond to the function
displayed.
PHASE
MENU
PHASE CHROMA
VOLUME/SELECT
–
+
Function
displayed
Contents
∞
Advance the menu item.
5
Reverse the menu item.
–
Lower the adjustment
value (to the minimum).
+
Raise the adjustment
value (to the maximum).
3
Advance the setting value.
2
Reverse the setting value.
EXIT
Exit the <SET-UP
MENU> screen (release).
DRV Selects DRV adjustment.
CUTO
Selects CUT OFF
adjustment.
R Adjusts red signal level.
G
Adjusts green signal
level.
B Adjusts blue signal level.
DISP
Turns the ON-SCREEN
display on or off. (This
function is effective only
in the DRIVE or CUT OFF
adjustment mode.)
02-15EN_TM-A140E_f.indd 802-15EN_TM-A140E_f.indd 8 06.6.8 7:53:27 PM06.6.8 7:53:27 PM