SSDNow
For Notebooks
6
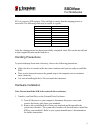
85% of your new SSD capacity. This will help to ensure that the imaging process is
successful. The following chart may be useful as a guide:
SSD capacity
Adjusted HDD Used Space
32GB
27GB or less
40GB
34GB or less
64GB
54GB or less
80GB
66GB or less
128GB
109GB or less
160GB
136GB or less
256GB
218GB or less
512GB
423GB or less
Adjusted HDD Used space = SSD capacity X 85%
After the cloning process has been successfully completed, these files can be moved back
to their original location on the hard drive.
Handling Precautions
To prevent damage from static electricity, observe the following precautions:
● Allow the drive to remain in the anti-static container until you are ready to install the
SSD.
● Wear a wrist strap and connect the ground strap to the computer case to minimize
static electricity.
● Use care in handling the drive. Do not touch the connectors.
Hardware Installation
Note: Do not install the SSD in the external drive enclosure.
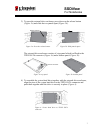
1. Transfer your Hard Drive to the External Drive Enclosure:
1) Turn off the power to your computer, disconnect the power source and
remove the battery pack from your notebook.
2) Remove the system hard drive from your notebook and disassemble the
system drive bracket. (The system drive bracket will be used later to install the
SSD in your notebook.) Refer to your system manufacturer’s documentation
for further instructions.


