


KODAK PROFESSIONAL ENDURA Metallic Paper • E-4028 3
Printer Setup
KODAK PROFESSIONAL ENDURA Metallic Paper is
slightly slower than KODAK PROFESSIONAL PORTRA
and SUPRA ENDURA Papers. As a starting point, use the
same printing times and include a density series to determine
your preferred exposure.
Initial conversion to this paper from KODAK
PROFESSIONAL Color Metallic Paper involves
rebalancing your printers. Since the green speed is about a
1/2 stop faster than Color Metallic Paper, increase your
magenta filtration by approximately 15CC.
White-Light Exposure Method
Control color balance with dichroic filters built into the
printer or enlarger, or with KODAK Color Printing (CP)
Filters (Acetate) placed between the lamp and the negative.
You can use any number of filters between the light source
and the negative. If you use cyan filtration, use filters with
the suffix “-2,” (e.g. “CP10C-2”).
1. Start with a filter pack of 60M + 45Y to make a test
print.
2. Evaluate the test print under light of the same color and
brightness that you will use to display the final print.
(See “Viewing.”)
3. Judge print density first. If necessary, make another
print by adjusting the exposure as recommended in the
following table:
4. Then judge the color balance. You can use the KODAK
Color Print Viewing Filter Kit, KODAK Publication
No. R-25, to evaluate your test print. The kit contains
18 color-print viewing filters and instructions to help
you determine filter adjustments for the white-light
exposure method.
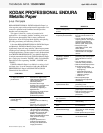
If your
print is
Do this OR Do this
TOO LIGHT Open the lens
aperture to increase
the light level
Increase the
exposure time
TOO DARK Close the lens
aperture to
decrease the light
level
Decrease the
exposure time
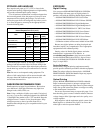
If your
print is
Subtract these
filters
OR Add these filters
CYAN Magenta + Yellow
(Red)
Cyan
MAGENTA Cyan + Yellow
(Green)
Magenta
YELLOW Magenta + Cyan
(Blue)
Ye l l o w
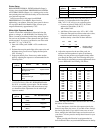
5. Remove neutral density from your filter pack. For
example, if you determine that a filter pack of
40R + 10Y + 10C will give you a pleasing print:
a. Convert any primary filters (R, G, B) to their
subtractive equivalents (C, M, Y):
40R = 40M + 40Y.
b. Add filters of the same color: 10Y + 40Y = 50Y.
c. If the new filter pack has all three subtractive colors,
cancel the neutral density by subtracting the
smallest density value from all three densities:
6. Adjust the exposure for the new filter pack. An
exposure time that produced a print of satisfactory
density may not produce an acceptable density when
you change the filter pack. The following table gives
filter factors for calculating exposure adjustments when
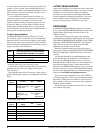
you use KODAK Color Printing (CP) Filters.
Note: The filter factors listed in the table take into account
the effects of filter surfaces.
To use the factors, divide the old exposure time by the
factor for any filter you remove. If you add a filter, multiply
the time by the factor. If you add or remove two or more
filters, multiply the individual factors and use the result as
your factor. You may need to modify these factors for your
equipment.
When you adjust the filtration in equipment that has
built-in dichroic filters, any noticeable differences in density
RED Cyan Magenta + Yellow
GREEN Magenta Cyan + Yellow
BLUE Yellow Cyan + Magenta
10C 40M 50Y
-10 -10 -10
30M 40Y =
filtration without
neutral density
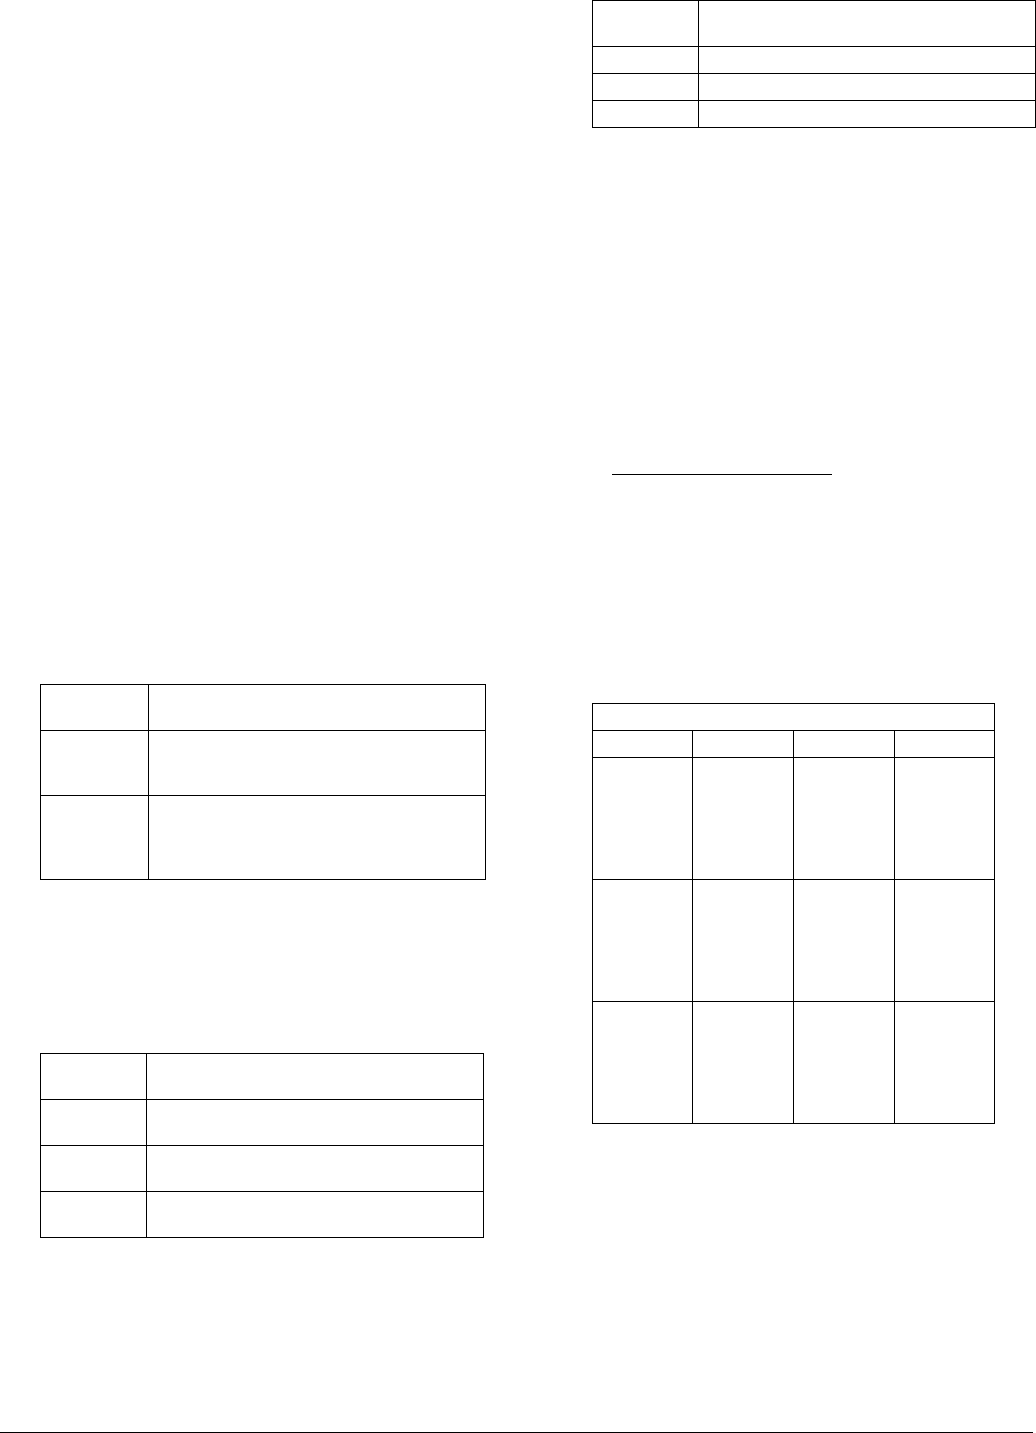
Filter Factors for CP Filters
Filter Factor Filter Factor
05Y
10Y
20Y
30Y
40Y
50Y
1.1
1.1
1.1
1.1
1.1
1.1
05R
10R
20R
30R
40R
50R
1.2
1.3
1.5
1.7
1.9
2.2
05M
10M
20M
30M
40M
50M
1.2
1.3
1.5
1.7
1.9
2.1
05G
10G
20G
30G
40G
50G
1.1
1.2
1.3
1.4
1.5
1.7
05C
10C
20C
30C
40C
50C
1.1
1.2
1.3
1.4
1.5
1.6
05B
10B
20B
30B
40B
50B
1.1
1.3
1.6
2.0
2.4
2.9
If your
print is
Subtract these
filters
OR Add these filters