


6
NetWare 2.x & 3.x Configuration
1. Login as Supervisor and start PCONSOLE.
2. Define the Print Queue.
ê If a Print Queue already exists that will be assigned to the 3000E, skip to step 3
ê Select Print Queue Information from the Available Options menu.
ê Press
INSERT, type a name for the new queue to be serviced by the 3000E
and press ENTER. Press ESCAPE to return to the Available Options menu.
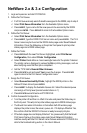
3. Define the Print Server.
ê Select Print Server Information from the Available Options menu.
ê Press
INSERT, type the 3000E Print Server name and press ENTER. The Print
Server name may be found on the 3000E status page under Novell Network
Information. Press the Status key on the printer front panel to print a printer
status page and a 3000E status page.
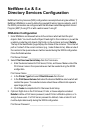
4. Define the Printer.
ê Press
ENTER with the new Print Server highlighted, select Print Server
Configuration, then select Printer Configuration.
ê Select Printer 0 and define a more meaningful name for the printer if desired.
The printer name is displayed in various NetWare printing messages, such as
when notifying users that their job is completed.
ê Set the TYPE field to Remote/Other Unknown.
ê Press
ESCAPE to exit and select Yes to save the changes. Press ESCAPE
again to return to the Print Server Configuration menu.
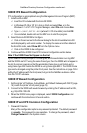
5. Assign the Print Queue.
ê Select Queues Serviced By Printer, highlight the 3000E printer on the
Defined Printers list and press
ENTER.
ê Press
INSERT to display the Available Queues list. Select the desired queue
and assign a Priority level (recommended choice is 1).
ê Press
ESCAPE several times to exit PCONSOLE.
6. Confirm Successful Configuration.
ê Turn the printer off and then on. Wait 2 minutes and press the Status key on
the front panel. This will print a printer status page and a 3000E status page.
ê The Novell Connection Information in the bottom half of the status page
displays the printer name, file server, queue, etc. If it displays Attached: Yes,
this confirms that the 3000E Print Server is ready to accept print jobs.
ê If the status page does not display Attached: Yes, please verify that the Novell
Print Server Name on the status page under Novell Network Information
matches exactly with the Print Server name that was entered in PCONSOLE or
refer to the troubleshooting section in the Users Manual.