


LTRx-512 Installer’s Guide
4
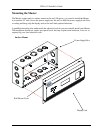
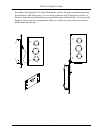
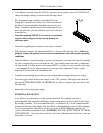
To surface mount the Master
•
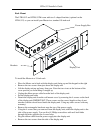
Place the Master on its back with the display unit facing up and the keypad to the right
•
Remove the two screws from just above the display unit
•
Lift the display unit up and away from you. Note that two rivets at the bottom of the
cover prevent you from lifting it straight up
•
Unplug the ribbon power cable from the back of the display unit
•
Set the display unit aside
•
Place two wall anchors and #8 screws 10 inches apart and level on the wall where you
want to mount the Master
•
If needed, place two wall anchors 5 inches below the first two screws
•
Hang the power supply onto the top two screws using the keyholes on the back
•
Screw two more #8 screws through the two holes at the bottom of the power supply into
the wall anchors
•
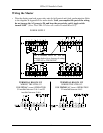
Follow the wiring steps in the next chapter
•
Reconnect the ribbon cable
•
Replace the display unit using the two screws that you earlier removed
Semi-Flush Mount
You can set the power supply portion of the Master into the wall. See the steps below and
refer to the Surface Mount drawing to semi-flush mount your Master. A competent electrician
should mount the Power Supply Box inside the wall
To recess the Master in the wall
•
Place the Master on its back with the display unit facing up and the keypad to the right
•
Remove the two screws from just above the display unit
•
Lift the display unit up and away from you. Note that two rivets at the bottom of the
cover prevent you from lifting it straight up
•
Unplug the ribbon power cable from the back of the display unit
•
Set the display unit aside
•
The power supply measures 12" wide x 6" high x 3 3/8" deep. The cover extends ½"
around the 12" x 6" dimensions. Cut a hole roughly 12¼" x 6¼" in the wall between two
studs where you want to hang your Master
•
Cut two blocks of wood for filler and attach them to the studs
•
Using the two holes on each side of the power supply, screw it to the blocks
•
Follow the wiring steps in the next chapter
•
Plug the ribbon cable
•
Replace the display unit using the two screws that you earlier removed
Lowering the Display Unit during Testing
With a Semi-Flush or Surface mount, you can hang the display unit below the back box when
testing the Master and its circuits. To lower the display unit, remove the two screws that
attach the display unit to the back box. Lift the unit up and away from the back box, leaving