


• If the computer does not charge during operation, go to “Checking operational charging” on page 33.
To check the ac adapter, do the following:
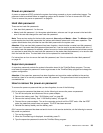
1. Unplug the ac adapter cable from the computer.
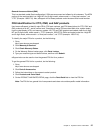
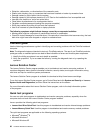
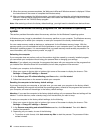
2. Measure the output voltage at the plug of the ac adapter cable. See the following illustration:
Pin
Voltage (V dc)
1 +20
2 0
3
Ground
1
2
3
(20V)
Note: Output voltage across pin 2 of the ac power adapter might differ from the one you are servicing.
3. If the voltage is not correct, replace the ac adapter.
4. If the voltage is acceptable, replace the system board.
Note: Noise from the ac adapter does not always indicate a defect.
Checking operational charging
To check whether the battery charges correctly during operation, do the following:
Note: Before you begin, install a discharged battery pack or a battery pack that has less than 50% of the
total power remaining in the computer.
1. If the battery status indicator does not turn on, remove the battery pack and let it return to room
temperature.
2. Reinstall the battery pack.
3. If the indicator still does not turn on, replace the battery pack.
4. If the indicator still does not turn on, replace the system board. Otherwise, refer to Checking the battery
pack to check the original battery pack.
Checking the battery pack
The battery status icon in the Windows notication area displays the percentage of battery power remaining.
To check for detailed battery status information, do the following:
• For Windows 7: Open the Power Manager program and click the Battery tab.
• For Windows 8: Open the Lenovo Support program and click Battery Health, or open the Lenovo
Settings program and click Power.
Note: If the battery pack becomes hot, it may not be able to charge. Remove it from the computer and leave
it at room temperature for a while. After it cools down, reinstall and recharge it.
To check the battery pack, do the following:
1. Turn off the computer and disconnect the ac power adapter.
2. Remove the battery pack and measure the voltage between battery terminals 1 (+) and 7 (-). The
correct voltage are shown in the following table.
Chapter 3. General checkout 33