


v When you restart the server after you add or remove a DIMM, a message is
displayed indicating that the memory configuration has changed.
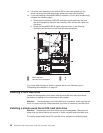
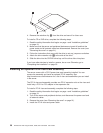
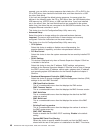
To remove a DIMM 1 or 2, complete the following steps:
1. Read the safety information that begins on page v and “Installation guidelines”
on page 19.
2. Turn off the server and peripheral devices, and disconnect the power cord and
all external cables. Remove the cover (see “Removing the cover” on page 21).
Attention: To avoid breaking the retaining clips or damaging the DIMM
connectors, open and close the clips gently.
3. Open the retaining clip on each end of the DIMM connector.
4. Lift the DIMM out of the connector.
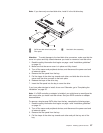
To
install a DIMM, complete the following steps:
1. Read the safety information that begins on page v and “Installation guidelines”
on page 19.
2. Turn off the server and peripheral devices, and disconnect the power cord and
all external cables. Remove the cover (see “Removing the cover” on page 21).
Attention: To avoid breaking the retaining clips or damaging the DIMM
connectors, open and close the clips gently.
3. Open the retaining clip on each end of the DIMM connector.
4. Touch the static-protective package that contains the DIMM to any unpainted
metal surface on the server. Then, remove the DIMM from the package.
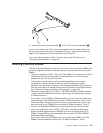
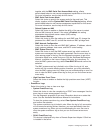
5. Turn the DIMM so that the DIMM keys align correctly with the connector.
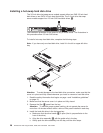
6. Insert the DIMM into the connector by aligning the edges of the DIMM with the
slots at the ends of the DIMM connector. Firmly press the DIMM straight down
into the connector by applying pressure on both ends of the DIMM
simultaneously. The retaining clips snap into the locked position when the DIMM
is firmly seated in the connector. If there is a gap between the DIMM and the
retaining clips, the DIMM has not been correctly inserted; open the retaining
clips, remove the DIMM, and then reinsert it.
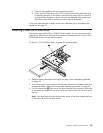
If
you have other devices to install or remove, do so now. Otherwise, go to
“Completing the installation” on page 35.
34 ThinkServer RS110 Types 6435, 6436, 6437 and 6438: User Guide