


For Macintosh users
1
With a document open, choose File > Print.
If necessary, click the disclosure triangle to see more options.
2 From the print options or Copies & Pages pop‑up menu, choose Job Routing.
3 Select your job type (Confidential, Repeat, Reserve, or Verify), and then assign a user name. For a confidential job,
also enter a four‑digit PIN.
4 Click OK or Print, and then go to the printer to release the job.
5 From the printer control panel, press the up or down arrow button until Held jobs appears, and then press
.
6 Press the up or down arrow button until appears next to your user name, and then press .
7 Press the up or down arrow button until appears next to the job type or job name, and then press .
If you selected a job name, proceed to step 10 on page 70.
8 After selecting your job type, use the keypad to enter your PIN.
If you enter an invalid PIN, the Invalid PIN screen appears.
• To re‑enter the PIN, make sure Try again appears, and then press .
• To cancel the PIN, press the up or down arrow button until Cancel appears, and then press .
9 Press the up or down arrow button until appears next to the job you want to print, and then press .
10 Press the up or down arrow button until appears next to the number of copies you want to print, and then press
.
Note: Use the keypad to enter a number if necessary.
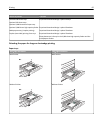
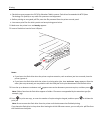
Printing from a flash drive
A USB port is located on the printer control panel. Insert a flash drive to print supported file types. Supported file types
include: .pdf, .gif, .jpeg, .jpg, .bmp, .png, .tiff, .tif, .pcx, .xps, and .dcx.
Lexmark has tested and approved the following USB flash memory devices:
• Lexar FireFly 512 MB
• Lexar FireFly 1 GB
• SanDisk Cruizer Micro 512 MB
• SanDisk Cruizer Micro 1 GB
• Sony 512 MB
• Sony 1 GB
Notes:
• High‑speed flash drives must support the full‑speed USB standard. Flash drives supporting only USB low‑speed
capabilities are not supported.
Printing 70