16
ENG
ENGLISH
ASSEMBLING AND PREPARING
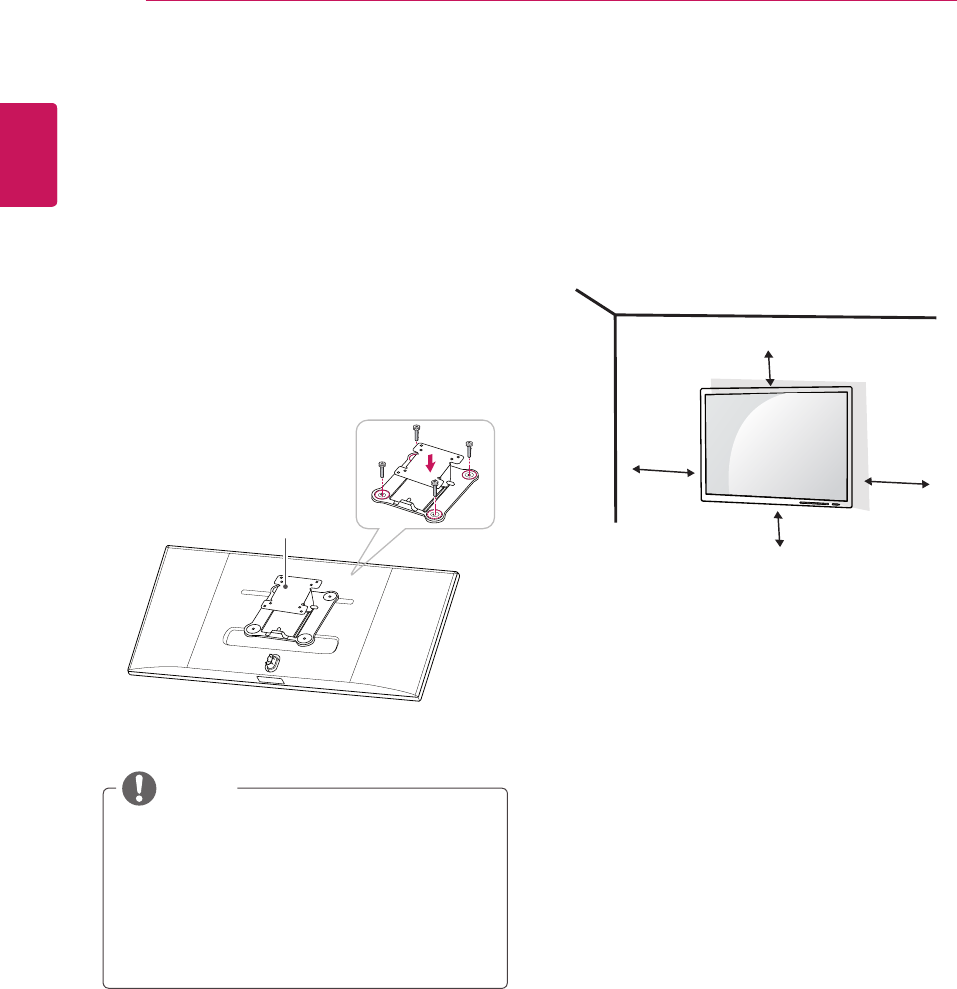
Installing the wall mount plate
Thismonitorsupportsthespecificationofthestan-
dardwallmountplateorcompatibledevice.
1
Placethescreenfacedown.Toprotectthe
screenfromscratches,coverthesurfacewitha
softcloth.
2
Placethewallmountplateontothemonitor
andalignitwiththescrewholes.
3
Usingascrewdriver,tightenthefourscrewsto
fixtheplateontothemonitor.
Thewallmountplateissoldseparately.
Formoreinformationoninstallation,referto
thewallmountplate'sinstallationguide.
Becarefulnottouseexcessiveforcewhen
mountingthewallmountplate,asthiscan
damagethemonitor'sscreen.
Wall Mount Plate
NOTE
Toinstallthemonitortoawall,attachawallmount-
ingbracket(optional)tothebackofthemonitor.
Makesurethatthewallmountingbracketissecurely
fixedtothemonitorandtothewall.
1Usethescrewsandwallmountingbracketthat
complywiththeVESAstandard.
2Screwswhicharelongerthanthestandard
lengthmaydamagetheinsideofthemonitor.
3Anon-VESAstandardscrewmaydamagethe
productandcausethemonitortofall.LGElec-
tronicsisnotliableforanyaccidentsrelatingto
theuseofnon-standardscrews.
4ThemonitorisVESAstandardcompliant.
5UseitaccordingtotheVESAstandardasspeci-
fiedbelow.
784.8mmorless
*Thicknessofthewallmountplate:2.6mm
*Fasteningscrew:Diameter4.0mmxPitch0.7
mmxLength10mm
787.4mmorgreater
*
Usethewallmountplateandscrewsthatcon-
formtotheVESAstandard
.
Installing to a wall
Installthemonitoratleast10cmawayfromthe
wallandleaveabout10cmofspaceateachside
ofthemonitortoensuresufficientventilation.De-
tailedinstallationinstructionscanbeobtainedfrom
yourlocalretailstore.Pleaserefertothemanual
toinstallandsetupatiltingwallmountingbracket.
10cm
10cm
10cm
10cm


