


LINDY Dual/Quad PRO Installation and Use Page 57
To perform a complete reset and return the LINDY Dual/Quad PRO to its factory
default state:
1) Power on the LINDY Dual/Quad PRO normally.
2) Whilst the LINDY Dual/Quad PRO is powered on move switch 2 on the rear
panel of the LINDY Dual/Quad PRO (labelled UPGRADE) to the ON (down)
position.
3) Press the USER and the COMPUTER keys together.
4) The green USER display will show 'r' for a few seconds to confirm that a reset is
taking place.
5) Return switch 2 to the normal OFF position (up).
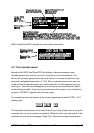
4.20 Saving and restoring the menu configuration to and from an
Excel compatible file.
The CPU Switch will store up to 512 computer names and 16 sets of user access
rights. If you have a cascade of CPU Switches then it may take some time to enter
all the computer names and port numbers and decide on the access rights that you
are going to grant to each user profile. Consequently, for peace of mind it is useful
to be able to store these settings. This can be done by connecting a computer to the
CPU Switch’s RS232 serial port and uploading to configuration settings. You can
only perform this function if you are logged onto the CPU Switch as the ADMIN
user. The file that is used to store the configuration settings has the additional
advantage that it can be loaded into an Excel spreadsheet and edited to make
changes to computer names and access rights. This edited information may then be
downloaded back to the CPU Switch.
To save the menu names and configuration settings:
1. Logon to the Lindy website at www.lindy.com and download the files
DQPREAD.EXE and DQPWRITE.EXE.
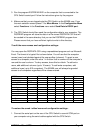
2. Connect the serial port on the rear of the CPU Switch to a serial COM port on
your computer using the serial cable supplied with the CPU Switch. If you have
lost this cable then you may use a replacement cable with a 9-way female
connector on one end and a 9-way male connector on the other end and all lines
connected straight through (i.e. pin 1 to pin 1, 2 to 2, 3 to 3 etc.).