


Appendix B
Configuration
10
USB Ethernet Adapter
Appendix B:
Configuring the Adapter
for Use with Nintendo Wii
This chapter describes how to connect and configure the
Adapter for use with Nintendo Wii.
NOTE: Throughout this user guide, it is assumed
that “D” is the letter of your CD-ROM drive.
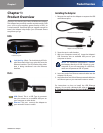
Connect the USB Ethernet Adapter to one of the 1.
available USB ports on the back of the Nintendo Wii.
Connect one end of the Ethernet cable to the RJ-45 2.
port on the Adapter.
Connect the other end of the Ethernet cable to an 3.
available RJ-45 port on your router or switch.
Power on your Nintendo Wii by pressing the power 4.
button on the front panel of the Wii.
Press 5. A on your Wii Remote to continue through the
Health and Safety Warning Screen.
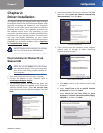
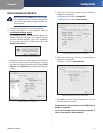
Starting on the Wii Menu, navigate to the 6. Wii button
(Wii Options) and press A on the Wii remote to confirm
the selection.
Navigate to the 7. Wii Settings button and press A on
the Wii remote.
Navigate to the Right Arrow on page 1 of the 8. Wii System
Settings and press A on the Wii remote to proceed to
page 2 of the Wii System Settings.
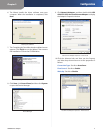
Navigate to the 9. Internet button and press A on your
Wii Remote.
Navigate to the 10. Connection Settings button and
press A on your Wii Remote.
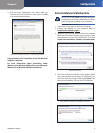
Navigate to the connection which shows “Wired” 11.
in the list. If none of the connection options show a
wired connection then you can create one by selecting
Connection 1.
Select 12. Connection Test by navigating to the button
and pressing A.
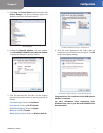
Navigate to the 13. OK button on the Connection test
to start the network connection. You should see a
message that says “Testing Connection”.
If the network test was successful, the message 14.
“The connection test was successful” will appear. If a
connection test failure message appears instead, make
sure that the Adapter is connected properly to your
Nintendo Wii and that all wired network connections
are properly connected to your network.