


Chapter 7 Cluster Installation and Configuration
95
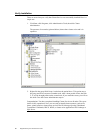
Validating the Cluster Installation
Use the Cluster Administrator snap-in to validate the Cluster Service installation on the
first node.
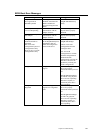
Step Description
1 Click on Start.
2 Click on Programs.
3 Click on Administrative Tools.
4 Click on Cluster Adminstrator.
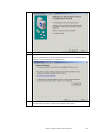
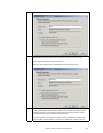
5 The following screen displays. If your snap-in window is similar to that shown above
below, your Cluster Service was successfully installed on the first node. You are now
ready to install Cluster Service on the second node.
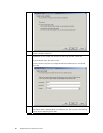
Configuring the Second Node
Note
: For this procedure, have node one and all shared disks powered on, then power up the
second node.
Installation of Cluster Service on the second node takes less time than on the first node.
Setup configures the Cluster Service network settings on the second node based on the
configuration of the first node.
Installation of Cluster Service on the second node begins the same way as installation on
the first node. The first node must be running during installation of the second node.
Follow the same procedures used to install Cluster Service on the first node, with the
following differences:
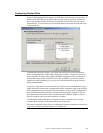
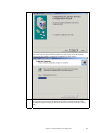
1. In the Create or Join a Cluster dialog box, select The second or next node in the
cluster, then click Next.
2. Enter the cluster name that was previously created (it is MyCluster
in this example
)
,
and click Next.
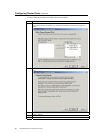
3. Leave Connect to cluster as unchecked. The Cluster Service Configuration Wizard
automatically supplies the name of the user account selected when you installed the
first node. Always use the same account you used when you set up the first cluster
node.
4. Enter the password for the account (if there is one), then click Next.
5. At the next dialog box, click Finish to complete configuration.
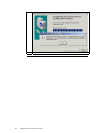
6. The Cluster Service will start. Click OK.
7. Close Add/Remove Programs.
If you install additional nodes, repeat these steps to install Cluster Service on all other
nodes.