


INTRODUCTION
Thank you for purchasing the MANHATTAN
®
Wireless Multi-Media Keyboard
and Optical Mouse Set, Model 177122.
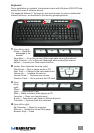
Offering multi-media capability without a cord, this convenient combo features
multi-media and Internet hotkeys that give quick access to 17 essential browser,
Windows and media functions. The keyboard provides an ergonomic design, a
generous work area and an adjustable tilt mechanism for comfortable typing
positions without compromising valuable desktop workspace. Durable key
switches and sturdy construction provide quiet, reliable operation and long life.
The wireless optical ve-button mouse with power management and its USB
receiver easily installs to give users a range of up to 15 m (50 ft.).
The easy-to-follow instructions in this user manual help make setup and operation
quick and simple, so you’ll also soon be enjoying the benets of these additional
features:
• 2.4 GHz RF wireless technology with USB receiver
• 2 full-size shift keys with separate cursor/navigation controls
• Full-size space and enter keys
• Windows 2000/XP/Vista compatibility
• Lifetime Warranty
INSTALLATION/SETUP
NOTE: Prior to installation and operation of the MANHATTAN Wireless Multi-
Media Keyboard and Optical Mouse Set, it is recommended that all previous
keyboard and mouse drivers be removed from the computer with which you’ll
be using these devices.
Battery Installation
The mouse and the keyboard each operate with a pair of AAA batteries (four
total, included in the package). Simply open the battery compartment on the
underside of both units, insert the two batteries as indicated and close the
compartment cover.
Receiver Connection
Both the keyboard and the optical mouse use digital radio technology to
wirelessly communicate. They transmit radio frequency signals that are picked
up by the receiver and sent to the computer. The USB receiver is connected to
one of the the computer’s USB ports. CauTiON: Turn the computer off before
connecting the receiver to it, and remember that working on a metallic surface
will reduce the RF performance.
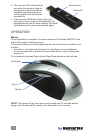
Setting the ID Codes
After installing the batteries and connecting the receiver to the computer, turn
on the computer and follow the procedure below to set the ID codes. There is
one ID button on the bottom of the mouse, one on the bottom of the keyboard,
and another one on the front side of the receiver (see gure below).
1. Press the ID button on the receiver, then press the ID button on mouse.
After two seconds, press the ID button on keyboard. The ID code will be set
automatically.
3