


4
5
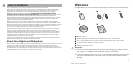
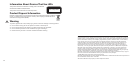
3 Position the Wireless Mouse and Receiver
For optimum performance, position the receiver away from any items that might
cause interference, such as computer monitors, large metal objects (including
metal furniture), desktop fans, or fluorescent lights. Make sure that the distance
between the mouse and receiver is within the wireless range specified on the
packaging.
Desktop mouse positioning Notebook mouse positioning
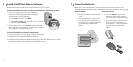
4 Connect the Receiver to the Computer
● Turn on your computer, and then plug the rectangular USB
connector into your computer’s rectangular USB port.
Note If you don’t have an available USB port, see “Other
Connection Options” later in this manual.
5 Test the Mouse
Try using the mouse. If it doesn’t work as expected, make sure that you completed
the following procedures as specified earlier in these instructions:
● The battery or batteries are new and inserted correctly.
● The receiver is properly connected to the computer.
● The receiver and mouse are properly positioned within their wireless range and
there are no nearby items that might cause interference.
If the mouse is still not working, try changing the wireless connection channel.
Changing the channel is useful if your mouse is experiencing interference.
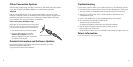
To change the wireless connection channel
● Press the Connect button on the bottom of the wireless mouse.
If changing the channel doesn’t solve the problem, you may need to reconnect
the mouse to the receiver.
To reconnect the mouse to the receiver
1 Make sure that the mouse and receiver are positioned as specified earlier in
this manual.
2 Press the button on the receiver, and then immediately press the Connect
button on the bottom of the mouse. Using the tip of a pen may make it easier
to press smaller buttons.
USB Connector