


7
CONNECTIONS
OTHERS
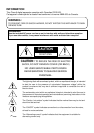
PRECAUTIONS
FEATURES
PREPARATION
TROUBLE-
SHOOTING
CONTENTS
FEATURES & FUNCTIONS
POWER
ALARM
PAPER/INK RIBBON
DATA
READY COOLING
CANCEL
DOOR OPEN
FEED&CUT
11
1
2
4
6
3
7
9
10
8
12
13
5
A
B
2
14
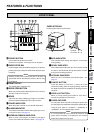
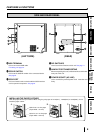
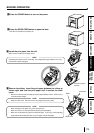
FRONT PANEL
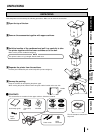
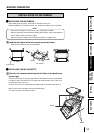
PAPER STRIP BIN
Hook the paper strip bin by its latches.
To attach: A -> B
To remove: B -> A
11
11
1 POWER BUTTON
Use to switch the power ON and OFF.
Press to turn on power. Press again to turn off power.
22
22
2 PAPER STRIP BIN
Holds the paper chips generated by margin cut. To prevent
jamming the chips at the print outlet, throw away the chips
frequently.
NOTE
Remove the bin before opening the door. If the door is
opened with this bin attached, the printer or this bin may
be damaged.
33
33
3 PRINT OUTLET
The printed paper comes out here.
44
44
4 DOOR OPEN BUTTON
When you press this button while the power is on, the door
will open in about five seconds.
55
55
5 DOOR
Open this door when installing print paper or ink ribbon.
Press the DOOR OPEN button 4 to open the door.
66
66
6 POWER INDICATOR
When the power is turned on, the indicator illuminates.
77
77
7ALARM INDICATOR
This indicator illuminates or blinks when a paper jam occurs
or the door is open. See page 18.
88
88
8PAPER/INK RIBBON INDICATOR
When an error concerning the ink ribbon or print paper
occurs, this indicator illuminates or blinks. See page 18.
99
99
9DATA INDICATOR
This indicator blinks during data transfer. It illuminates
during printing.
AA
AA
A READY INDICATOR
This indicator illuminates when this unit is ready to accept
the data. It also illuminates during data transfer. It blinks
during print canceling procedure.
BB
BB
B COOLING INDICATOR
When the unit is overheated, this indicator blinks. See
page 18.
CC
CC
C CANCEL BUTTON
Press this button for more than 1 second to cancel
continuous printing. After the ongoing printing at the time
this button is pressed is completed, the printing process is
canceled.
DD
DD
D FEED & CUT BUTTON
When you keep pressing this button for more than 1
second, the print paper is fed and cut.
EE
EE
E PAPER CATCHER
You may stack about 10 prints on this paper catcher. See
the next page for the installation of this paper catcher. When
using the print paper of 13x18(5x7”), 15x20(6x8”) or
15x23(6x9”), do not install the paper catcher.
NOTE
It is recommended to remove the prints stacked on the
paper catcher frequently. If the prints are not removed
frequently, a paper jam may cause.