


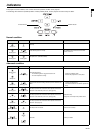
EN-25
ENGLISH
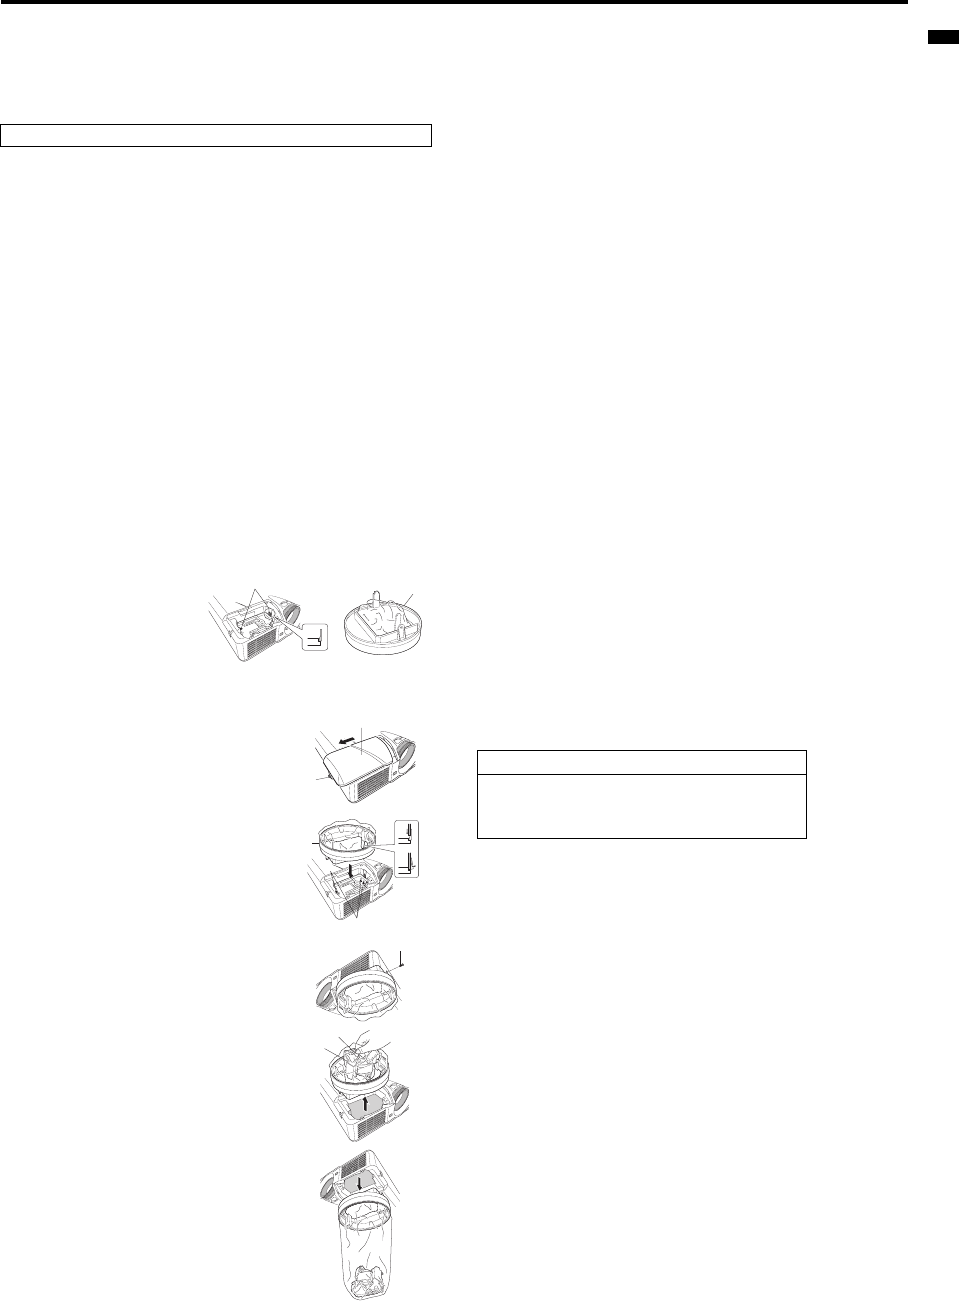
Lamp replacement
This projector is equipped with a lamp to project images. This lamp is a con-
sumable. It may burn out or its brightness may decrease during use. In such
cases, replace the lamp with a new one as soon as possible. Be sure to
replace the lamp with a new lamp separately sold that is exclusive to this pro-
jector. Contact your dealer for purchase of the lamp.
Caution:
• Do not remove the lamp immediately after using the projector. You may
get burned because the lamp very hot after use.
• Before replacing the lamp, press the POWER button to turn off the lamp
and wait for two minutes for lamp to cool down. Unplug the power cord
from wall outlet and wait one hour for the lamp to cool down completely.
• Do not remove the lamp except for replacement. Careless handling can
cause injury or fire.
• Do not touch the lamp directly. It may break and cause injury or burn.
• Be sure not to drop the lamp lid screw into the projector. Also be sure not to
put metal or any flammable objects inside because it may cause fire or elec-
tric shock. If any objects should fall inside, unplug and contact your dealer.
• Install the lamp securely to prevent failure and fire.
• If the lamp should break, small glass fragments may fall out through the
grilles and some may remain inside of the projector or the lamp box.
When taking the lamp box out, be sure to turn over the projector and hold
the handle of the lamp box to avoid injury due to the glass fragments.
• If the lamp should break, never shake the lamp box or hold it in front of
your face after removing it. The lass fragments may fall out and cause
injury to your eyes.
• Be sure to use the lamp dedicated to this projector, VLT-XD510LP for
XD510U. Use of other lamps may cause a failure of the projector.
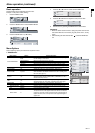
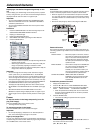
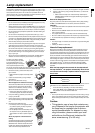
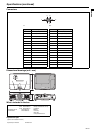
The lamp unit is fixed in position
with two retaining claws (a) inside
so the lamp attachment unit (b)
designed specifically for this projec-
tor is required to replace the lamp.
Do not pull out the lamp forcibly. The lamp unit may be irretrievably damaged.
A new lamp unit can be installed without the lamp attachment unit.
1. Remove the screw (c) and slide the lamp cover
(d) for removal.
• Make sure that the projector is securely held in
place.
2. Loosen the three screws (e) using a Phillips
screwdriver (+).
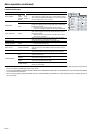
3. Mount the lamp attachment unit (b).
When the projector is mounted to the ceiling:
Secure the lamp attachment unit and the projec-
tor with the screw (f) that come with the lamp
attachment unit. Otherwise, the lamp unit may
fall from the inside and cause injuries.
• Contact your dealer when replacing the lamp
unit with the projector mounted to the ceiling.
4. Pull up the handle (g), and then pull out the lamp
unit (h) by the handle.
5. Confirm that the lamp unit is securely held inside
the lamp disposable bag of the lamp attachment
unit.
6. Remove the lamp attachment unit.
• Pull the lamp unit out of the projector slowly. If
it is pulled out quickly, the lamp may break,
scattering glass fragments.
• Do not spill liquid on the removed lamp unit or
do not place it near any flammable object or
where children can reach to prevent injuries or
fire.
When the projector is mounted to the
ceiling:
Confirm that the lamp unit (h) is securely held
inside the lamp disposable bag of the lamp
attachment unit. And then loosen the screw
(f) that come with the lamp attachment unit.
Then remove the lamp attachment unit.
7. Load a new lamp unit securely into the projector in the right orientation.
8. Tighten up the screw (c) using a Phillips screwdriver (+) to secure the
lamp cover (d).
• Make sure that the lamp cover is secured firmly. Otherwise, the
POWER indicator flashes red and green, disallowing the projector
to be powered on.
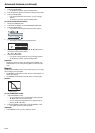
Reset of the lamp operation time
Plug in the power cord, and reset the lamp operation time by keep pressing
the
W
,
X
, and POWER buttons on the control panel at the same time.
Important:
• Unless these three buttons are pressed at the same time, the lamp opera-
tion time isn’t reset.
• Make sure that the STATUS indicator is lit twice and the lamp operation
time is reset successfully.
• The projector doesn’t turn on if the lamp cover isn’t attached securely.
• Be sure to reset the lamp operation time whenever you replace the lamp.
• Do not reset the lamp operation time unless you replace the lamp.
Caution:
• The lamp is fragile. If it is broken, be careful not to cut yourself with glass
fragments.
• Contact your dealer for a new lamp.
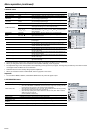
Interval of lamp replacement
When the lamp shutdown notice is issued, the lamp replacement is recom-
mended even if the lamp is lit normally. Decrease in luminescence and/or
color brightness indicates that the lamp needs to be replaced. When the lamp
operation time exceeds the time elapsed until the lamp shutdown notice
*1
is
issued, the indicator will blink alternately green and red while the lamp is lit
(while the lamp is not lit, the indicator will blink red only) and the lamp replace-
ment message will appear on the screen for one minute every time the lamp is
turned on. When the lamp operation time exceeds the time elapsed until the
lamp shutdown warning
*2
is issued, the replacement message (LAMP
EXCHANGE) will appear on the screen for one minute at fixed intervals
*4
thereafter.
When the lamp operation time exceeds the time elapsed until
the lamp shutdown
*3
, the projector automatically shuts off and
can’t be used until the lamp is replaced and the lamp operation
time is reset.
The times above are when LAMP MODE of the INSTALLATION menu is set to
LOW. When it is set to STANDARD, this duration will be shortened.
*4
These intervals vary depending on the lamp mode setting.
*5
When LAMP MODE is set to STANDARD, the time elapsed until the
lamp shutdown will be shortened to 2000 hours.
Important:
• Do not open the lamp cover when the projector is set at a ceiling or a high
place. Lamp fragments may fall from the inside if the lamp were broken.
Please contact your dealer when you need to replace the lamp with a new
one.
Caution:
• This projector uses a lamp that contains mer-
cury. Disposal of the lamp or the projector with
the lamp may be regulated due to environ-
mental considerations. For disposal or recy-
cling information, please contact your local
authorities or the Electronic Industries Alli-
ance: www.eiae.org. (For US only).
Spare lamp for XD510U: VLT-XD510LP
(b)
(a)
(b)
(e)
(f)
(h)
(g)
(d)
(c)
XD510U
*1
3000 Hours
*2
3800 Hours
*3
4000 Hours
*5