


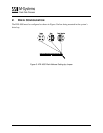

3. Connect a 44-pin ribbon cable between the IDE 4000 and the adapter. Make sure to orient
the cable so that pin 1 of the IDE 4000 is connected to pin 1 of the host adapter.
4. Mount the IDE 4000 in a free drive bay.
5. Close the PC cover and power on the PC.
The host BIOS sign-on message appears and displays a key sequence to enter the BIOS setup.
Set up the BIOS to recognize the IDE 4000.
7.4. Using the IDE 4000 in an MS-DOS-Based Platform
After installing the IDE 4000, it must be installed as a disk drive under DOS. Run the DOS
commands listed below and follow the instructions displayed for each command. For more
information regarding DOS commands, refer to your DOS manual.
• Run the DOS FDISK program to partition the IDE 4000.
• Run the DOS FORMAT command to high-level format the IDE 4000.
• If you want the IDE 4000 to be a bootable drive, run the DOS SYS command and change the
partition to active.
7.5. Troubleshooting
The problems that arise in most installations can be summarized below:
Cables:
• Homemade, short, flat ribbon cables with bad contacts or cheap cables
• Mixing round cables with flat cables.
Cable Length:
• The cable exceeds the length specified in the standard
• Cables are too long to support the transfer rate.
Device Address Conflict:
• A new device was added with an IDE setting identical to an existing device on the bus.
• Connection problems.
• A cable was connecting with reverse polarity.
19 Product Specification and User Manual IDE 4000 Flash Disk 34-PS-0304-00 Rev. 2.1