Instruction Sheet For The Murphy
AT-67207 Engine Throttle Controller
AT-I.AI
REVISED: 11-96
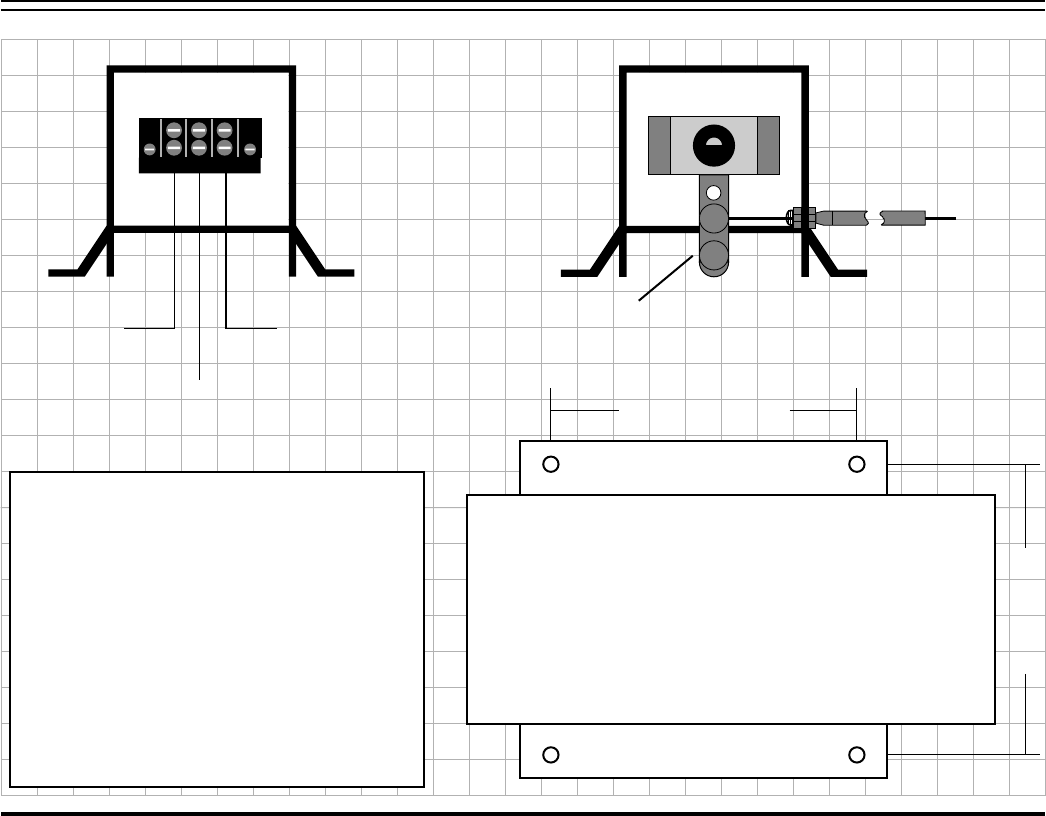
1 2 3
Battery (+)
Battery (-)
Causes Shaft To Rotate
Clockwise
Battery (-)
Causes Shaft To Rotate
Counter-Clockwise
A second swivel is provided for
use on the butterfly valve lever arm.
Flex-linkage Assembly
Back View Front View
3 13/16" [97 MM]
5" [127 MM]
Drill Guide
(Not To Scale)
Note: The AT-67207 is Voltage sensitive. Be
sure that you have the proper voltage model
for your system. Hooking the unit into the
wrong voltage can cause damage. The
Automatic Throttle controller is used by
alternately grounding terminals 2 and 3 to
maintain the desired engine RPM. A Typical
application uses a Murphy Pressure OPL and
Stepper to maintain a discharge pressure on
an engine driven Pump. The High/Low
contacts on the OPL are wired to terminals 2
& 3 and the desired discharge pressure is
dialed in on the gauge.
Selection of the Auto Throttle should include consideration for the service application, electrical ratings, hazardous area
requirements, and general operating conditions. The control linkage has been specially designed to isolate vibration from the gear
motor on the throttler to the outer case. This control linkage must be used or vibration may seriously damage the gear motor. The
flex linkage assembly has been removed for shipment and must be installed before use. The flex linkage assembly may be
assembled in the right or left hand slots on the sides of the throttler. The AT-67207 must be mounted close to, and in line with, the
throttle block for straight line pull between the lever arm and the butterfly lever arm. The throttler should be mounted in a
manner that minimizes the effects of excessive shock and vibration on the unit.
A Separate throttle block must be used if the engine is equipped with a governor or a manual control wire. The AT-67207 is not
designed to override other controls. The butterfly valve must work freely.
1. Connect terminal #1 to battery (+).
2. Advance the lever arm to the full idle RPM position (fully clockwise or counter-clockwise by grounding #2 or #3 -- See above
illustration.)
3. Connect the flex linkage wire to the butterfly lever arm. Alternately ground terminal #2 and #3 to determine the direction of
travel. Select the proper mounting hole in the lever arm of the AT-67207 and on the throttle block butterfly arm to provide proper
travel. The proper throttler travel is from the mechanical set idle point, to just slightly above the point where the mechanical
governor limits the engine RPM.
4. Visually inspect the linkage assembly to insure that there are no sharp bends or kinks. If the linkage wire bows during
operation, a center support should be added.
5. After correct travel is established, tighten the set screws and linkage assembly.
Note: The lever arm must be allowed to travel its full arc. This allows the unit to disconnect itself with internal limit
switches. If the lever is unable to reach limit switches, Damage to the unit can occur.


