


in SD100 could also be missing if the SD100 is purchased without the special
type of MSR. Connect the USB connector of KB4000 to a USB hub or the USB
port in a PC or a Posiflex POS system or touch monitor TM4000. Connect the
USB connector of KP100 or SD100 to one of the USB ports of Jiva series or
TM4000 in connector area. Connect the PS/2 KB connector of KB4000 to the
PS/2 KB jack in a PC or a Posiflex POS system or touch monitor TM4000.
Connect the PS/2 KB connector of KP100 to the PS/2 KB jack in Jiva or
TM4000. The special MSR connector of SD100 is an 8 pin SIL connector.
Connect it to the connector marked “MSR” in Jiva series or TM4000 connection
area if this special “MSR” connector is supported there. When the SD100 is
installed with iButton receptor, there will be one additional 9 pin female D
connector and a pair of male/female PS/2 keyboard connectors from the upgrade
kit. Connect the D connector to the COM port for iButton setup (and data
connection). Connect the male PS/2 keyboard connector to the keyboard port in
Jiva or TM4000 for data connection if KB interface is selected. Route the cable
connection for KP100 or SD100 to Jiva series or TM4000 through the side of the
cable cover on Jiva series or TM4000. Break the obstructing side wall of the
cable cover in the cable entrance to the connector area according to the needs.
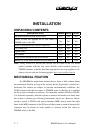
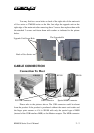
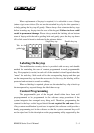
Connection To PS/2 Keyboard
Indentation For Cable Holding
KP100 Rear View
KB4000 Rear View
PS/2 KB Connector
Refer to the pictures of bottom of KB4000 and KP100 with their partially
enlarged pictures to the right above. In the cavity found at rear side of KB4000
or KP100, there is a PS/2 KB jack. Connect a standard PS/2 keyboard device to
this jack and insert the cable from the PS/2 keyboard device into the indentation
for strain relief and fixation when a PS/2 KB is required.
KB4000 Series User’s Manual
2 - 3