


Chapter 2 Hardware Installation
© National Instruments Corporation 2-3 MXI-Express Series User Manual
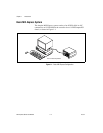
Installing an NI PXI-8360
Complete the following steps to install the NI PXI-8360 in your PXI or
CompactPCI chassis.
1. Power off your PXI or CompactPCI chassis, but leave it plugged in
while installing the NI PXI-8360. The power cord grounds the chassis
and protects it from electrical damage while you install the module.
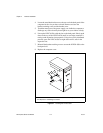
2. Select a slot for the NI PXI-8360. The NI PXI-8360 must be installed
in the controller slot (slot 1 in PXI).
Caution To protect both yourself and the chassis from electrical hazards, leave the chassis
off until you finish installing the NI PXI-8360.
3. Remove or open any doors or covers blocking access to the slot in
which you intend to install the NI PXI-8360.
4. Touch the metal part of the case to discharge any static electricity that
might be on your clothes or body.
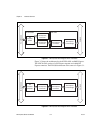
5. Make sure the injector/ejector handle is in its downward position.
Be sure to remove all connector packaging and protective caps from
retaining screws on the module. Align the NI PXI-8360 with the card
guides on the top and bottom of the system controller slot.
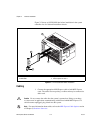
Caution Do not raise the injector/ejector handle as you insert the NI PXI-8360. It will not
insert properly unless the handle is in its downward position so that it does not interfere
with the injector/ejector rail on the chassis, as shown in Figure 2-2.
6. Hold the handle as you slowly slide the module into the chassis until
the handle catches on the injector/ejector rail.
7. Raise the injector/ejector handle until the module firmly seats into the
backplane receptacle connectors. The front panel of the NI PXI-8360
should be even with the front panel of the chassis.
8. Tighten the bracket-retaining screws on the top and bottom of the front
panel to secure the NI PXI-8360 to the chassis.
9. Replace or close any doors or covers to the chassis.