


Chapter 2 Installation and Configuration
© National Instruments Corporation 2-3 PXI-846x and NI-CAN for Windows NT
Install the Hardware
This section describes how to install your PXI-8460, PXI-8461 or
PXI-8462 hardware.
Check the Configuration of Your PXI-8460, PXI-8461 or PXI-8462
If you plan to use your CAN board in a system where bus power is
available, you may want to configure the power supply jumpers on your
board. See Appendix C, Cabling Requirements for PXI-8461 High-Speed
CAN for more information.
If you are installing a low-speed CAN board, you may need to change the
power supply jumpers or termination resistors. See Appendix B, Cabling
Requirements for PXI-8460 Low-Speed CAN, for more information.
If you are installing a dual-speed CAN board, you might have to change the
power supply jumpers or termination resistors. See Appendix D, Cabling
Requirements for PXI-8462 Dual-Speed CAN, for more information.
Install Your PXI-8460, PXI-8461 or PXI-8462
Caution
Before you remove the board from the package, touch the antistatic package to a
metal part of your system chassis to discharge electrostatic energy, which can damage
several components on your board.
1. Make surethat your PXI orCompactPCI chassisis turned off.Keep the
PXI or CompactPCI chassis plugged in so that it remains grounded
while you install the PXI board.
2. Choose an unused PXI or CompactPCI 5 V peripheral slot.
3. Remove the filler panel for the peripheral slot you have chosen.
4. Touch a metal part on your chassis to discharge any static electricity
that might be on your clothes or body.
5. Regarding the RTSI interface on the J2 connector of your PXI-846x
series board, there are important issues to consider when using it in a
CompactPCI chassis. Please refer to Appendix E, RTSI Bus,for
detailed information about the PXI-846x series RTSI interface.
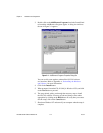
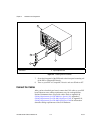
6. Insert the PXI board into the selected 5 V slot. Use the injector/ejector
handle to fully inject the device into place. Figure 2-2 shows how to
install the PXI board into a PXI or CompactPCI chassis.