


Chapter 2 Installation and Configuration
PXI-8461 or PXI-8460 and NI-CAN for Windows NT 2-4 www.natinst.com
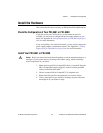
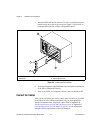
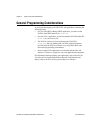
5. Insert the PXI board into the selected 5 V slot. Use the injector/ejector
handle to fully inject the device into place. Figure 2-2 shows how to
install the PXI board into a PXI or CompactPCI chassis.
Figure 2-2. Installing the PXI Hardware
6. Screw the front panel of the PXI board to the front panel mounting rail
of the PXI or CompactPCI chassis.
7. Turn on your PXI or CompactPCI chassis and start Windows NT.
Connect the Cables
After you have installed your board, connect the CAN cables to your PXI
board. Because exact cabling requirements vary for each application,
National Instruments does not provide cables. Refer to Appendix B,
Cabling Requirements for PXI-8461 High-Speed CAN, or Appendix C,
Cabling Requirements for PXI-8460 Low-Speed CAN, for information
about the cabling requirements of the CAN hardware.
1 Injector/Ejector Handle (In Down Position)
2 PXI Board
3 PXI Chassis
4 Injector/Ejector Rail
8
7
6
5
4
3
2
1
ON STANDBY
4
1
2
3