


Chapter 2 Installation and Configuration
RT Series DAQ Device User Manual 2-2 www.ni.com
PXI Installation
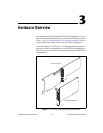
Complete the following steps to install your RT Series PXI board:
1. Write down the PXI E Series board serial number for future reference.
2. Power off and unplug your computer.
3. Choose two adjacent unused PXI slots in your system.
4. Remove the filler panels for the slots you have chosen.
5. Insert the RT Series DAQ board into the 5 V PXI slots. Use the
injector/ejector handle to fully insert the board into the chassis.
6. Screw the front panel of the RT Series DAQ board to the front panel
mounting rail of the system.
7. Plug in and power on your computer.
Your RT Series DAQ device is installed. You are now ready to configure
your software.
Board Configuration
Because of the National Instruments standard architecture for data
acquisition and the PCI and PXI bus specifications, the RT Series DAQ
boards are completely software configurable.
The PCI RT Series DAQ boards are fully compatible with the industry
standard PCI Local Bus Specification Revision 2.0. The PXI RT Series
DAQ boards are fully compatible with the PXI Specification Revision 1.0.
This compatibility allows the PCI or PXI system to automatically perform
all bus-related configurations and requires no user interaction.
DAQ-related configuration includes such settings as analog input polarity
and range, analog input mode, and others. You also can configure virtual
channels, SCXI, and DAQ accessories. You can modify these settings
through Measurement & Automation Explorer and through LabVIEW RT
and NI-DAQ.
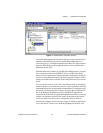
After you complete the installation, double-click the Measurement &
Automation Explorer icon on your desktop. Measurement & Automation
Explorer finds the RT Series DAQ board and any other DAQ boards you
have in your system and assigns device numbers to them. The RT Series
DAQ device appears in Measurement & Automation Explorer as shown in
Figure 2-1.