


English
English-7
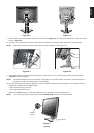
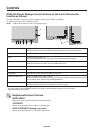
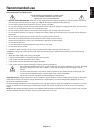
Figure S.1
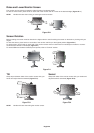
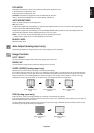
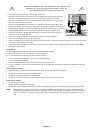
4. Place one hand around the base and one hand on the Quick Release Lever. Move the Quick Release Lever in the direction
indicated by the arrows (Figure S.2).
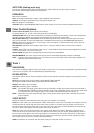
5. Lift up the bottom of the stand to unhook it from the monitor (Figure S.3). The monitor can now be mounted using and
alternate method. Reverse process to reattach stand.
NOTE: Use only VESA-compatible alternative mounting method (100 mm pitch).
NOTE: Handle with care when removing monitor stand.
Figure S.2
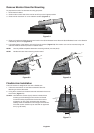
Flexible Arm Installation
This LCD monitor is designed for use with a flexible arm.
1. Follow the instructions on how Remove Monitor Stand for
Mounting to remove the stand.
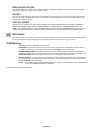
2. Using the 4 screws from the stand removal and attach the arm to
the monitor (Figure F.1).
Caution: Use ONLY the screws (4 pcs) that are included when
mounting to avoid damage to the monitor and stand.
To fulfil the safety requirements the monitor must be
mounted to an arm which guaranties the necessary
stability under consideration of the weight of the monitor.
The LCD monitor should only be used with an approved
arm (e.g. GS mark).
Figure S.3
Remove Monitor Stand for Mounting
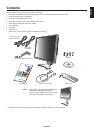
To prepare the monitor for alternate mounting purposes:
1. Disconnect all cables.
2. Place hands on each side of the monitor and lift up to the highest position.
3. Place monitor face down on a non-abrasive surface (Figure S.1).
100mm
100mm
Figure F.1
Up
Slide