


3
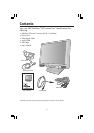
Quick Start
To attach the MultiSync
®
LCD monitor to your system, follow these instructions:
1. Turn off the power to your computer.
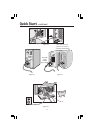
2. Remove connector cover and cable cover. Connect the audio cable to “Line-in” on
the back of the monitor and the other end to the “Audio out” terminal of the computer.
Place the Audio cable under Clip B (Figure A.1).
3. For the PC: Connect the 15-pin mini D-SUB of the appropriate signal cable to the
connector of the display card in your system (Figure B.1). Tighten all screws.
For the Mac: Connect the MultiSync LCD1550M™ Macintosh cable adapter to the
computer (Figure C.1). Attach the 15-pin mini D-SUB end of the appropriate signal
cable to the MultiSync LCD1550M Macintosh cable adapter (Figure C.1). Tighten all
screws.
NOTE:
To obtain the MultiSync LCD1550M Macintosh cable adapter, call NEC-Mitsubishi
Electronics Display of America, Inc. at (800) 820-1230.
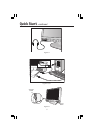
4. Connect the 15-pin mini D-SUB of the video signal cable to the appropriate connector
on the back of the monitor. Place the Video Signal Cable under Clip B (Figure D.1).
5. Headphones may be connected to the “Headphones” output on the front of the
monitor’s bezel marked “
” (Figure E.1). While the headphones are connected, the
sound from the speakers will be disabled. Headphones can be purchased from your
local electronics store.
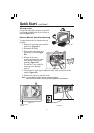
6. Using the USB cable, connect the B type connector to the USB upstream port on the
right side of the monitor and A type connector to the downstream port on the
computer (Figure F.1). If you are using the cord from the USB device, use one of the
downstream port on the side of the monitor (Figure G.1).
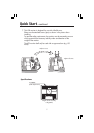
7. Connect one end of the power cord to the MultiSync LCD Series monitor and the other
end to the power outlet. Place the Video Signal Cable and AC power cord under Clips
(Figure D.1). Replace connector cover and cable cover.
NOTE: Adjust position of cable that place under clips, to avoid damage for cable or
monitor.
NOTE: If you use this monitor at AC220-240V, please refer to Recommended Use
section of this manual for proper selection of AC power cord.
8. The Vacation Switch on the left side of the monitor must be turned on (Figure H.1).
Turn on the monitor with the front power button and the computer.
NOTE: The Vacation Switch is a true on/off switch. If this switch is on the OFF position,
the monitor cannot be turned on using the front button. DO NOT switch on/off
repeatedly.
9. No-touch auto adjust automatically adjusts the monitor to optimal settings (native
resolution only) upon initial setup for most timings. For further adjustments, use the
following OSM
™
controls:
• Auto Adjust Contrast
• Auto Adjust
Refer to the Controls section of this User ’s Manual for a full description of these OSM
controls.
NOTE: For download information on the Windows
®
95/98/2000 INF file for your MultiSync
LCD1550M monitor, refer to the References section of this User’s Manual.
NOTE: If you have any problems, please refer to the Troubleshooting section of this User’s Manual.